The output section
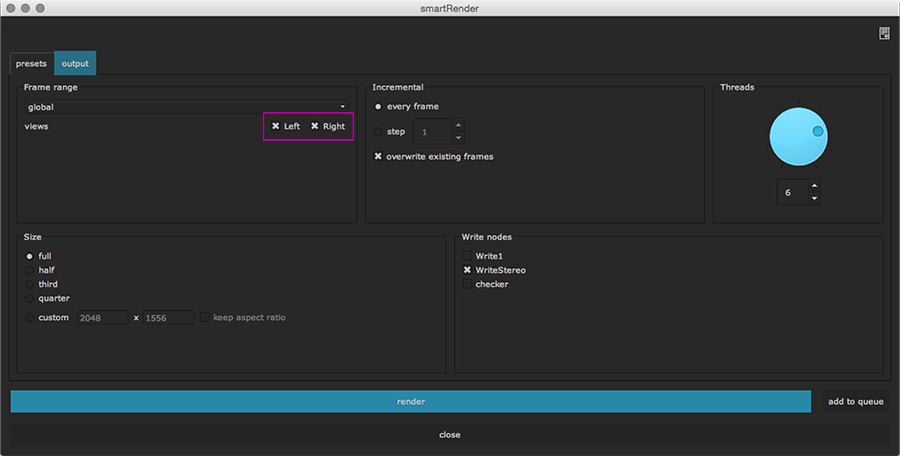
The output section lets you define your rendering settings including frame range, incremental renderings, thread count, output size and write node(s) to render.
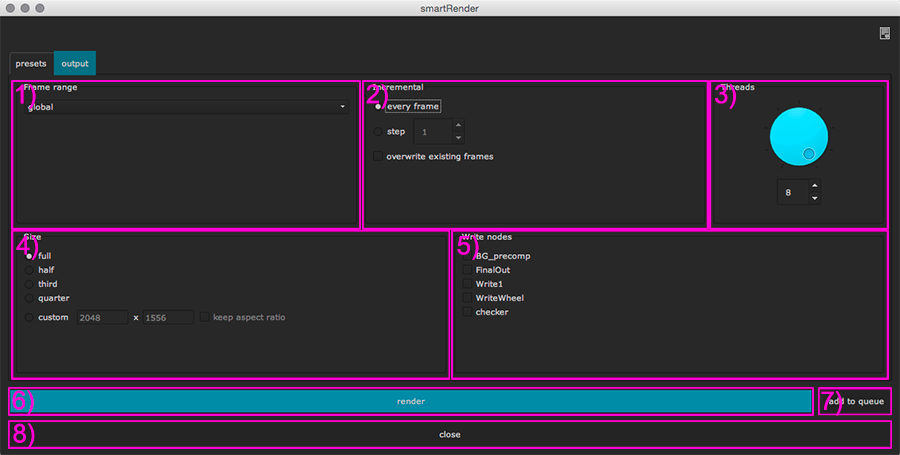
The output section contains 8 elements:
1) frame range: Here you can set the frame range to global which will take your scripts frame range or you can set the drop down to custom and reveal an input below in which you can set your custom frame range in the known format startframe - endframe.
2) incremental: Here you can choose to render every frame or every nth
frame. For instance if you wish to render only every other frame choose the
step radio button and enter 2 inside the input. Or if you want to render
only every 10th frame simply enter 10, and so on.
3) threads: Here you can choose how many threads to use for the rendering.
The number is limited to the number of cores on your machine. For example, if
your machine has 4 cores then the maximum thread count in the dial will be 8.
If you have 12 cores then the maximum thread count will be 24, and so on. If
you choose 0 as thread count then the job will be processed as a standard
NUKE rendering meaning a foreground rendering which will be a frame after frame
process.
4) size: Here you can set an output size. If you set anything else than full then a reformat node will created automatically before rendering and will be piped in before your write node. This reformat node will then be removed automatically once the rendering is finished.
5) write nodes: Here you can choose which write nodes to process. If you select any write nodes and then open the smartRender main window then the according checkboxes will be checked automatically for you. smartRender detects Write nodes and DeepWrite nodes being nested inside Group nodes and Gizmos. You can also add other executable nodes to show up in smartRender. For more information on that please refer to the executables section of the settings window.
6) render button: Click the render button to start the rendering processes.
7) add to queue button: Click to add the checked write node(s) to the job queue without automatically starting the rendering. The jobs are just added to the queue and you can start them manually by right clicking a job in the job history and choosing job->resume job.
8) close button: Click to close the smartRender window.
Note
All your render settings that you set in the output section are saved and remain if you close smartRender, your NUKE session and even if you shut down your computer. You can use the preset list if you need to quickly change from one render setting to another. This saves you from editing all the inputs every time manually. To load a preset, please refer to Loading a preset.
Write nodes section right click menu
If you right click one of the write nodes checkboxes in the write nodes section a right click menu will appear:
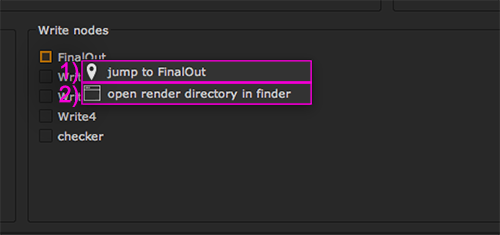
1) jump to [Write node Name]: Click to jump to the write node in your DAG.
2) create render directory Click to create the render directory for the Write node if it does not already exist.
3) open render directory in finder: Click to reveal the write node’s render directory if it is set.
Adding and processing jobs
To start the rendering process, double check if you have set all your rendering settings to your needs.
All checked write nodes in the Write nodes section at the bottom right of the output section will be processed.
When you are ready to start your renderings simply click the blue render button. The job(s) will be send to smartLib and all frames will be divided by the number of set threads and all frames will be rendered using a background rendering using multiple threads.
By hitting the blue render button, the rendering processes will start immediately. Right next to the render button you will find the add to queue button. By clicking it, the job will be added to smartRender’s job history but won’t be started. This can be useful to collect all jobs that need to be done first (even collecting from different nuke scripts) and then starting the jobs manually by right clicking a job and choosing job->resume job.
Warning
One wise word for those who try to go super crazy: Be careful with the combination of sending huge nukescripts to a very high thread count simultaneously. Each thread will open and process your nukescript. Therefore, a lot of ram will be needed. In situations in which too many jobs/ threads are started simultaneously to process huge nukescripts this can cause some memory overflow which can potentially freeze your system. In that case please do less jobs at a time/ choose a lower thread count to prevent memory overflow. Keep in mind that using more threads does not necessarily always faster results.
Warning
Attention: As smartRender will render your frames in terminal mode, all render sessions start without loading your nuke home directory’s menu.py file. That means that they cannot process custom installed gizmos inside your script that are installed via a menu.py. Please use an appropriate init.py file for that. Alternatively, you can convert your custom gizmos into groups.
Processing external NUKE scripts
smartRender offers the functionality to render external working files without opening them in NUKE, which saves you time because you don’t require to launch another Nuke session. To open another working file into the output section simply right click at the top of the smartRender main window (anywhere in the purple section as indicated in the screenshot below). A context menu shows up that contains the following entries:

1) current nuke script: Change back to the current working file.
2) recent files: Choose any working file that you previously opened.
3) browse for nuke script: Click to browse for a working file.
When you open another working file, its name will show up in the smartRender window’s title. It will then show you the write nodes of that file so that you can render these.

To switch back to the current working file, simply right click at the top and choose the first command current nuke script.
Multi view processing
smartRender supports multi view processing (e.g. stereo projects). If you run smartRender in a nukescript that contains multiple views you will see all views in that script in the Frame range section at the to left. Simply check the needed views and hit the render button. The views will be rendered simultaneously.