Caching
smartRender offers you to quickly create Write nodes for pre rendering any selected node. It lets you set up paths by using a pre defined absolute or a path relative to your working file. All paths are customizable to your needs.
Simply select any node that is not listed in the executables list and execute the shortcut that would normally launch the smartRender window for you: ctrl + R (Linux / Windows) or cmd + R (macos).
This will launch the caching window for the selected node which looks like the following:
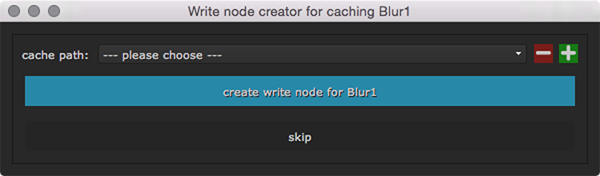
At the top, you can select one of the presets that you have set up. You can create new absolute paths (listed at the top of the list) and relative path presets (listed at the bottom of the list) by clicking the green plus button. Clicking the red minus button removes the currently selected path preset. After having selected the desired path, click the blue Create Write node for … button. This will then create a Write node for the selected node and set up the path as selected from the paths preset. The padding, padding delimiter and file extension are set from configuration of the settings window’s caching tab. Afterwards, the smartRender main window launches automatically for you so you can render your node right away.
If you click the ‘skip’ button, this will skip the Write node creation and will open the smartRender main window for you.
Creating new paths
To add a new path to the caching window, click the green plus button. The layout changes and reveals new widgets for you.
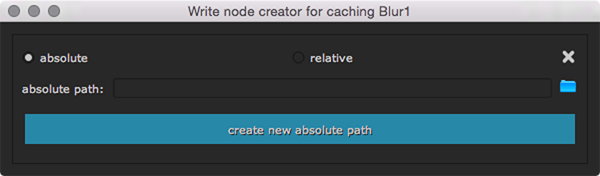
It offers to set up absolute and relative paths. Use the folder button to browse to an absolute render and caching path. After having set the path to your needs, click the blue create new absolute path button.
Sometimes, it is however more suitable to use a path relative to the currently opened working file. For that you can set up a relative path. Tick the relative option. As soon as you enter something into the input, the render path relative to the current working file shows up and you can see how it would look like for the current working file. The relative path options should become more clear with the following example.
Let’s say our working file lives in the following location:
/projects/ShowA_123/500/010/scripts/showa_500_010_comp_v001.nk
Let’s say we always want to have a render directory right next to our working files. For that we can simply enter ‘render’:
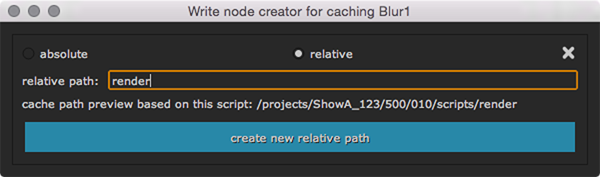
The image shows the path as it would look like for the currently open working file. In this example it would point to a ‘render’ folder right next to the current working file.
Sometimes, it is however more suitable to use a path upwards to the current working file. For example, let’s say we want to create a dedicated render directory but not inside the ‘scripts’ directory but next to it. For that we can use the ‘../’ notation. If you are familiar with walking directories using a terminal, you should be very familiar with that concept. In our example this would look like the following:
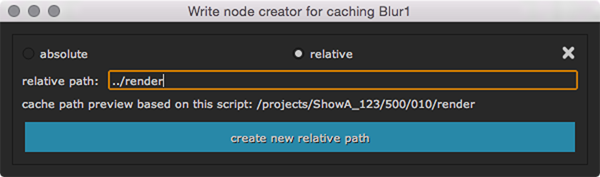
Keep in mind that you can jump up several directories as you need it. For
example, if you want to use a render directory two directories up, the relative
path would look like: ../../render.
Using the first set up relative path of ‘render’ next to the current working file will assemble the absolute path of our node to the following:
/projects/ShowA_123/500/010/scripts/render/Blur1_1550951818/Blur1_1550951818.%04d.exr
where Blur1 is the name of the selected node, followed by the current time stamp when creating the node. The padding, padding delimiter and file extension were set to the configuration of the setting window’s caching tab.