What’s new?
Here you see an overview about new features and bug fixes for new versions.
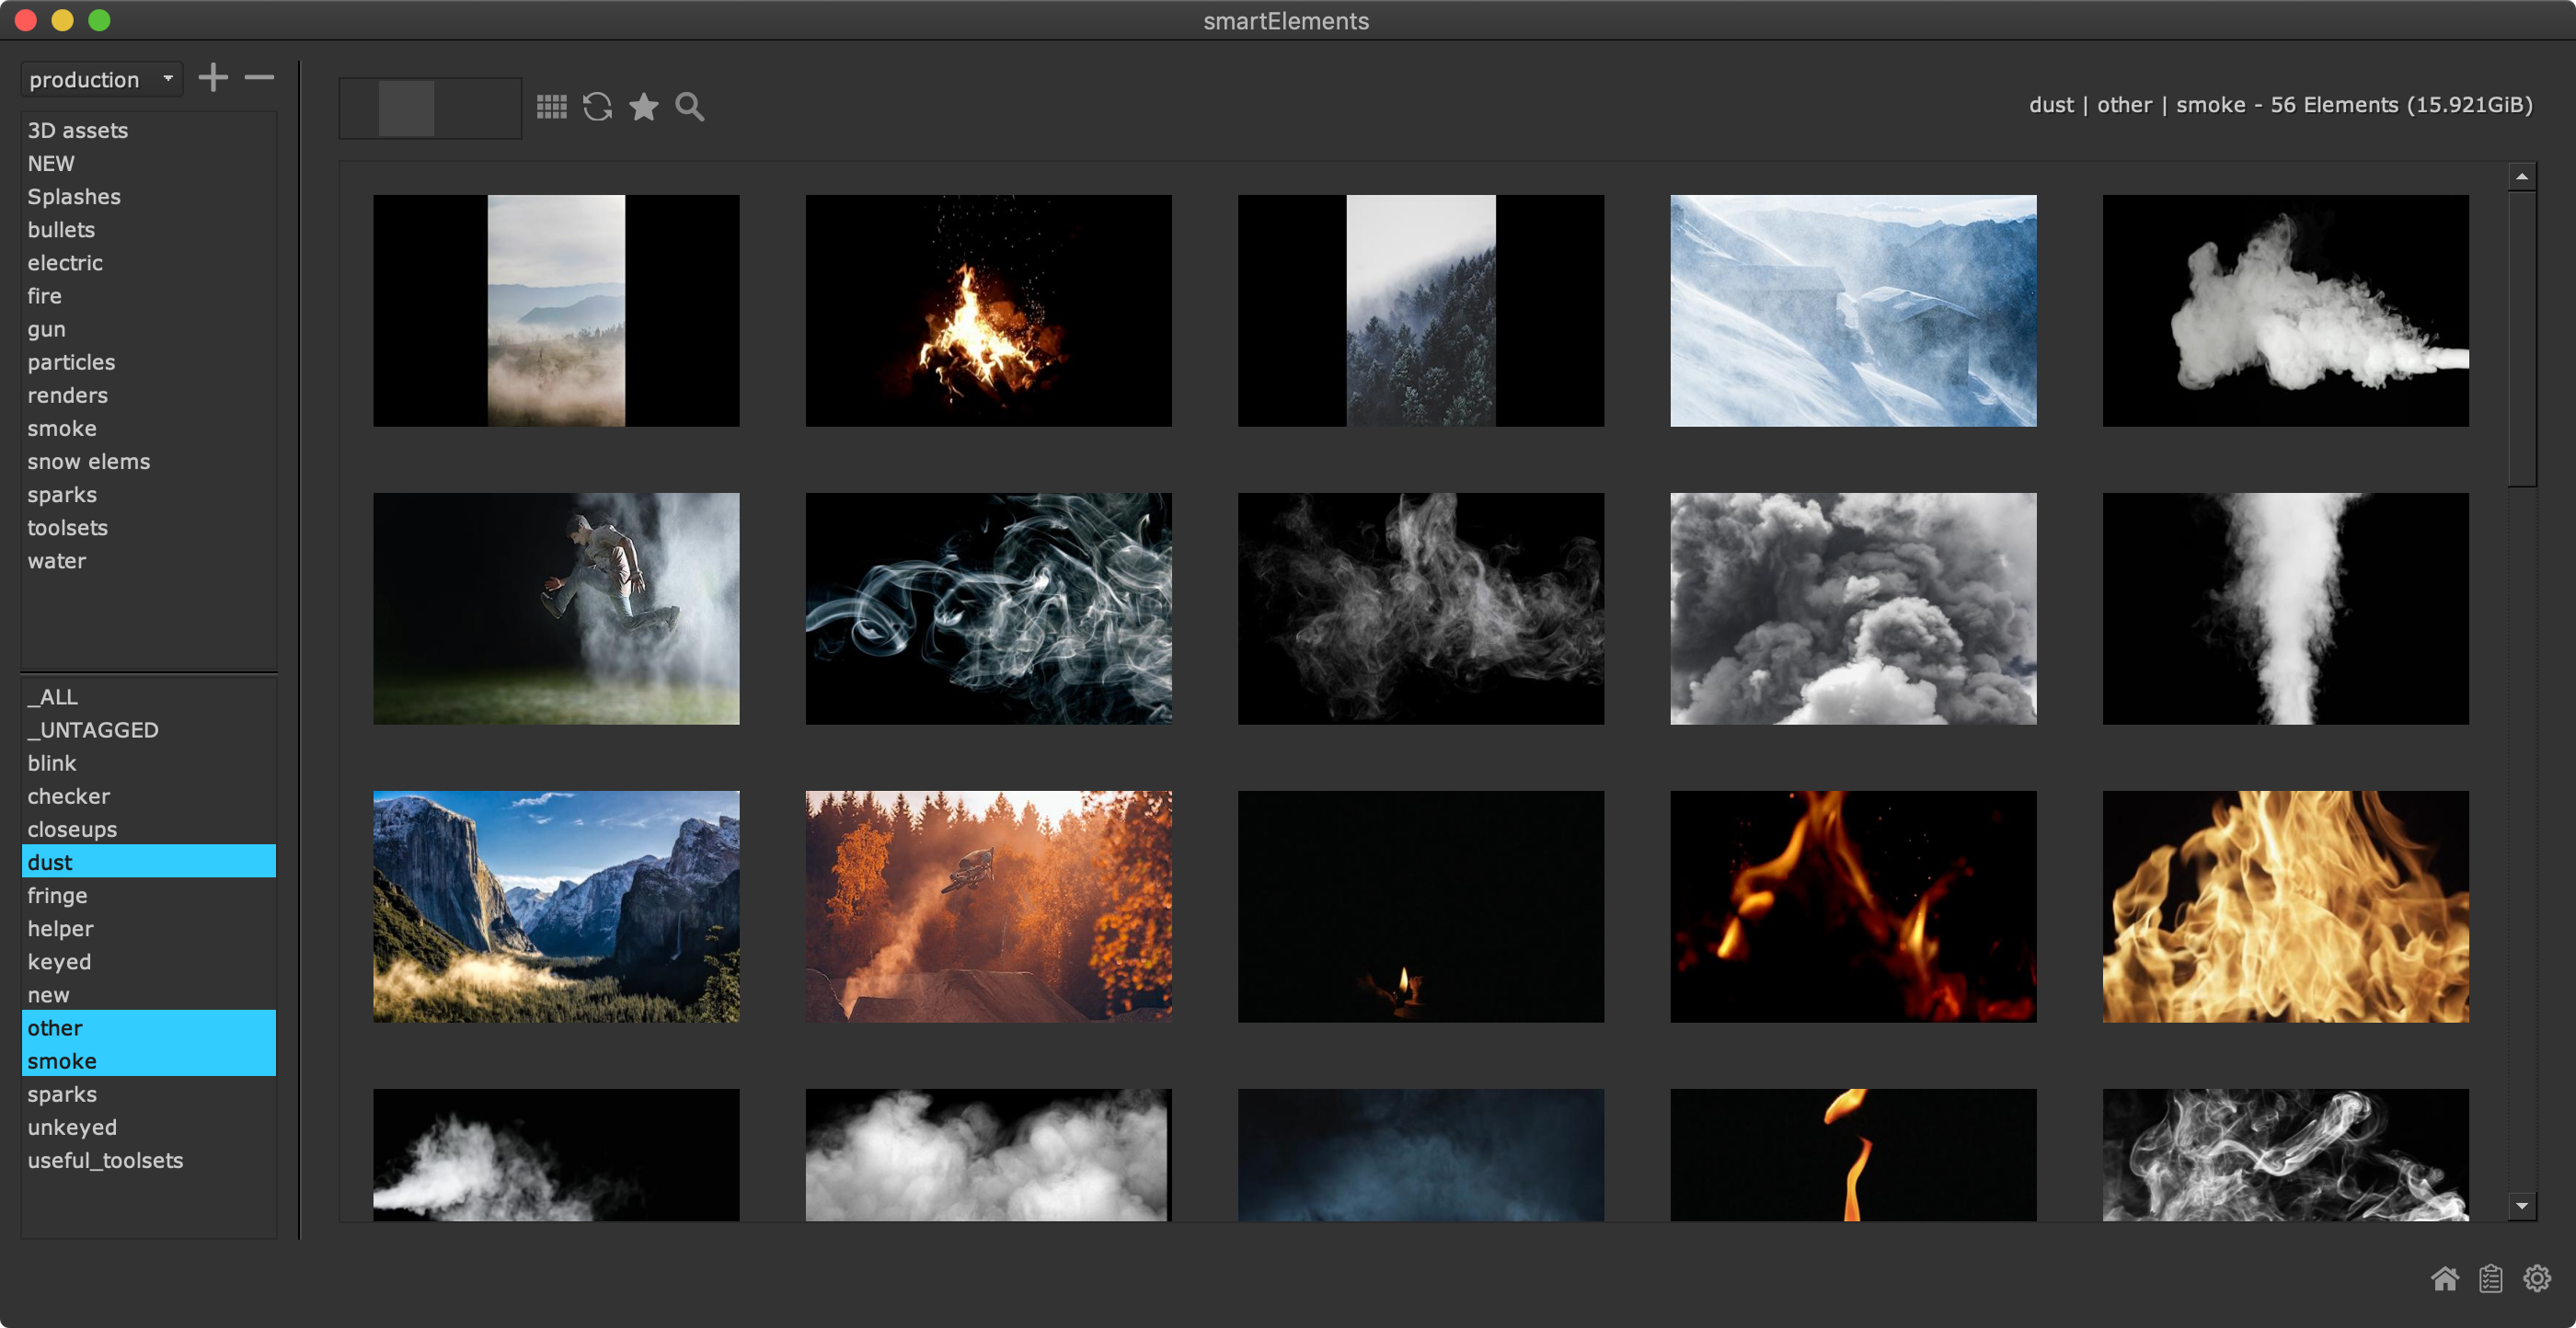
Version 2.39.0
Implement element ingestion matrix
Dragging media sources into smartElements launches now the smartElements ingestion matrix. This window lets you manage your ingstions and set up various things - including media transcodings during the ingestion.
For more information please have a look at our dedicated media ingestion documentation.
Version 2.38.0
Optimize for fullscreen mode
The element widgets scale now with the main window when resizing it. The display for gallery view has been improved.
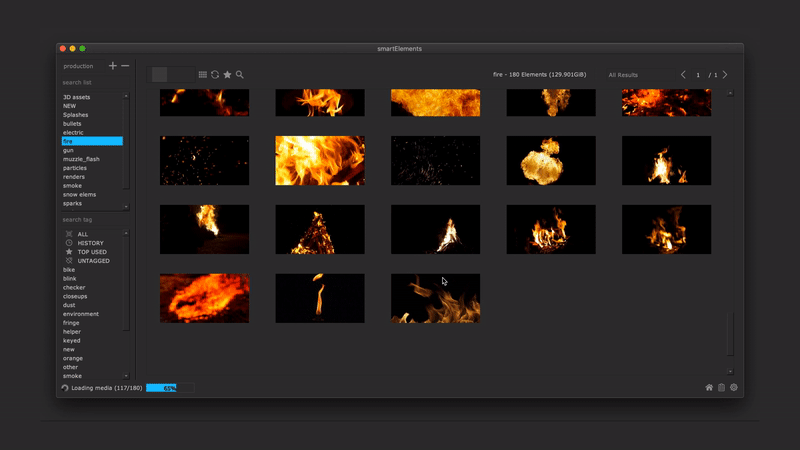
Speed up media crawl when ingesting
Dropping a folder scans it for all ingestable media before the actual ingestion starts. This crawl process has been massively speed up.
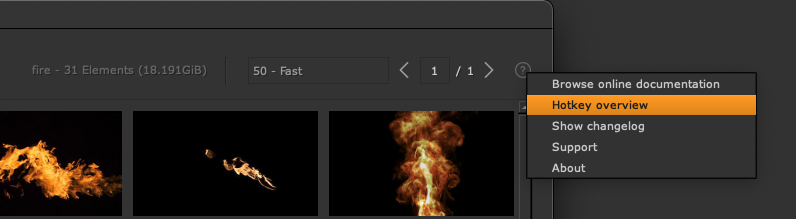
Hotkey overview
smartElements contains multiple hotkeys. The help menu (top right in the main window) contains now a hotkey overview so that you can quickly refer back to these.
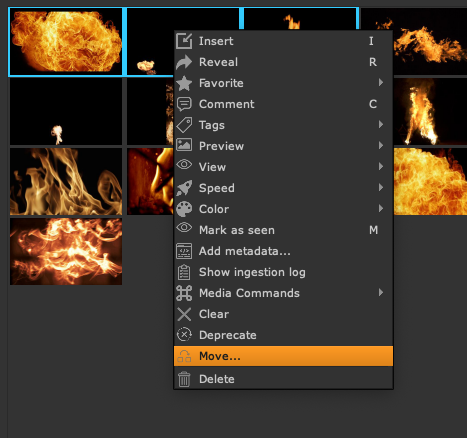
Move selected elements to other list
Select one or many elements, right click and choose ‘Move…’ from the context menu. In the upcoming dialog choose the new list to add the selected element(s) to.
Drive hard/soft copy ingestion mode via environment variable
Set the environment variable CRAGL_SMARTELEMENTS_INGEST_HARDCOPY to
True to enforce ingesting using a hard copy, i.e. the media to ingest
gets physically copied to the selected list.
Set the environment variable CRAGL_SMARTELEMENTS_INGEST_SOFTCOPY to
True enforce ingesting using a soft copy, i.e. the media to ingest does
NOT get physically copied to the selected list. When inserting the media
into a working file this will then reference the original media.
Use one of these environment variables. These override any import processor
settings when they are set.
Keep filter when switching viewing modes and switching lists
When switching viewing modes and lists the currently set up element filter gets preserved.
Wrap very long element names into multiple lines
Very long element names get now wrapped into multiple lines to ensure the full element name gets preserved. This happens in the list view and in the element quick info view.
Version 2.37.0
Live Filtering
We have implemented a live filtering feature into smartElements. While the lists and tags section let you categorize and group elements, the live filter feature lets you apply complex filtering to find exactly what you need across all category lists.
What makes this filtering feature so powerful is the fact that any new element ingested that matches these criteria gets added automatically to the live filter list so you don’t need to do any manual categorization.
For more information on live filtering please refer to the live filtering section section.
Search elements using regular expressions
Elements can now be searched in the filter section and the live filter section using regular expressions. This gives you more flexibility to find exactly what you need. Regular expression searches can be applied on name, type, comment and metadata fields.
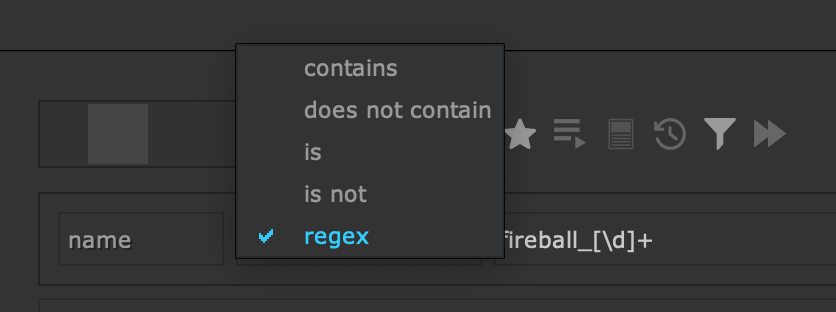
Use regex operator to filter for elements using regular expressions
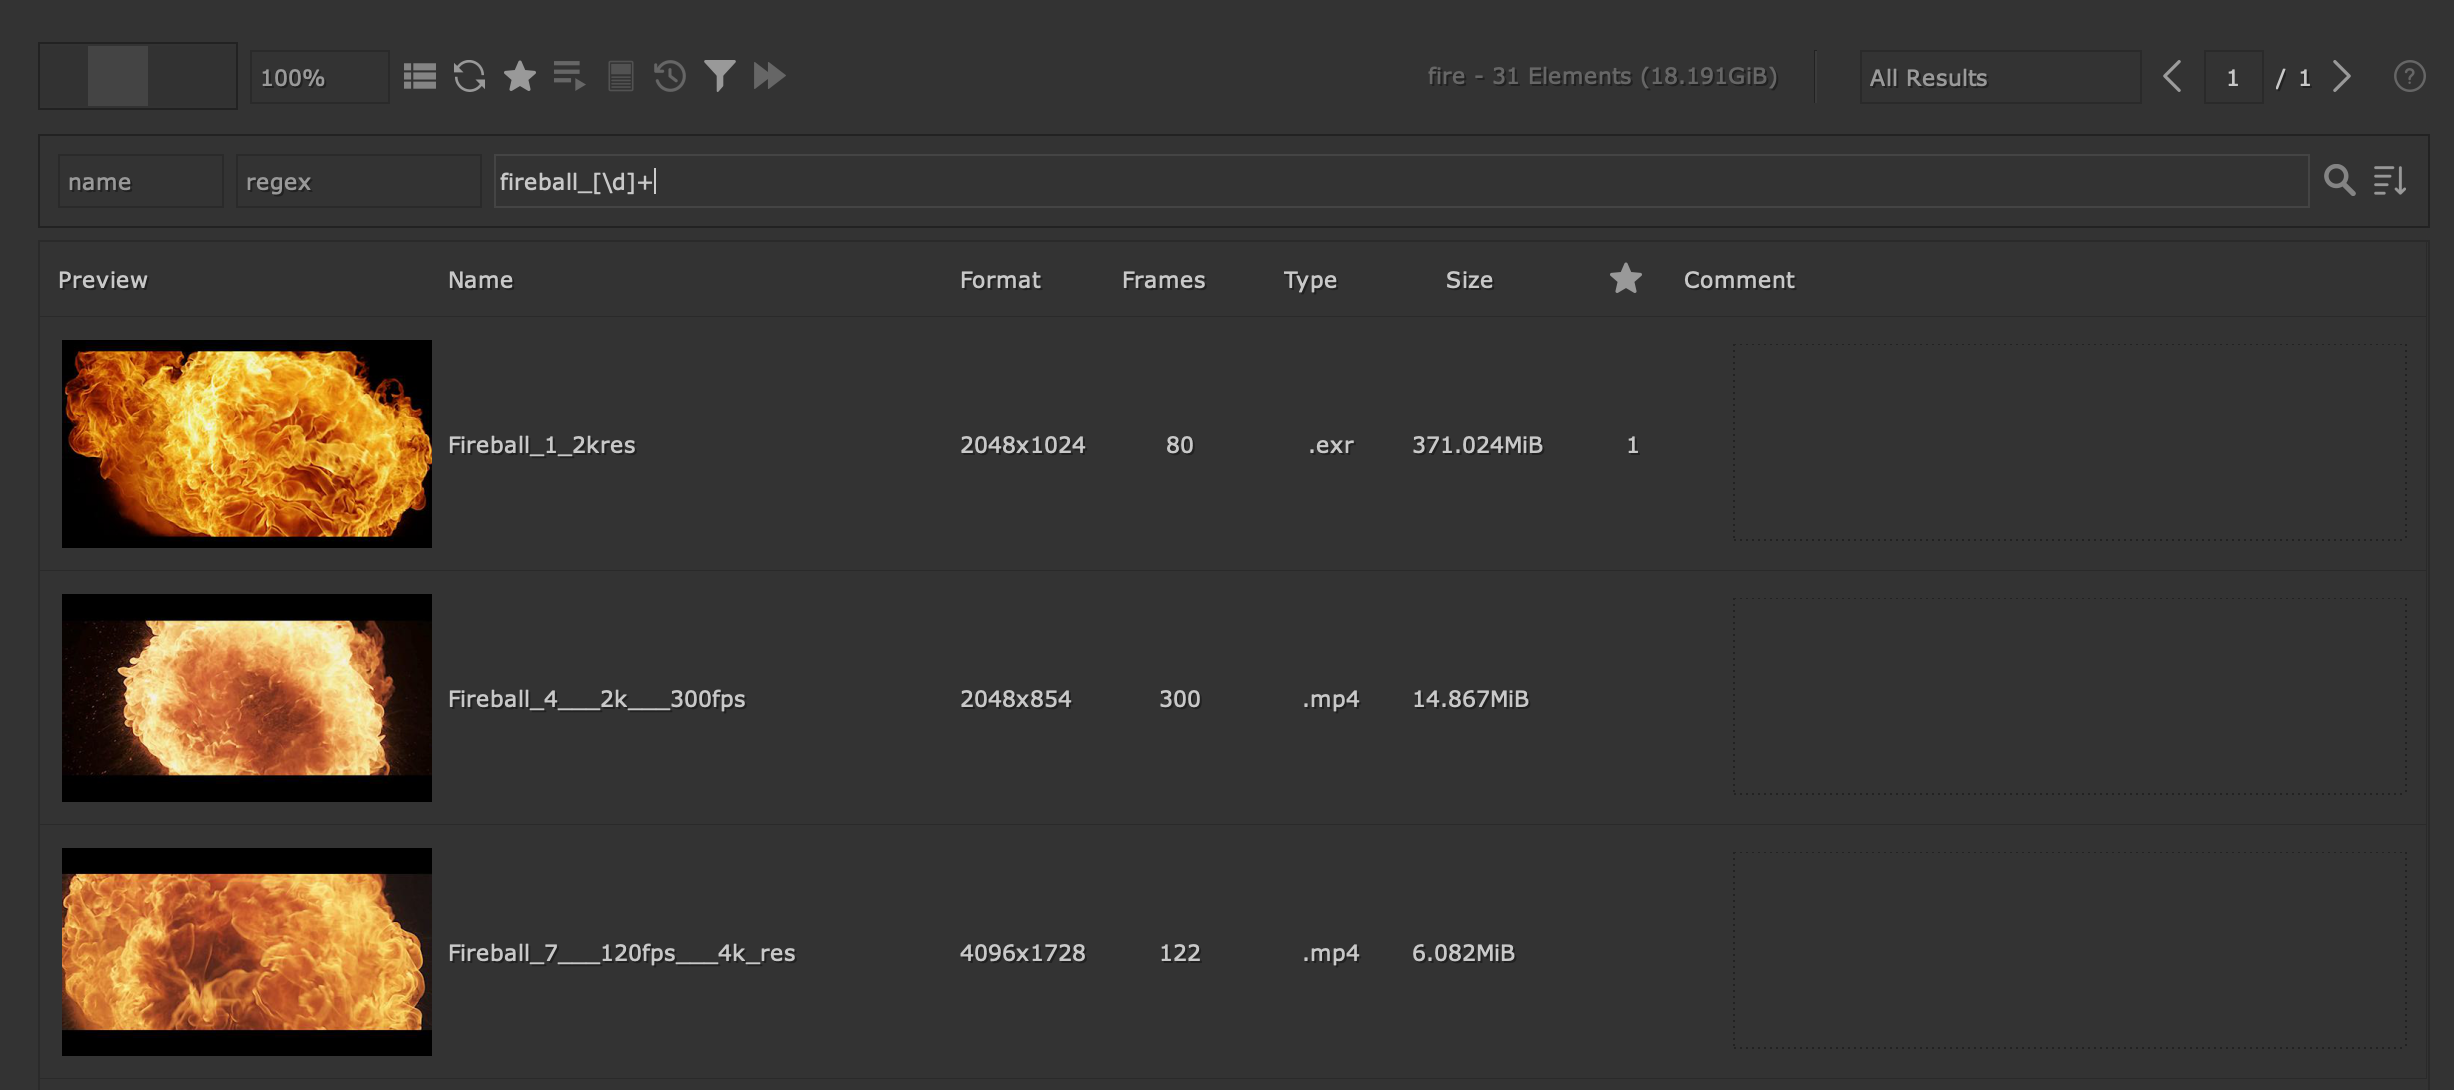
Using regular expressions to search for all ‘fireball’ elements followed by an index.
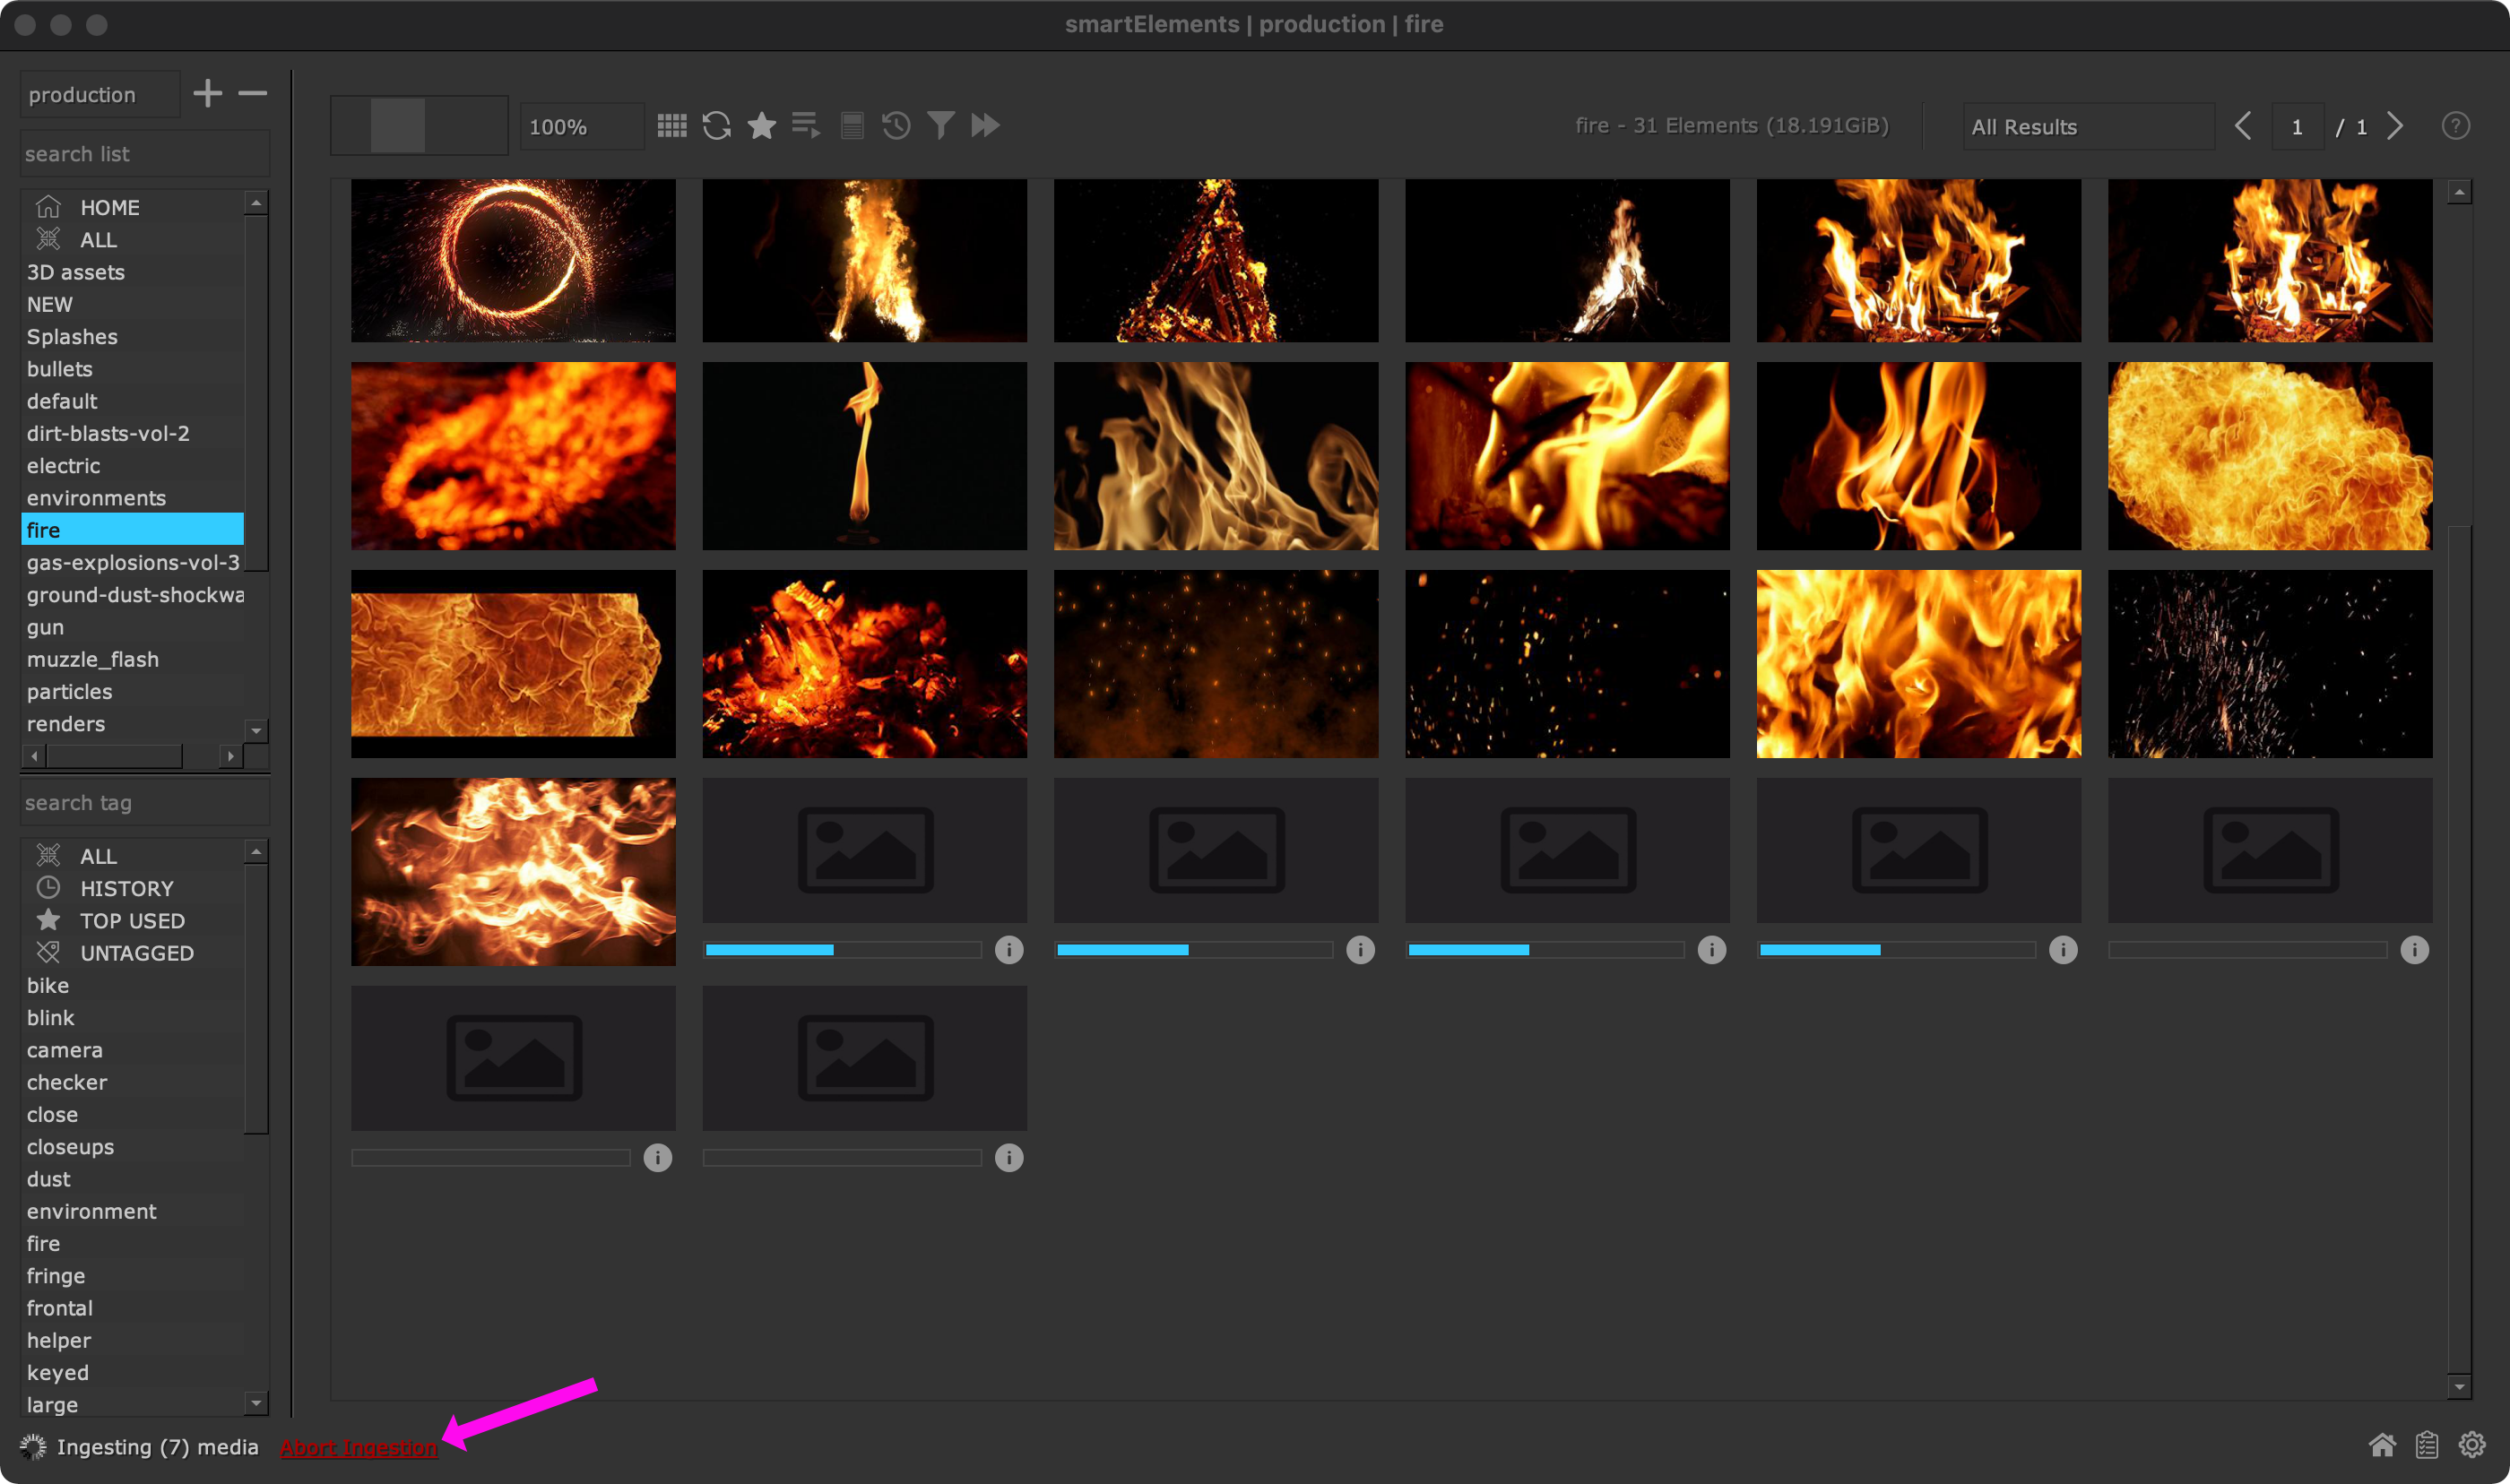
Implement to abort ingestion
When ingesting elements you will now find an ‘Abort Ingestion’ button on the bottom left. Clicking it will abort all open ingestion jobs in the ingestion queue. Elements that have been fully ingested remain.
Version 2.36.0
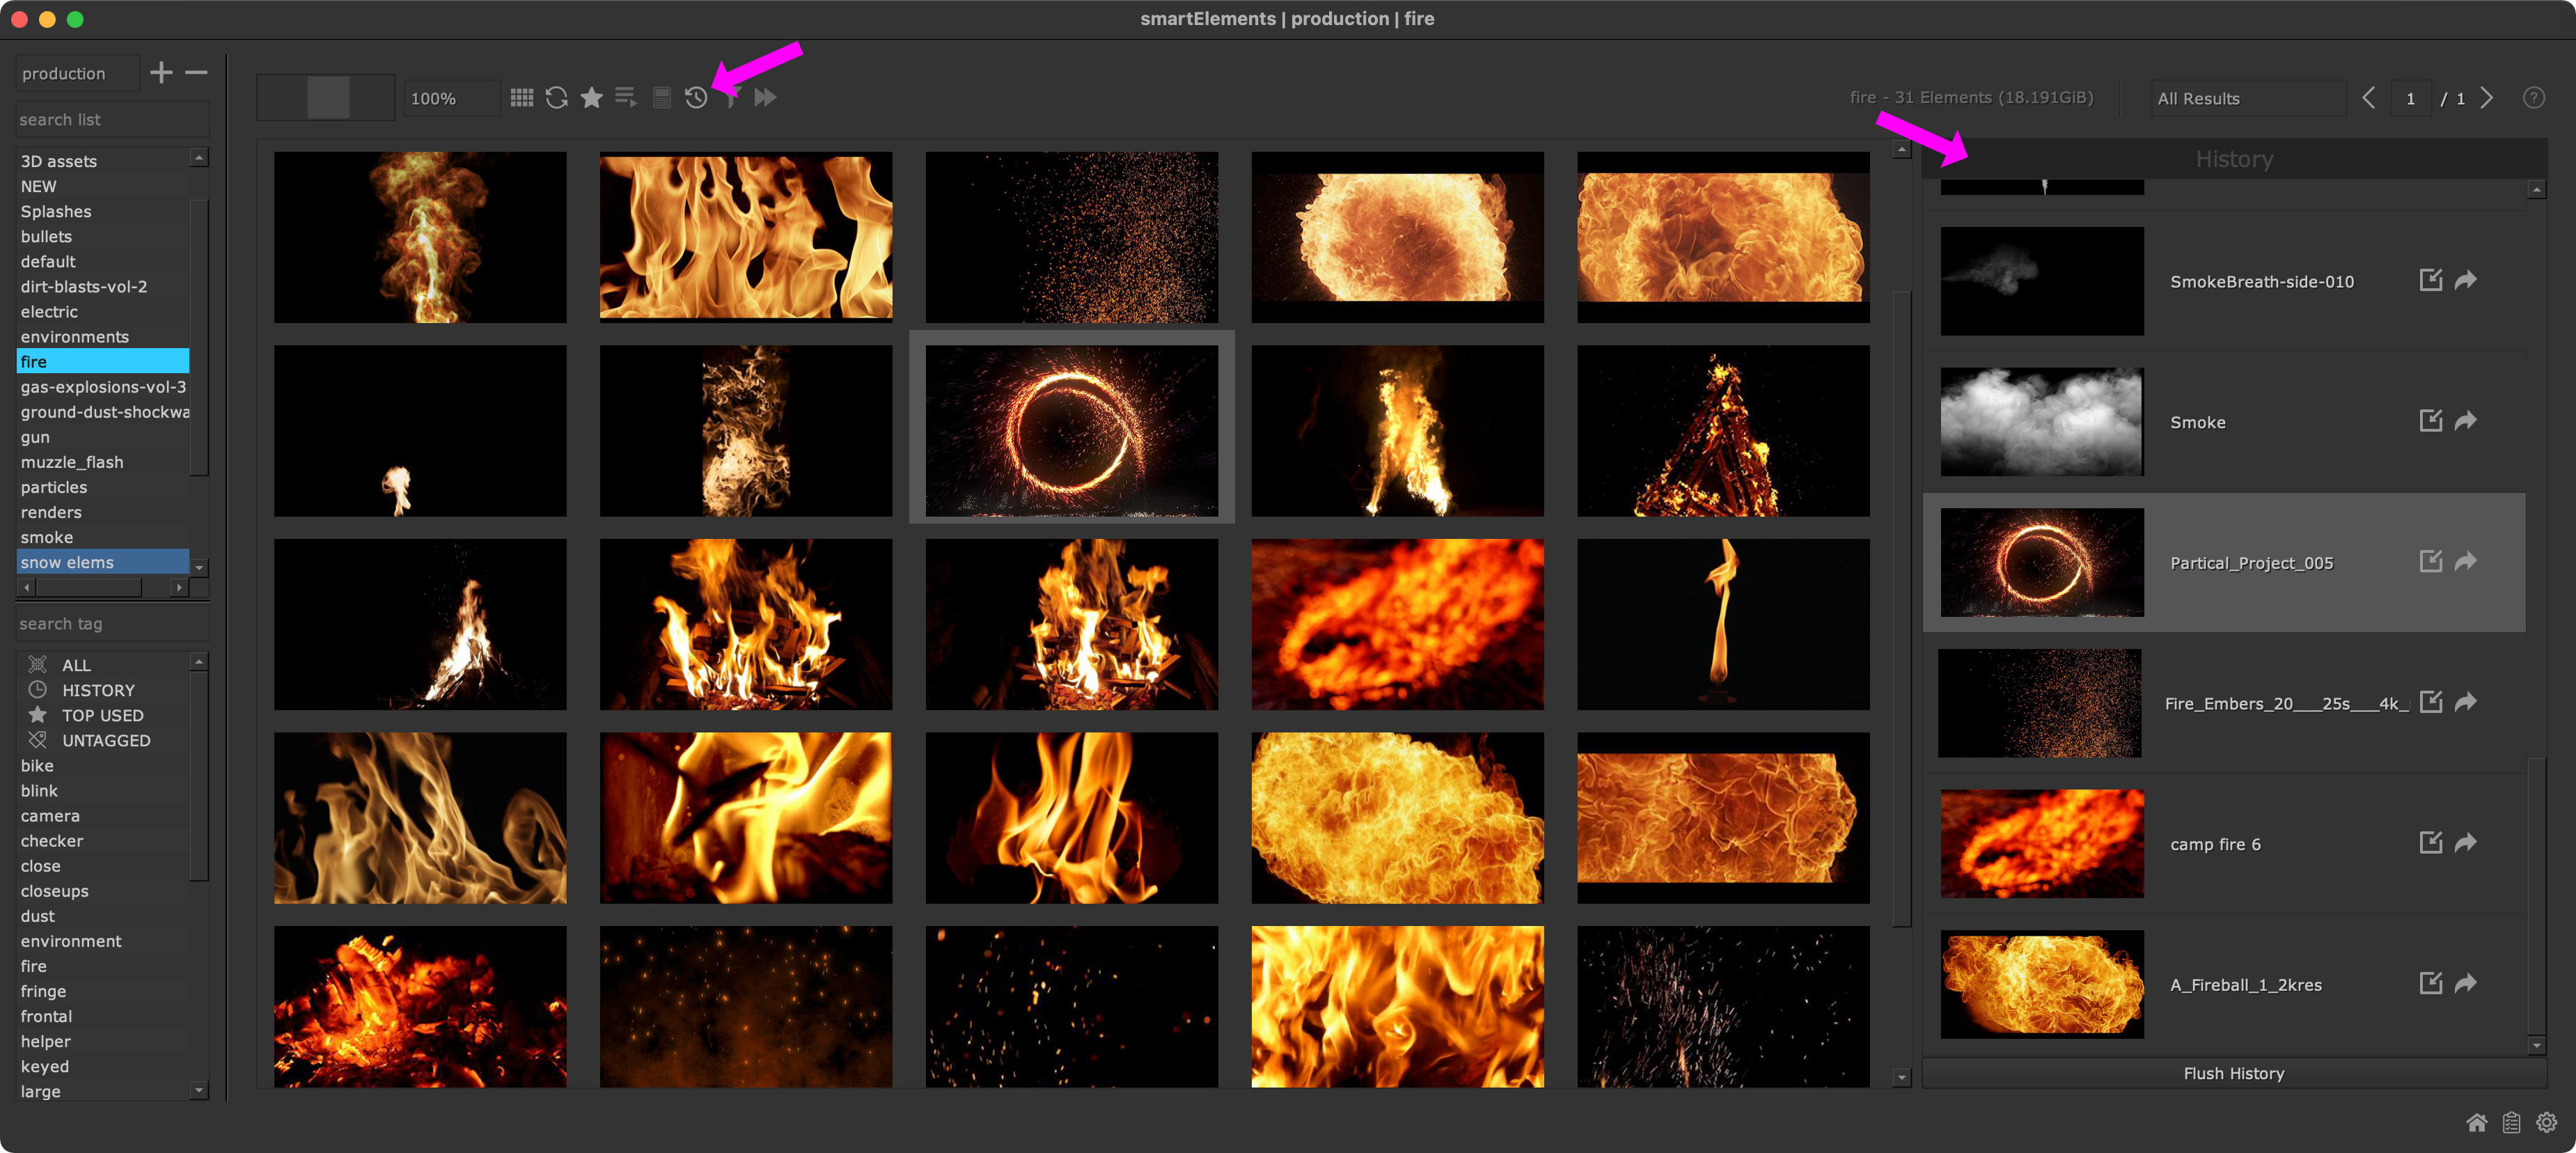
Add element history section
Press P or click the element history button at the top of smartElements to view the history of recently used elements. Click the insert button to insert these in your DAG. Click the reveal button to navigate to the element in your library inside smartElements.
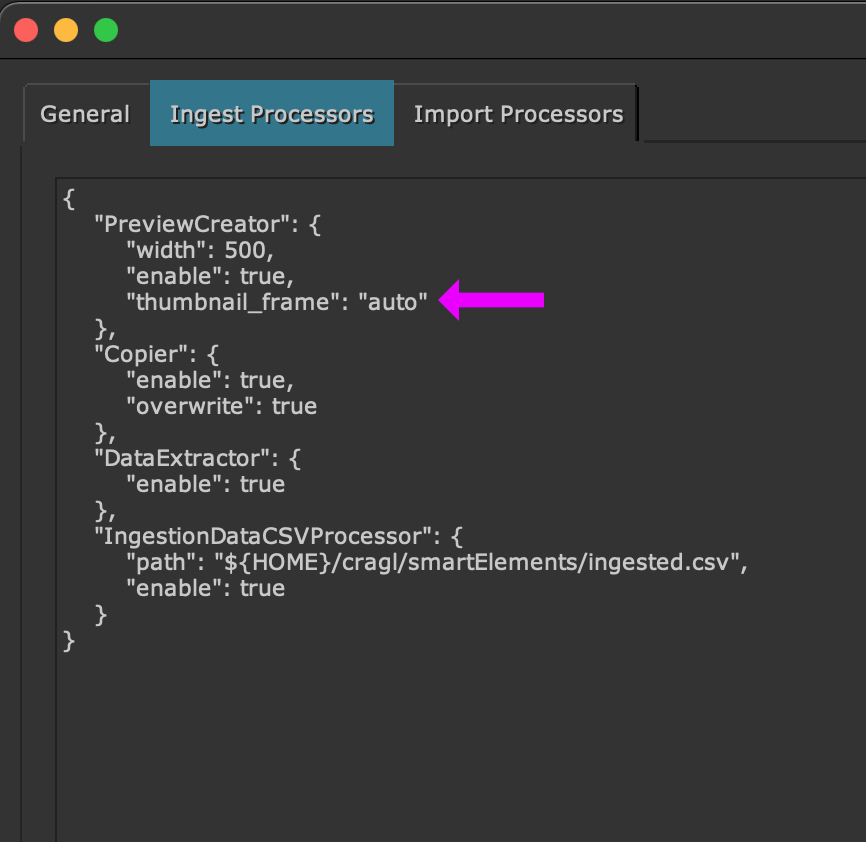
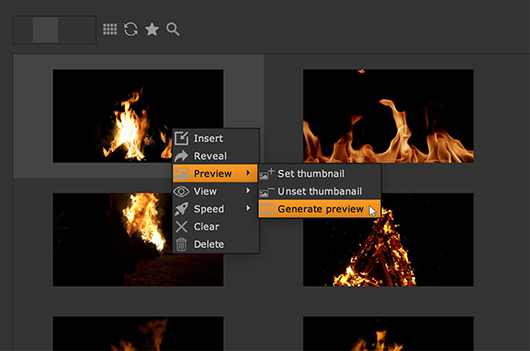
Auto set thumbnail
The ‘thumbnail_frame’ in the PreviewCreator ingestion processor is now by default set to ‘auto’. This will automatically find out and set the most representable thumbnail frame when ingesting.
You can also auto set thumbnails on multiple elements in one go. Select multiple elements and choose from the context menu: ‘Preview -> Set thumbnail -> auto’. Automatically setting thumbnails becomes quite handy on elements that start and end with a back background, e.g. muzzle flashes, explosions, dirt charges, etc.
Search: Add ‘is not’ and ‘does not contain’ operators
When searching for elements you can now also use the ‘is not’ operator to filter out any element that does not meet a given condition.

Use more accurate progress bar when ingesting
Elements that are currently ingesting show a progressbar. In previous versions this showed only a progress step per run ingestion processor. With this update we have made the progress more detailed and added more sub steps. This gives you a more accurate result where an element’s current ingestion status currently is.
Playlist widget list: don’t show playlists that don’t exist on disk
Over time you might remove playlists from disk when they are no longer needed. With that, they shouldn’t be displayed in smartElements anymore when they are not accessible anyways.
Version 2.35.0
Create element ingestion report
smartElements contains now an additional feature to keep track of recent element ingestions. You can now create an element ingestion report in various formats to get an overview of the recent element ingestions within a given time range. This helps you to keep up to date with the question ‘What elements do I have available?’
Right click a list and choose ‘Generate new elements report…’ from the context menu.

This launches a dialog in which you can specify the time range of newly ingested elements to put into a report. The report can be exported as HTML, PDF and CSV file:
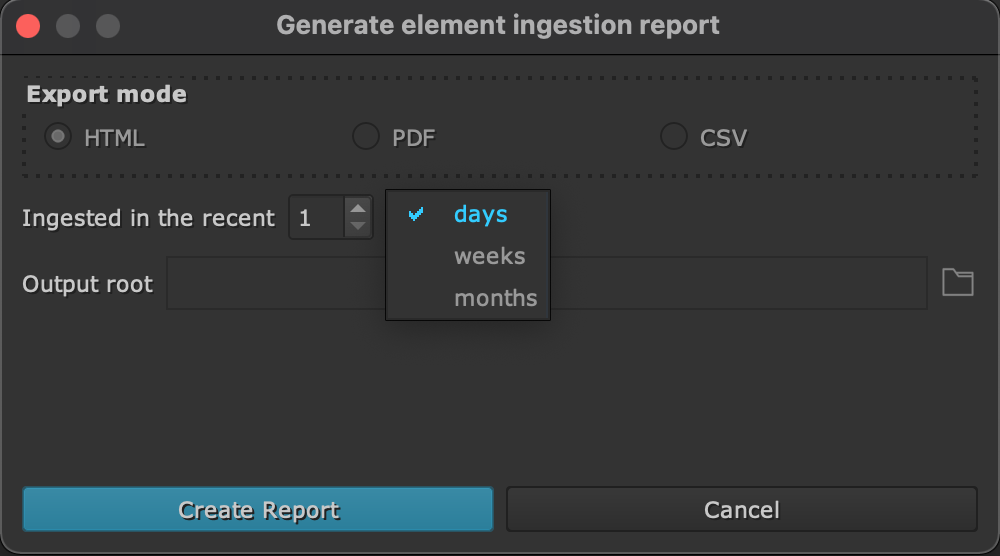
Choose an output root directory and smartElements creates a report for you:
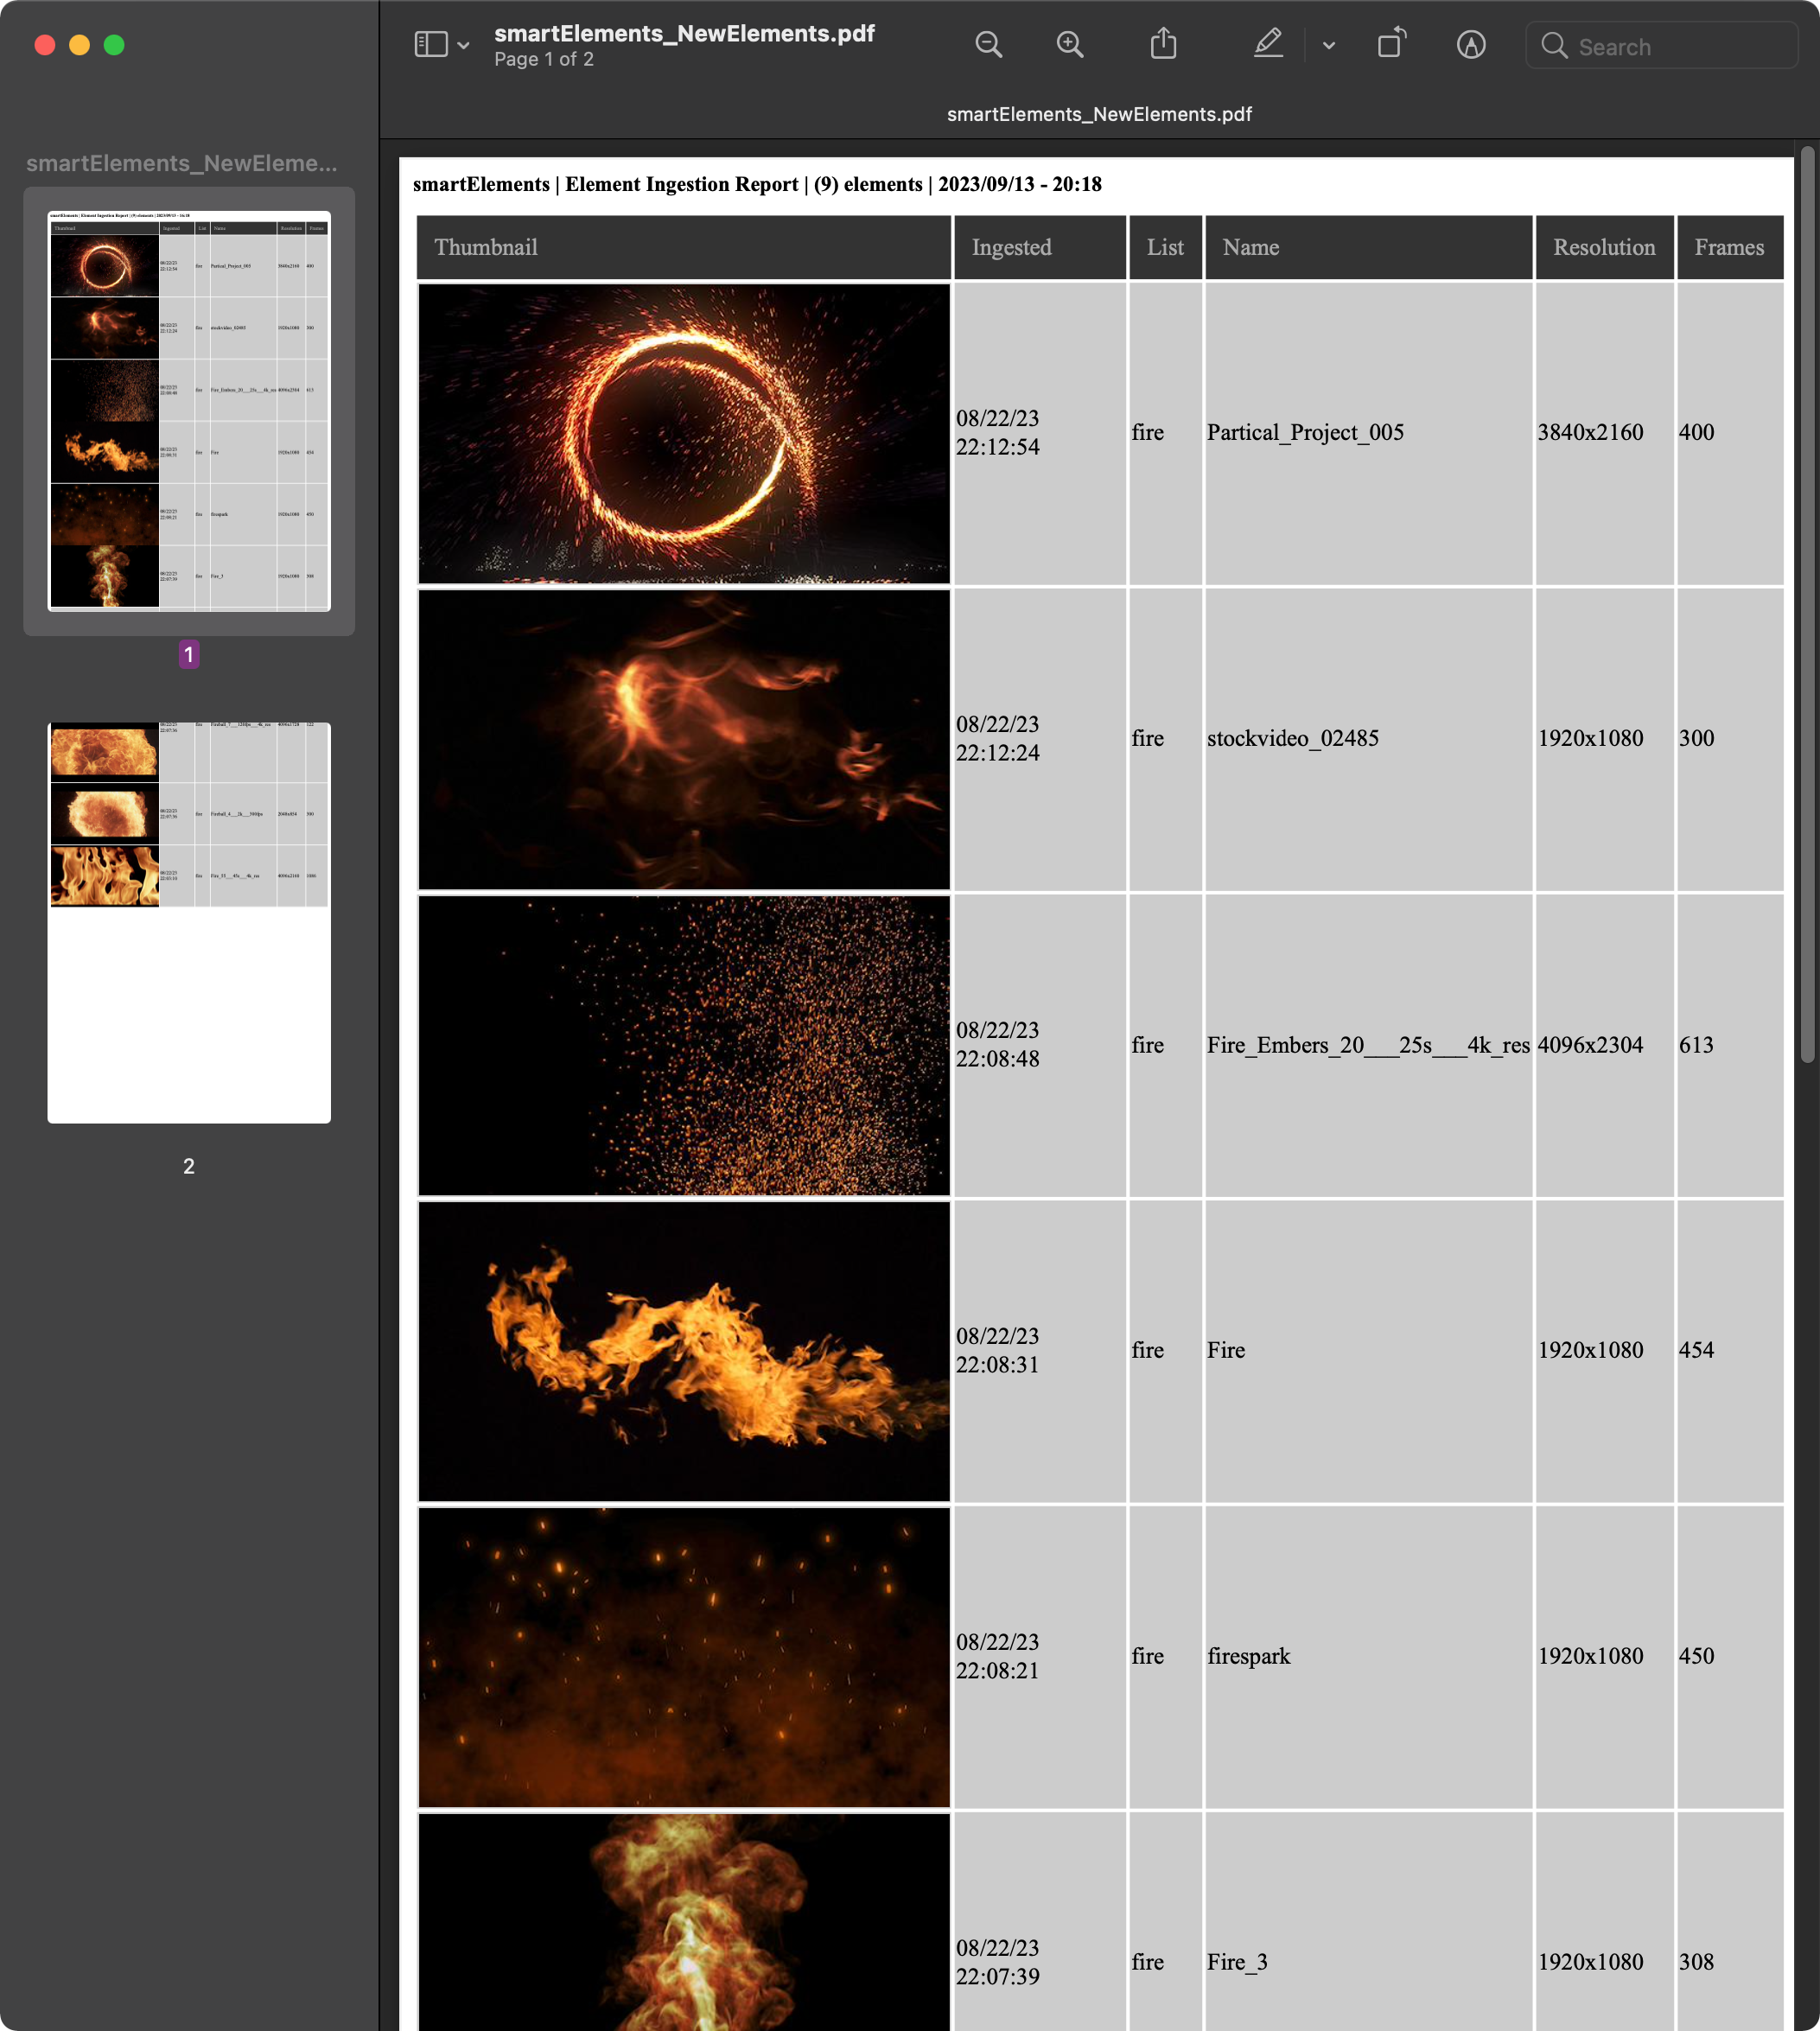
Element ingestion report as pdf
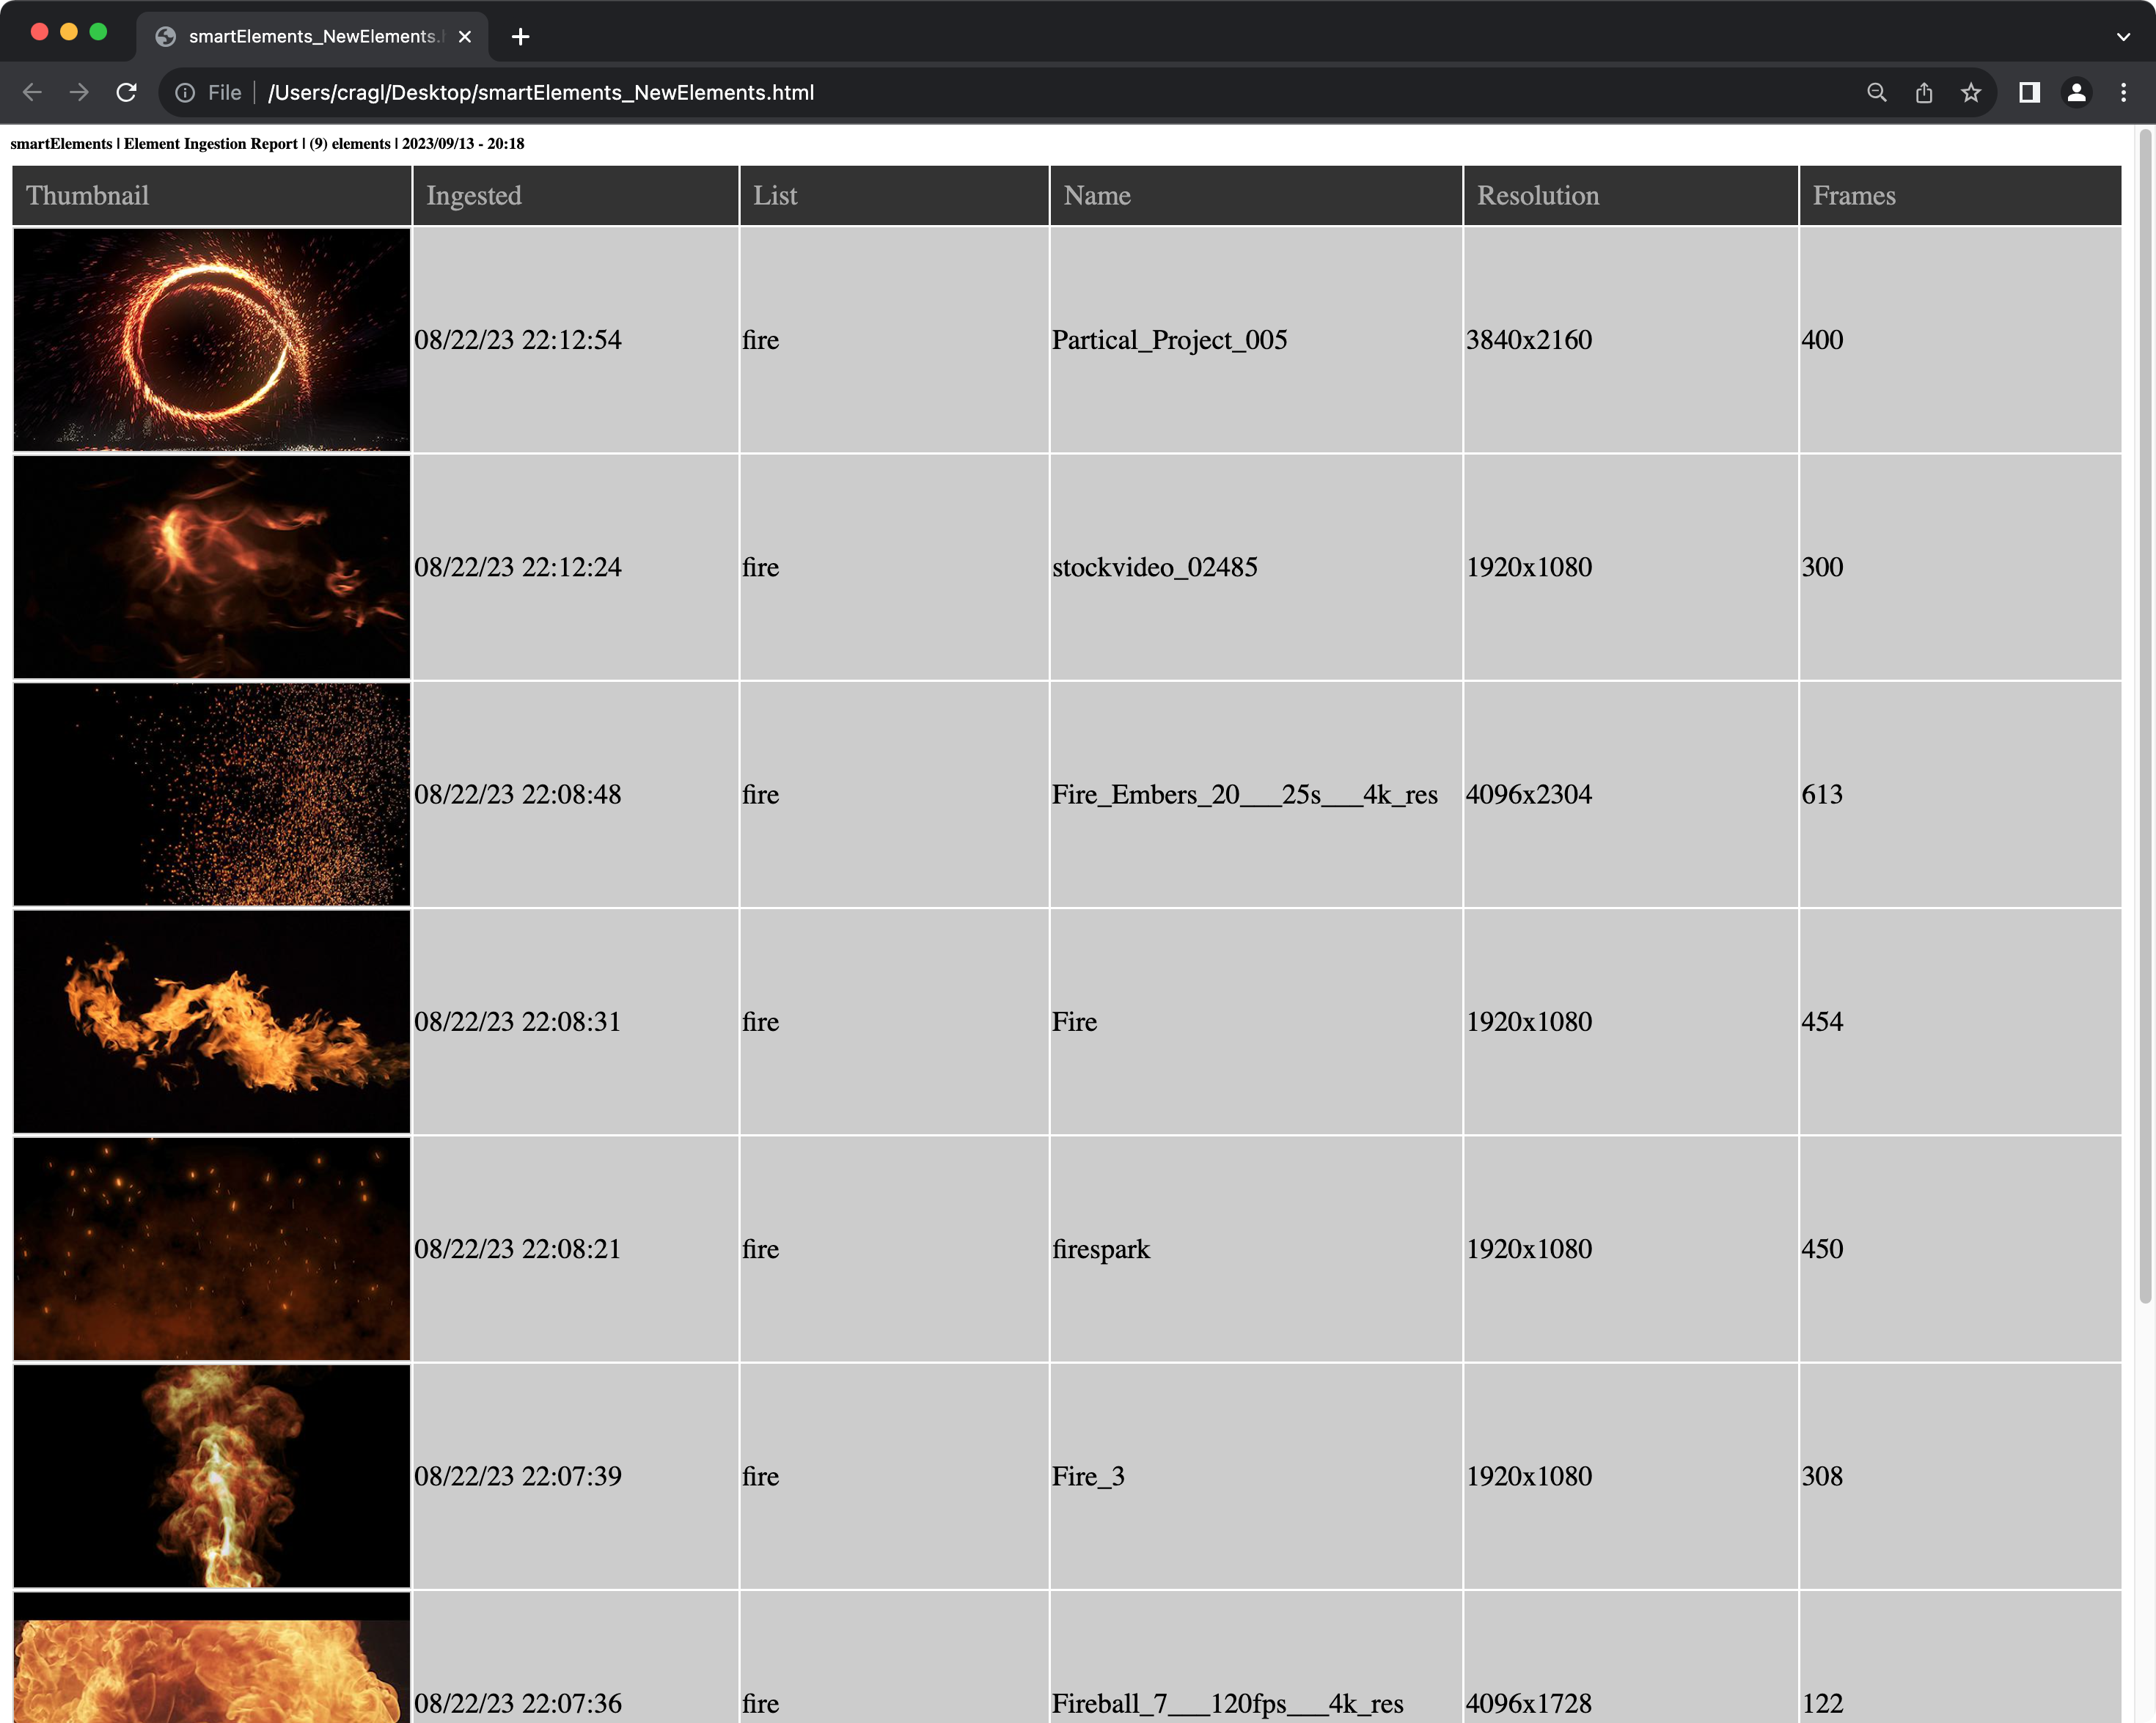
Element ingestion report as html
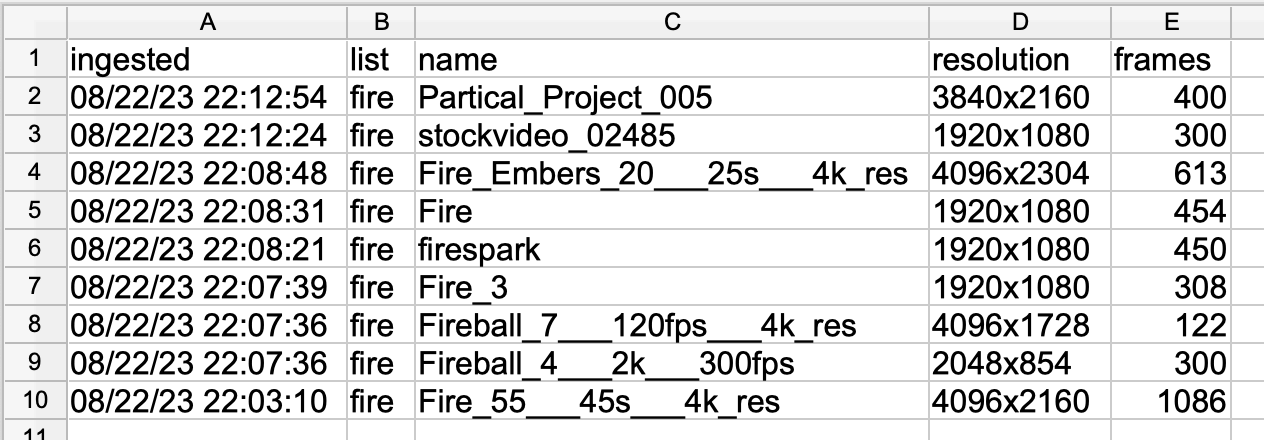
Element ingestion report as csv
For further information please visit the Keeping track of new elements page.
Version 2.34.0
Add API
smartElements provides an Application Programming Interface (API) which lets you communicate with smartElements from the outside. This lets you for example query stacks, lists, settings and elements and manipulate them, add new entries, update and delete them and ingest new elements - everything outside of smartElements and outside of Nuke. This lets you now to perform automations of various kinds without the need to use smartElement’s graphical user interface (GUI). For more information please refer to the API section in our documentation.
>>> from smartElements import api
>>> dir(api)

['Element', 'Favorites', 'LEVEL', 'LOGGER', 'Settings', '__builtins__',
'__cached__', '__doc__', '__file__', '__loader__', '__name__', '__package__',
'__spec__', 'add_list', 'add_stack', 'constants', 'get_all_elements_in_list',
'get_all_elements_in_stack', 'get_element', 'get_element_path', 'get_elements_by_tags',
'get_list_path', 'get_lists', 'get_settings', 'get_stack_path', 'get_stacks',
'getpass', 'ingest', 'json', 'logging', 'os', 'paths', 'platform',
'processor', 're', 'remove_stack', 'save_setting', 'scan_for_media',
'shutil', 'time']
Version 2.33.0
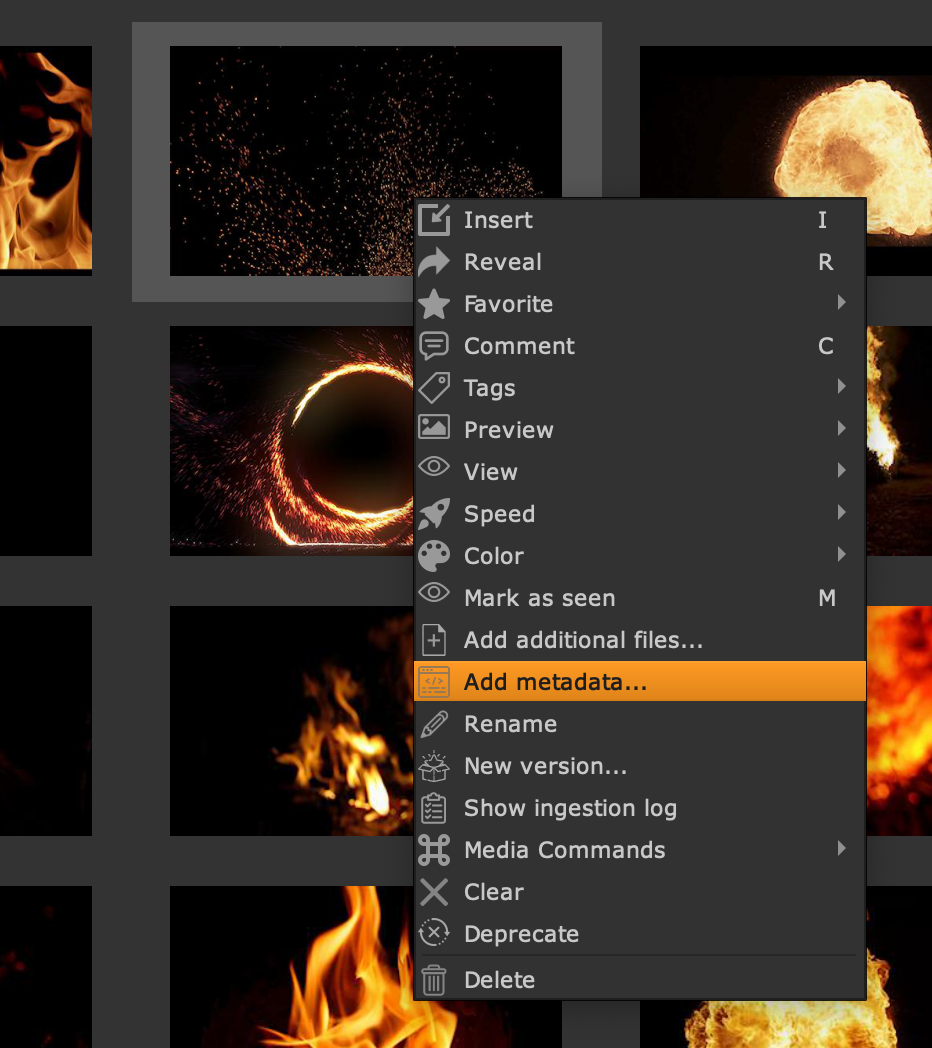
Add additional metadata and search elements by metadata
Right click one or several elements and execute ‘Add metadata’ from the context menu to add additional metadata for all selected elements. Elements can now also be searched by metadata.

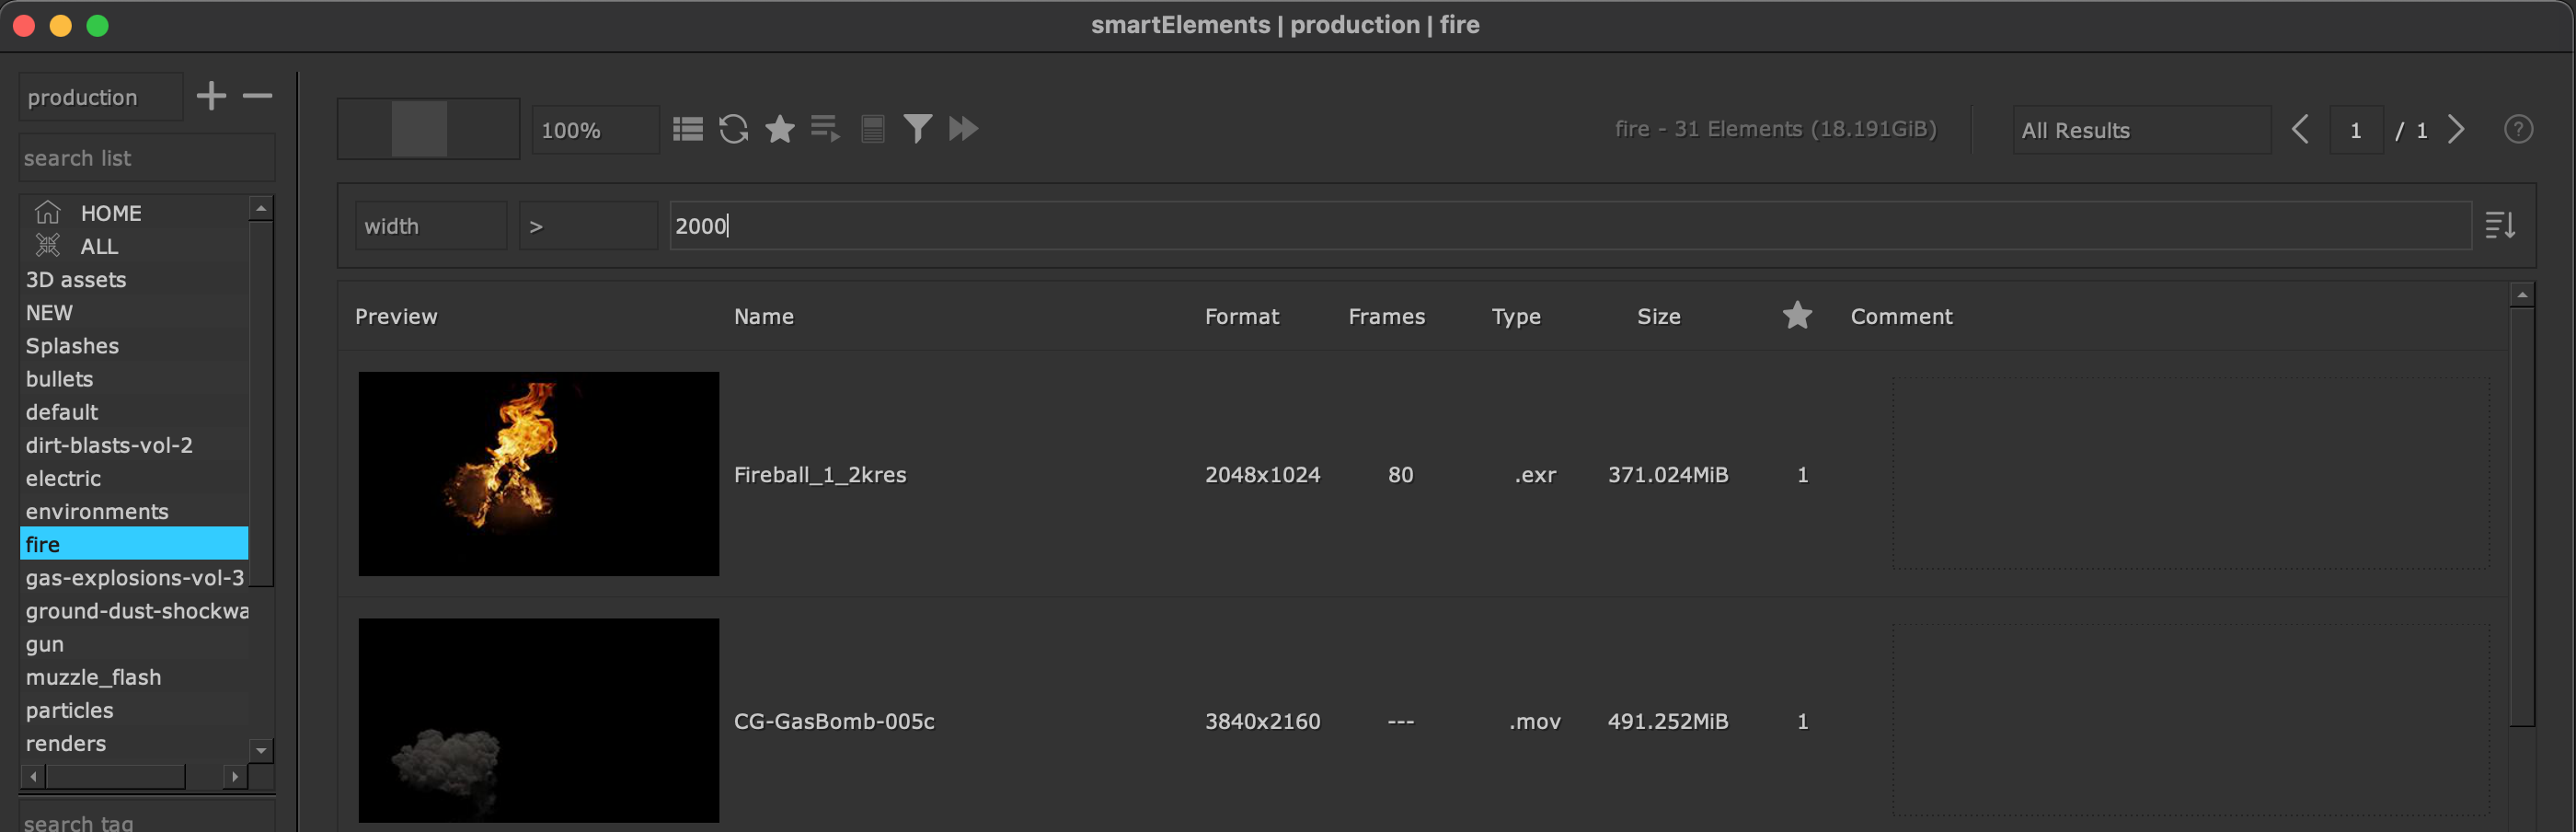
Search elements by width, height, frame length
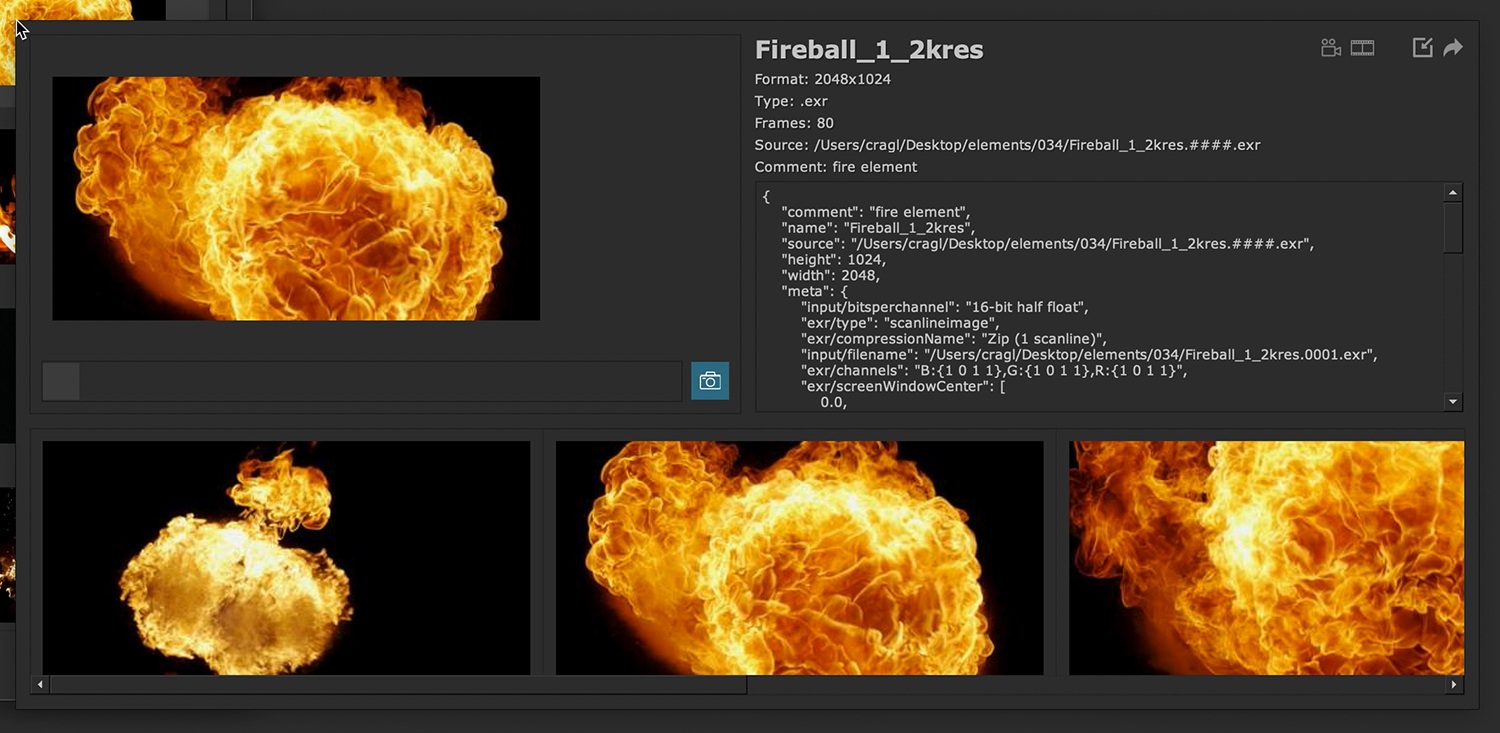
When filtering elements you can specify the width, height and frame length. You can search elements that have exactly the entered value as well as less than and more than the entered value. For example, let’s search for elements that are larger than 2000 pixels as seen below:
Version 2.32.0
Update to nuke-15
Version 2.31.0
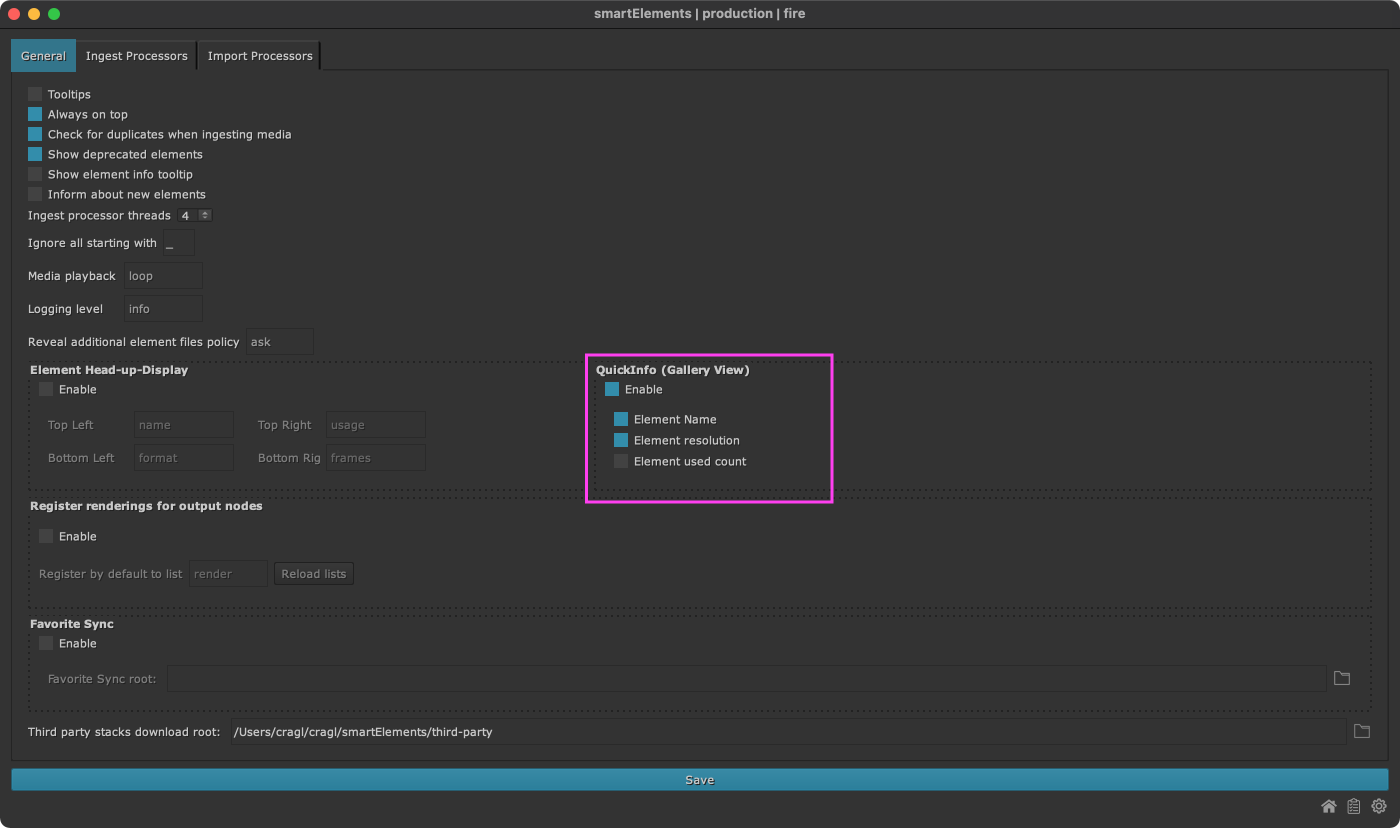
Gallery View: Show QuickInfo
The gallery view contains now a configurable quick info that lets you view additional information for all elements like name, resolution and used count so that you can quicker find what you are interested in.
The quick info and the details to show can be turned on and off in the settings section:
Version 2.30.0
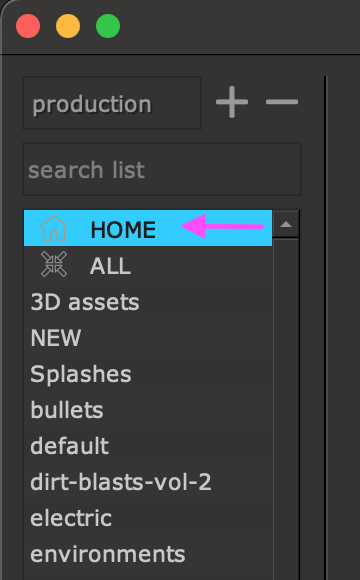
Add Home View showing preview thumbnails for each list
smartElements contains now a home view for each stack. The home view shows thumbnails for each list so that the user can easier find categories they are interested for.
The home view can be found on the very top in the category list:
Tip
Pressing H on your keyboard will always navigate you to the home view.
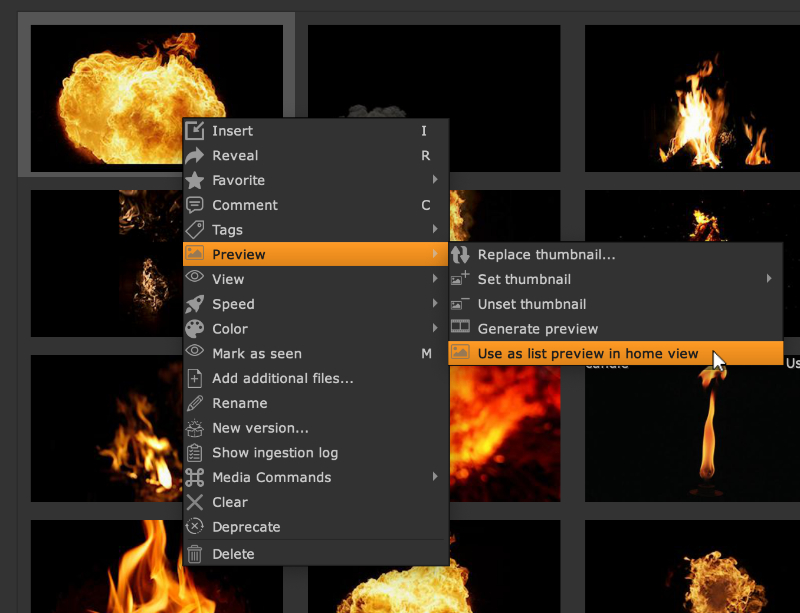
Inside a list right click any element and choose Preview -> Use as list preview in home view The currently set up thumbnail of the selected elements gets then used as list preview in the home for the list that the element resides in.
Version 2.29.0
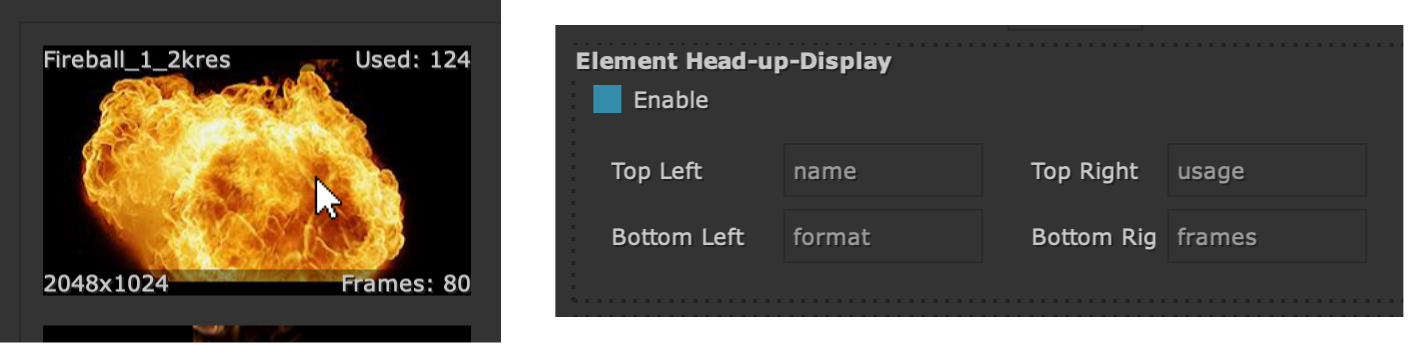
Implement element Head-up-Display
You can now enable a configurable Head-up-Display (HUD) for all elements. The element information gets displayed once you hover over an element. In the settings you can configure what to see or not see in each corner.
Version 2.28.1
Speed up launching time when being in offline mode
If your machine is not connected to the web we recommend to set the
environment variable CRAGL_NO_WEB to 'True'. This will speed
up launching smartElements.
Version 2.28.0
Notify when trying to ingest to the ‘ALL’ list
The ‘ALL’ list is a special list that shows all elements of all lists. While it was possible to ingest to this list in previous versions, it does not make too much sense. When you are currently viewing the ‘ALL’ list and drop an element into smartElements for ingesting then you will be notified about switching to a specific list.
Other
Fix: Color dialog is under smartElements main window on windows
Version 2.27.0
Add studio model
Add help menu
Version 2.26.0
Bulk adjust thumbnail for multiple elements
In the previous version we added functionality to configure the thumbnail frame to use when ingesting media. You can now also bulk adjust the thumbnail frame on your existing elements.
Select multiple elements and set thumbnails for all of them in one go using the start, middle or end frame as thumbnail:
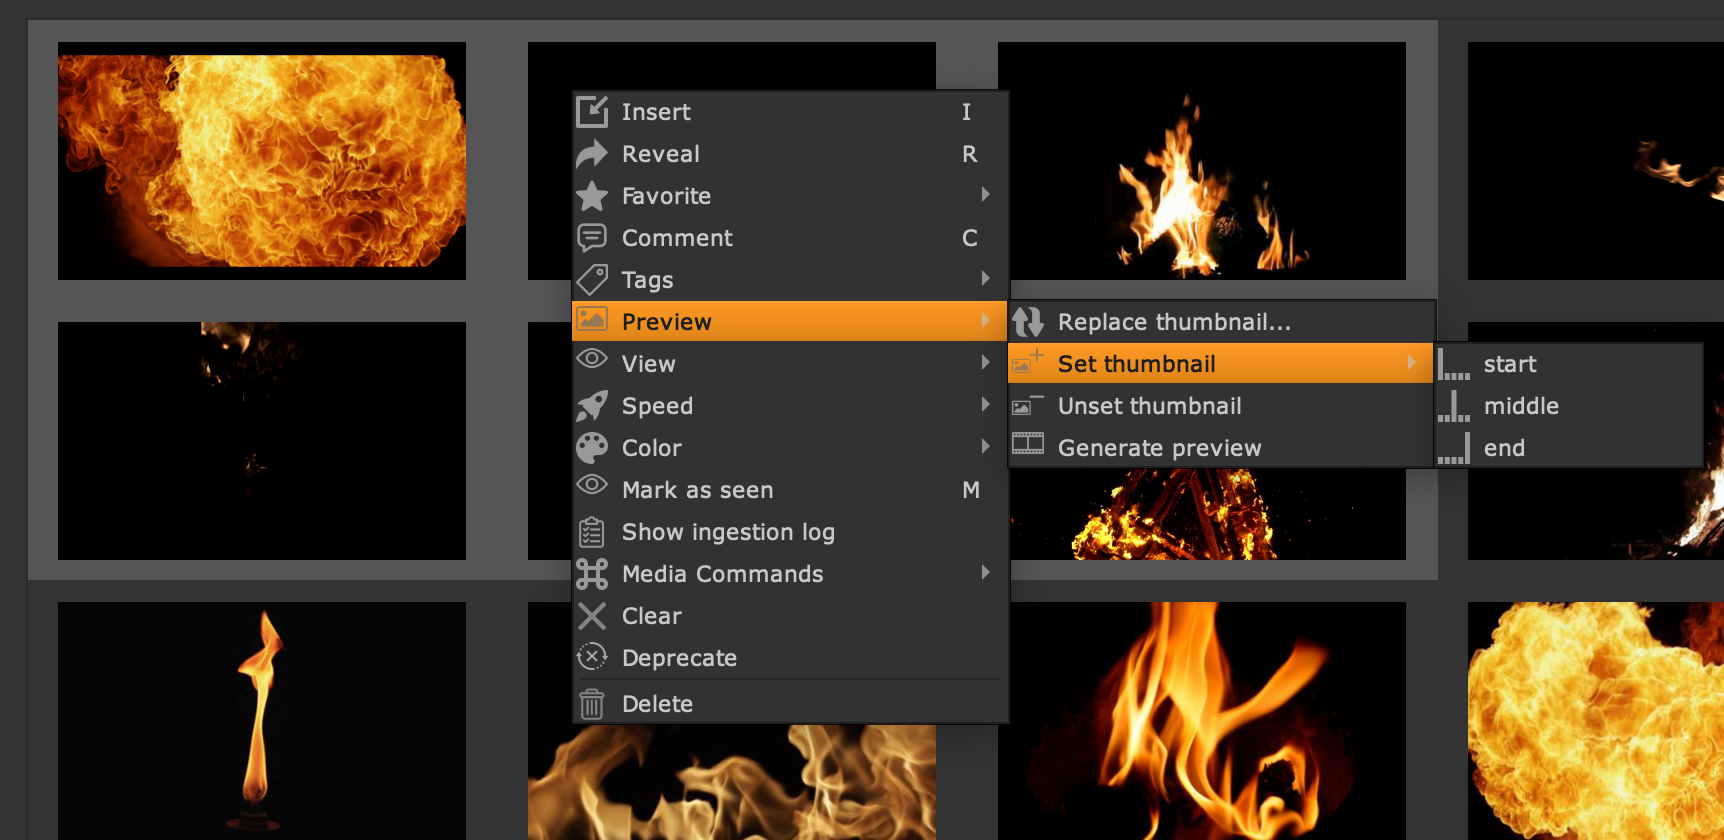
Adjust the thumbnail for multiple elements in one go
This is particularly useful for element types like smoke, dust, fire, explosions, etc. that often start with a black frame and progress over time. In these cases using a middle or end frame as thumbnail should get you 95% there and you can tweak the thumbnails for specific elements manually afterwards if needed.
Add filter section and order elements in ascending and descending order
We moved the search widget into a dedicated filter section which you can find here:
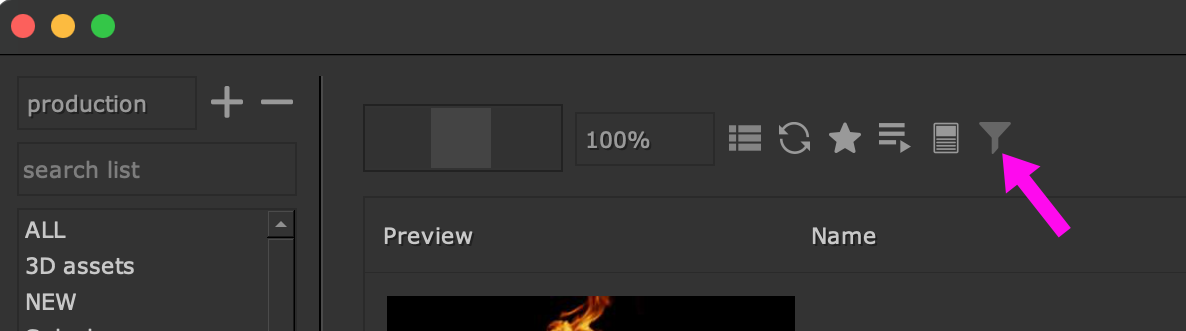
The filter button lets you search for elements
Click this button (shortcut: F) to toggle the visibility of the filter section. We have also added functionality to sort elements in ascending and descending order.
Drive visibility of local ‘default’ stack by environment variable
Setting the environment variable CRAGL_SMARTELEMENTS_HIDE_DEFAULT_STACK
to True will hide the local ‘default’ stack. This environment variable
is useful for larger studios in combination with the environment variable
CRAGL_SMARTELEMENTS_ADDITIONAL_STACKS to drive the visibility of stacks
seen by the artists. For more information about additional environment
variables for smartElements please have a look at our
environment variables section.
Other
Fix: Deleting all stacks lets a user not create a new stack
In previous versions, smartElements always required having one active stack set. One user mistakenly removed all stacks from the stacks dropdown menu. This caused some issues in various places as smartElements needs an active stack and this prevented the user from restoring stack locations back to their settings. This has been fixed. You can now remove all stacks from the stacks dropdown - either willingly or mistakenly - and can then add stacks back to the stacks dropdown menu without running into an issue.
Version 2.25.0
Make preview frame to use when ingesting configurable
You can now configure the thumbnail frame to render when ingesting and choose from rendering the ‘start’, ‘middle’ or ‘end’ frame. This can become a time saver on certain element type ingestions. For example, many smoke, dust, fire and other element types often start with a black or nearly black frame and slowly expose their relevant data over time. In these examples, configuring to not use the ‘start’ but rather the ‘middle’ or ‘end’ frame of an element saves you from manually setting the thumbnail afterwards for many elements. You can always change this setting when needed.
Launch into smartElement’s settings and navigate to the ‘Ingest Processors’ tab. In here you will now automatically find a new configuration thumbnail_frame:
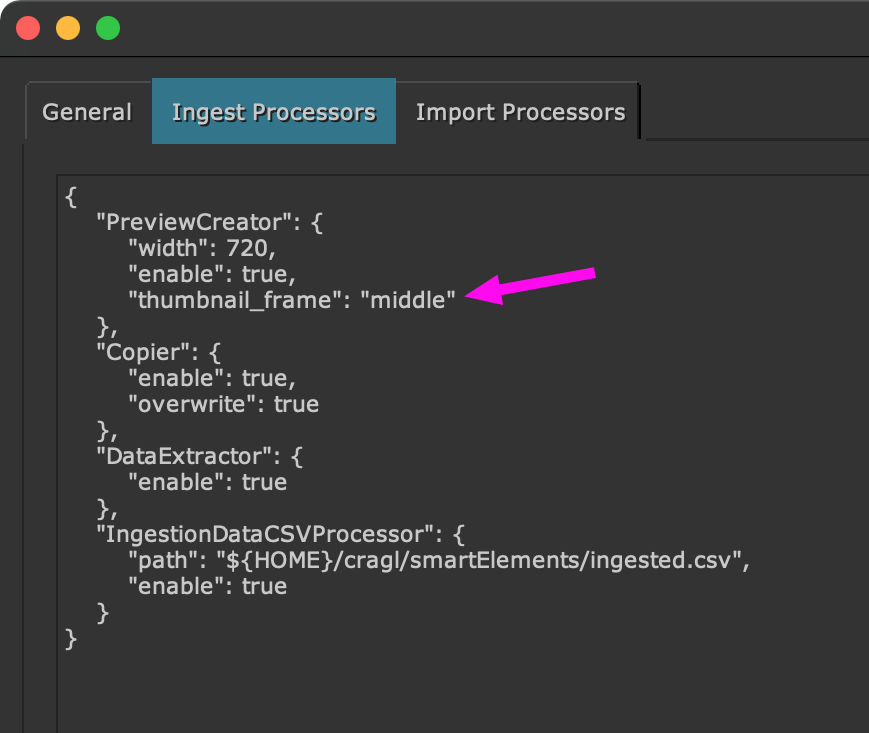
Configure the thumbnail to use when ingesting.
Set it to one of the following values:
start: Render the first frame as thumbnail (default).
middle: Render the middle frame as thumbnail.
end: Render the last frame as thumbnail.
Note that you can always adjust the thumbnail for any element afterwards at any time if needed. Simply select an element, hold the Alt key and scrub through the slider to find you frame of your needs. Then click the thumbnail button or use the shortcut T.
Version 2.24.0
Configure to mark new elements
Having an element library that contains hundreds or even thousands of elements makes it sometimes hard to keep track of what elements are new. This update helps you with that by marking elements that got newly ingested. This accounts only for elements that weren’t ingested by yourself of course as you should probably know what you ingested.
In the settings section you will find a new checkbox ‘Inform about new elements’:
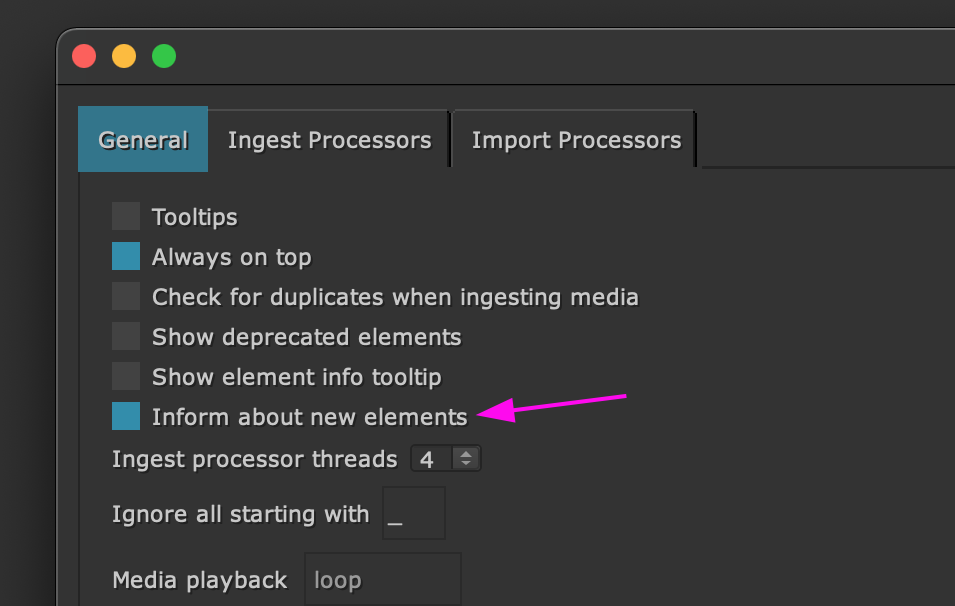
Turn this checkbox on to get newly ingested elements marked.
By default, this checkbox is turned off. Turning it on marks all new elements that get ingested from now on with a green border:
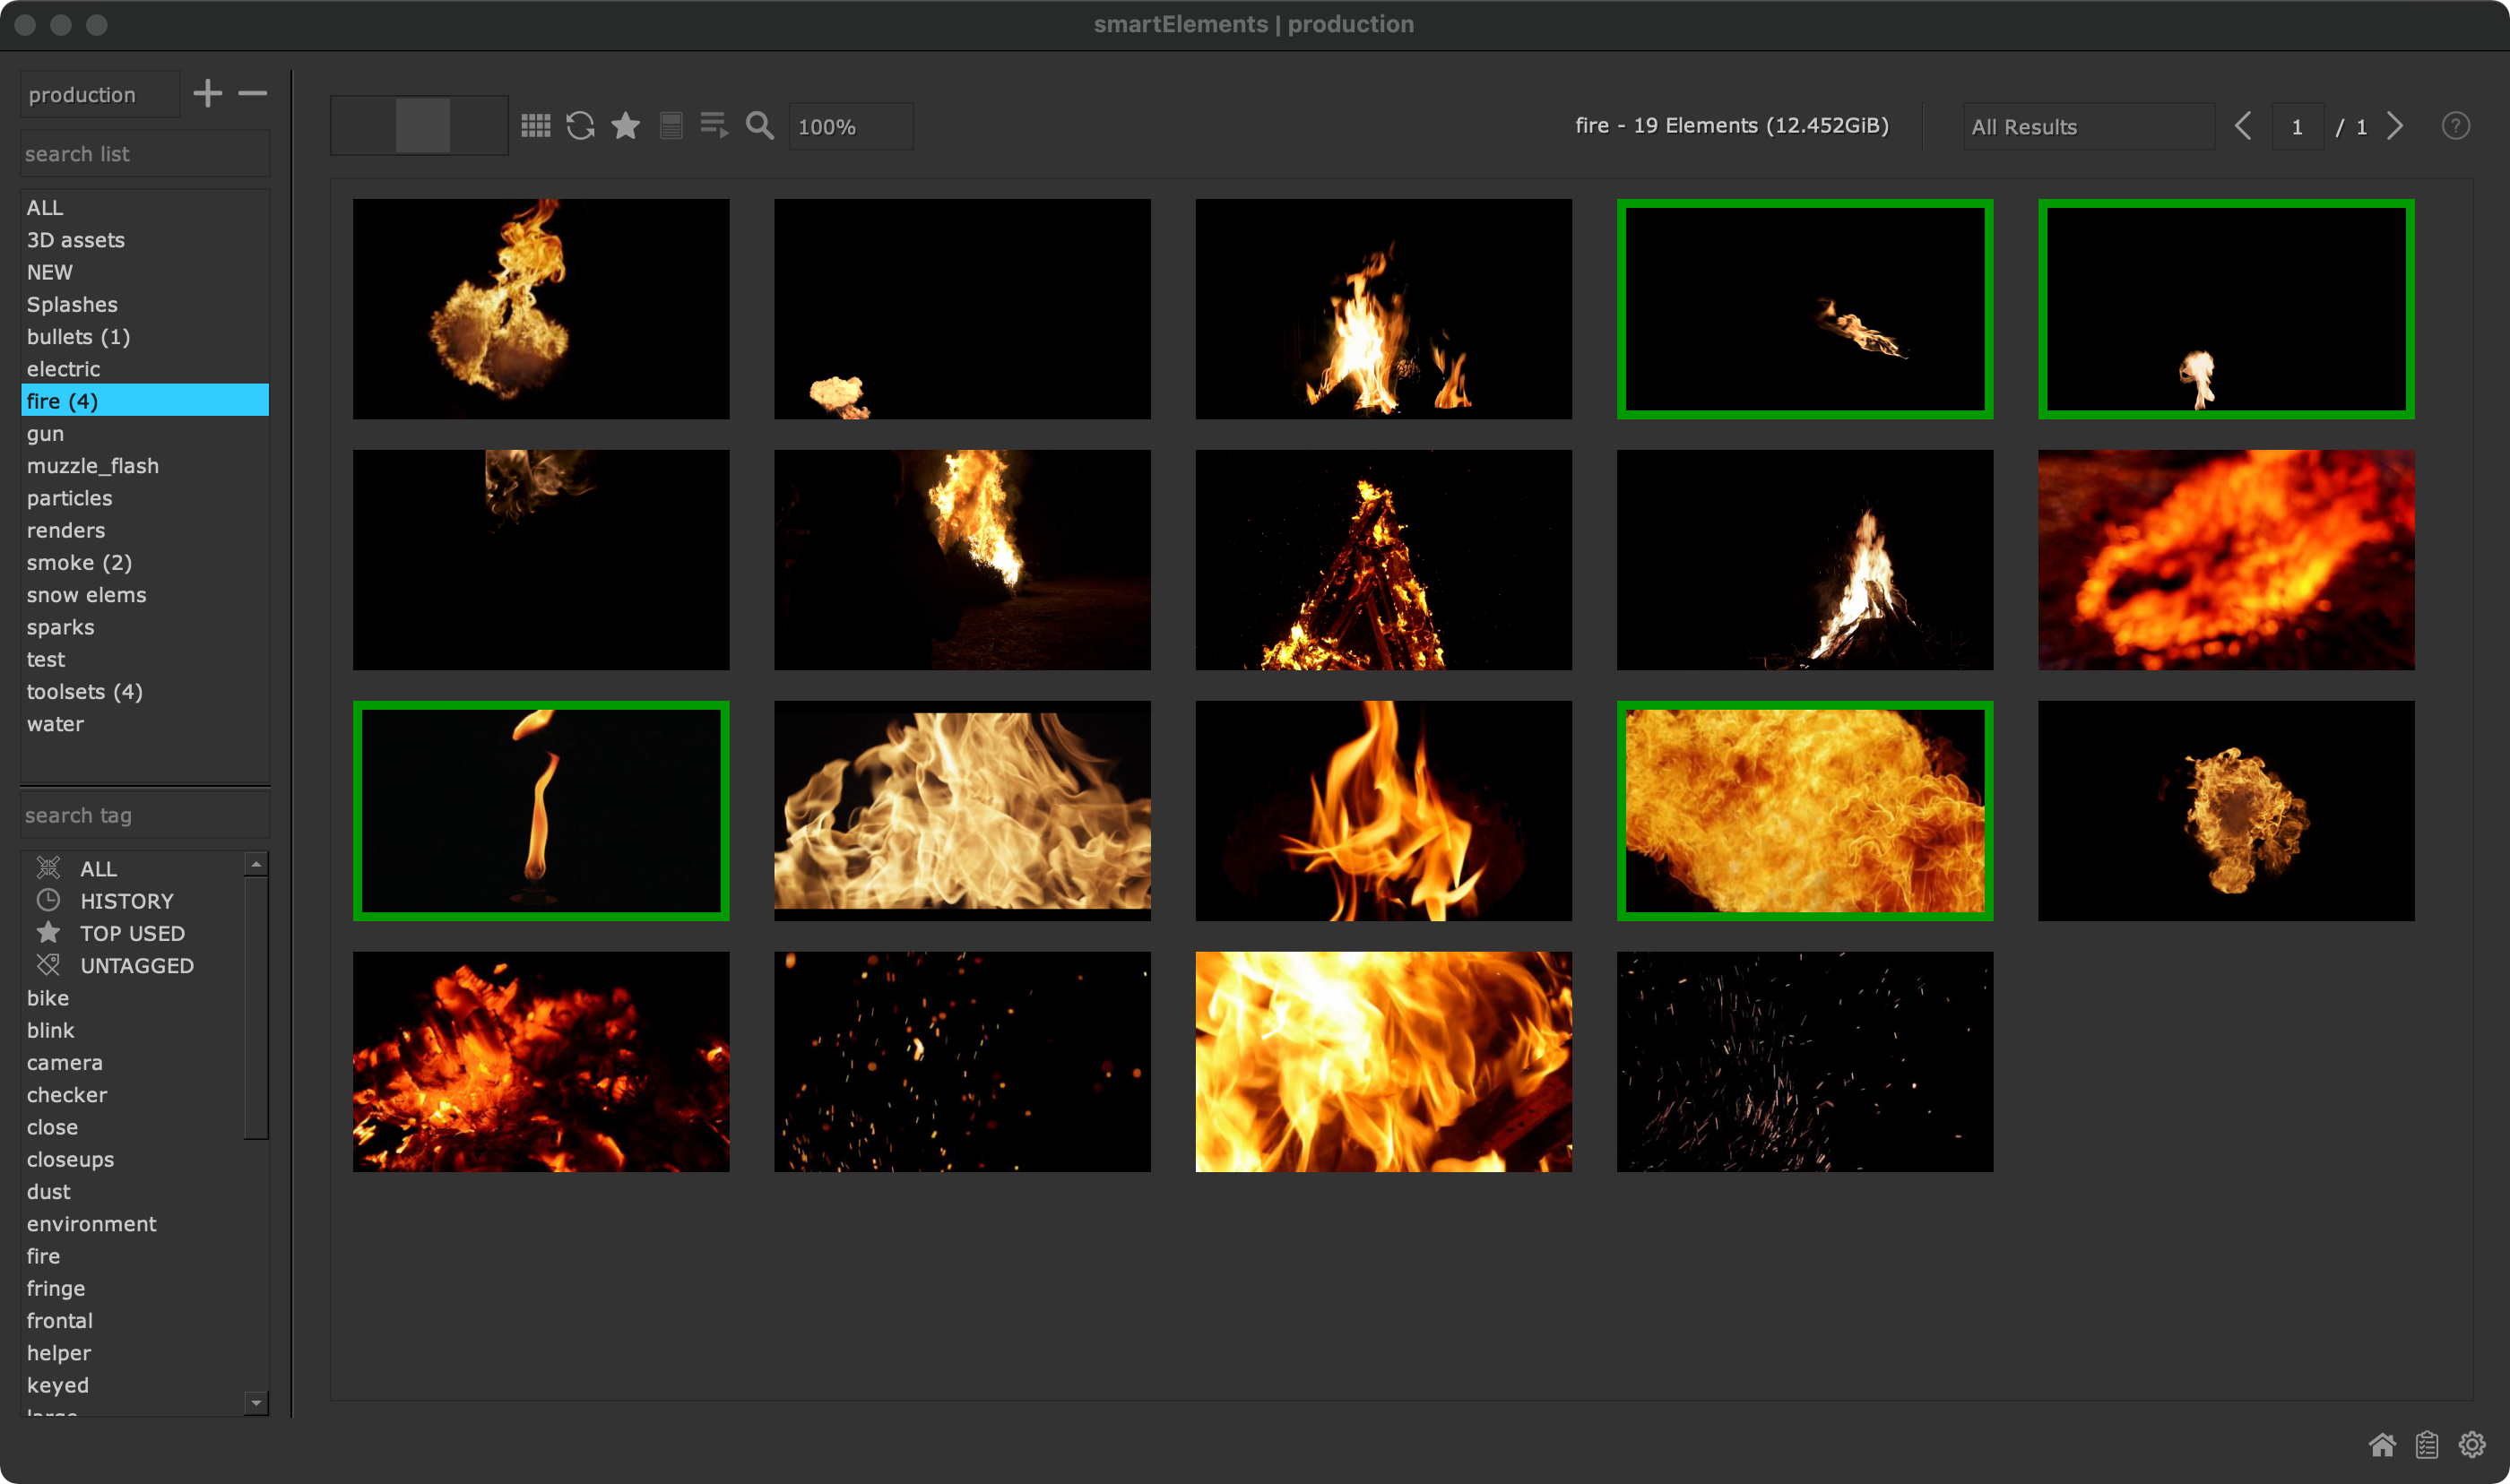
New elements are wrapped with a green border
To mark an element as seen (and thus to remove the green border) select one or multiple elements and choose ‘Mark as seen’ from the context menu (shortcut: M) :
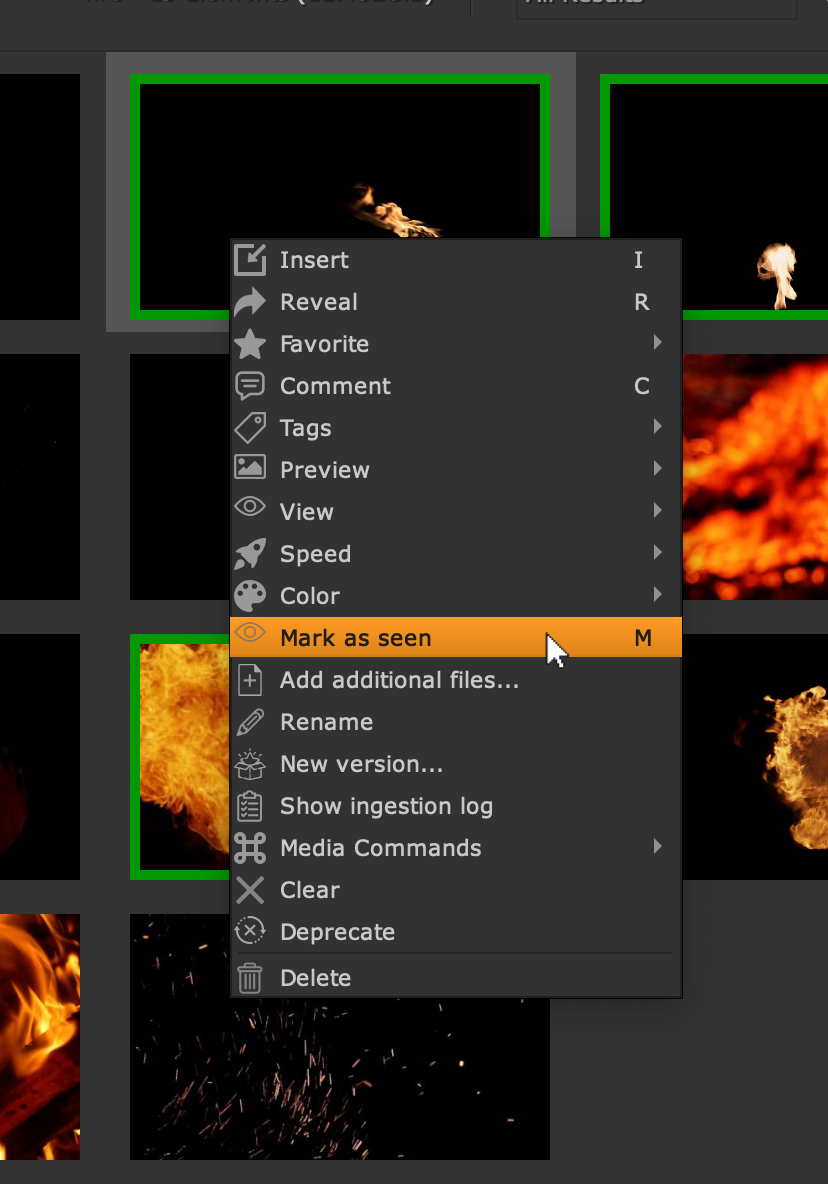
Mark all selected elements as seen
Right click any list in the list section and choose ‘Mark all as seen (all lists)’ to mark all elements in all lists as seen:
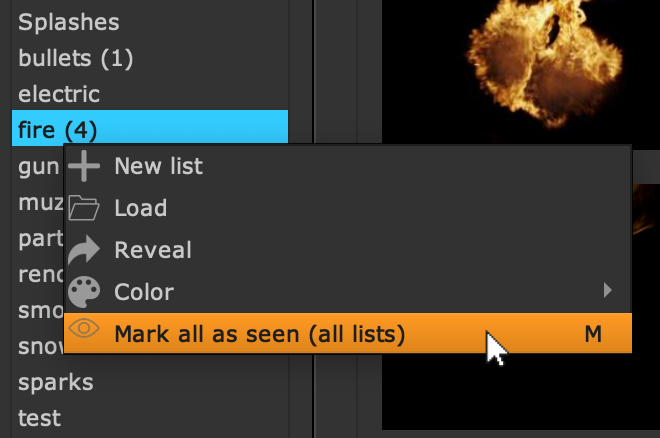
Mark all elements as seen
Version 2.23.0
Versionize elements
Right click any element and choose ‘New version…’ from the context menu to create a new version for the element. Any regular element insertion uses always the latest version; Use the version dropdown in the SideBar info panel to insert an explicit version. Element version paths stay consistent so nothing used gets offline.

Support .mxf video files
This update lets you now ingest .mxf files that are natively readable in Nuke.
Version 2.22.0
Colorize lists, tags and elements to quicker find items
Lists, tags and elements can now be tinted with a custom color to quicker find often used items. Right click any list from the elements list on the left, any tag from the tag list on the left or any element in the library and choose ‘Color -> set’ from the context menu to set a custom color. Choose ‘Color -> unset’ to remove the custom color.
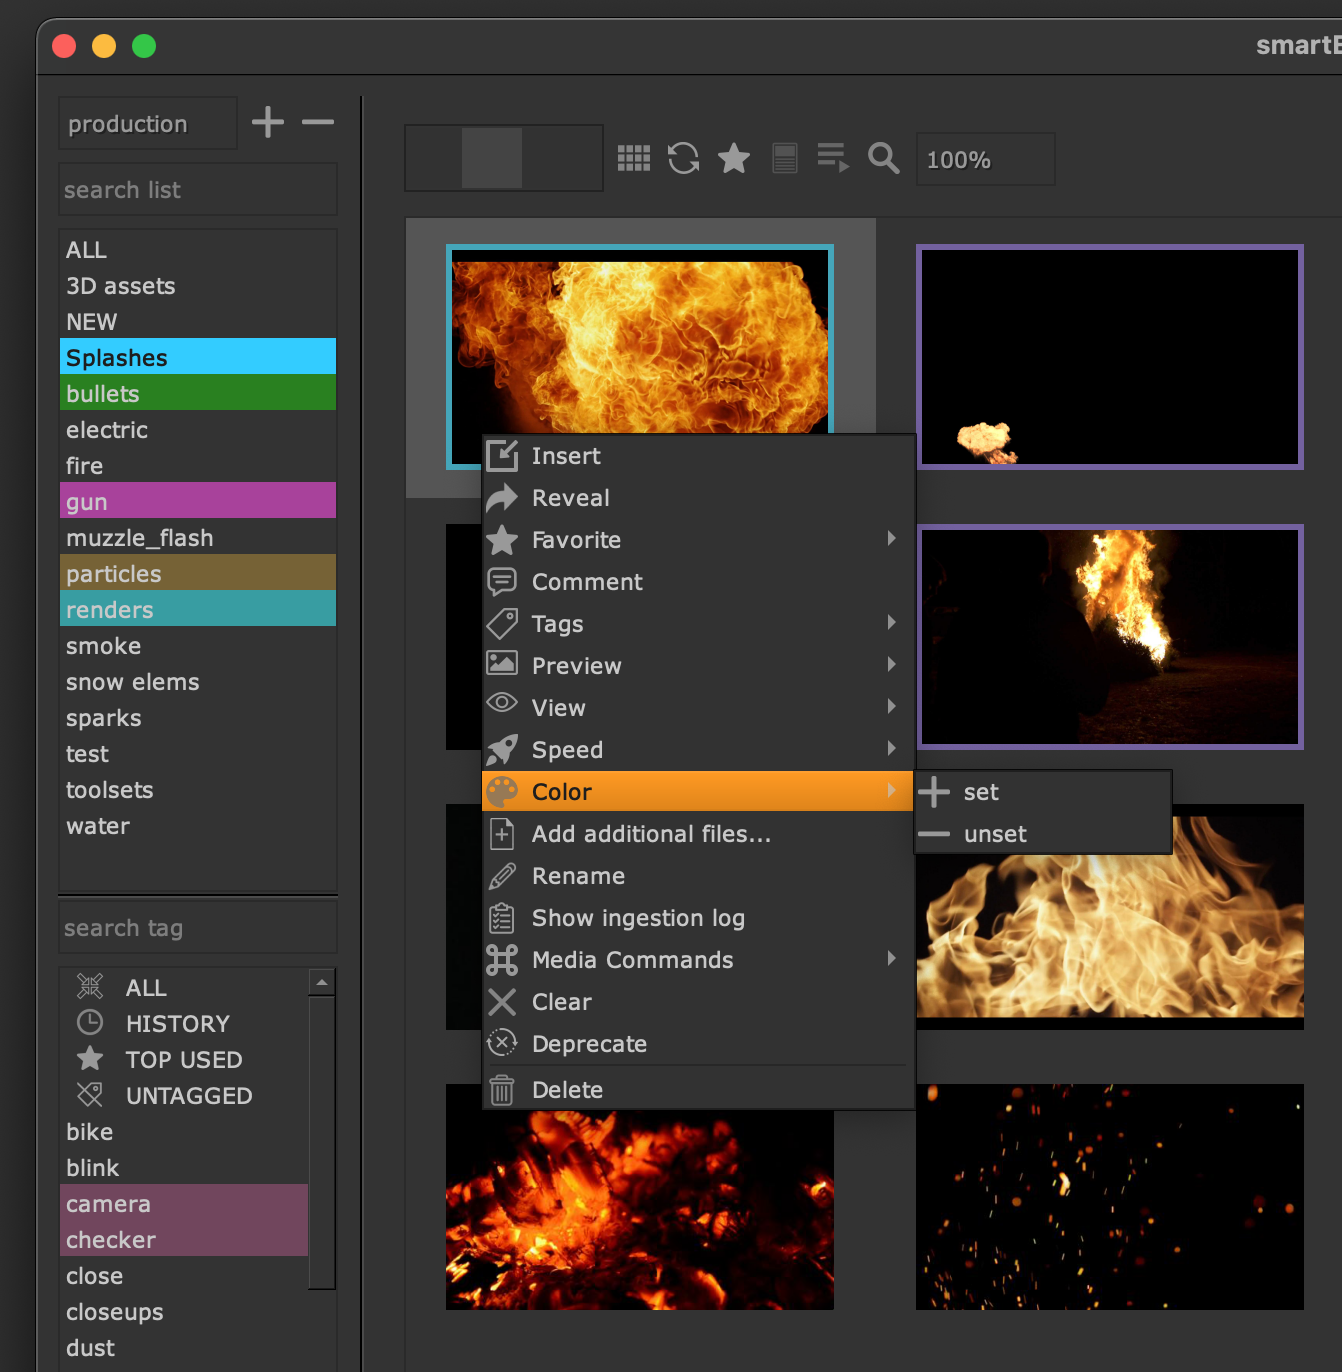
Custom colors get stored locally on a user basis so each user can set their own colors.
Add additional data to elements
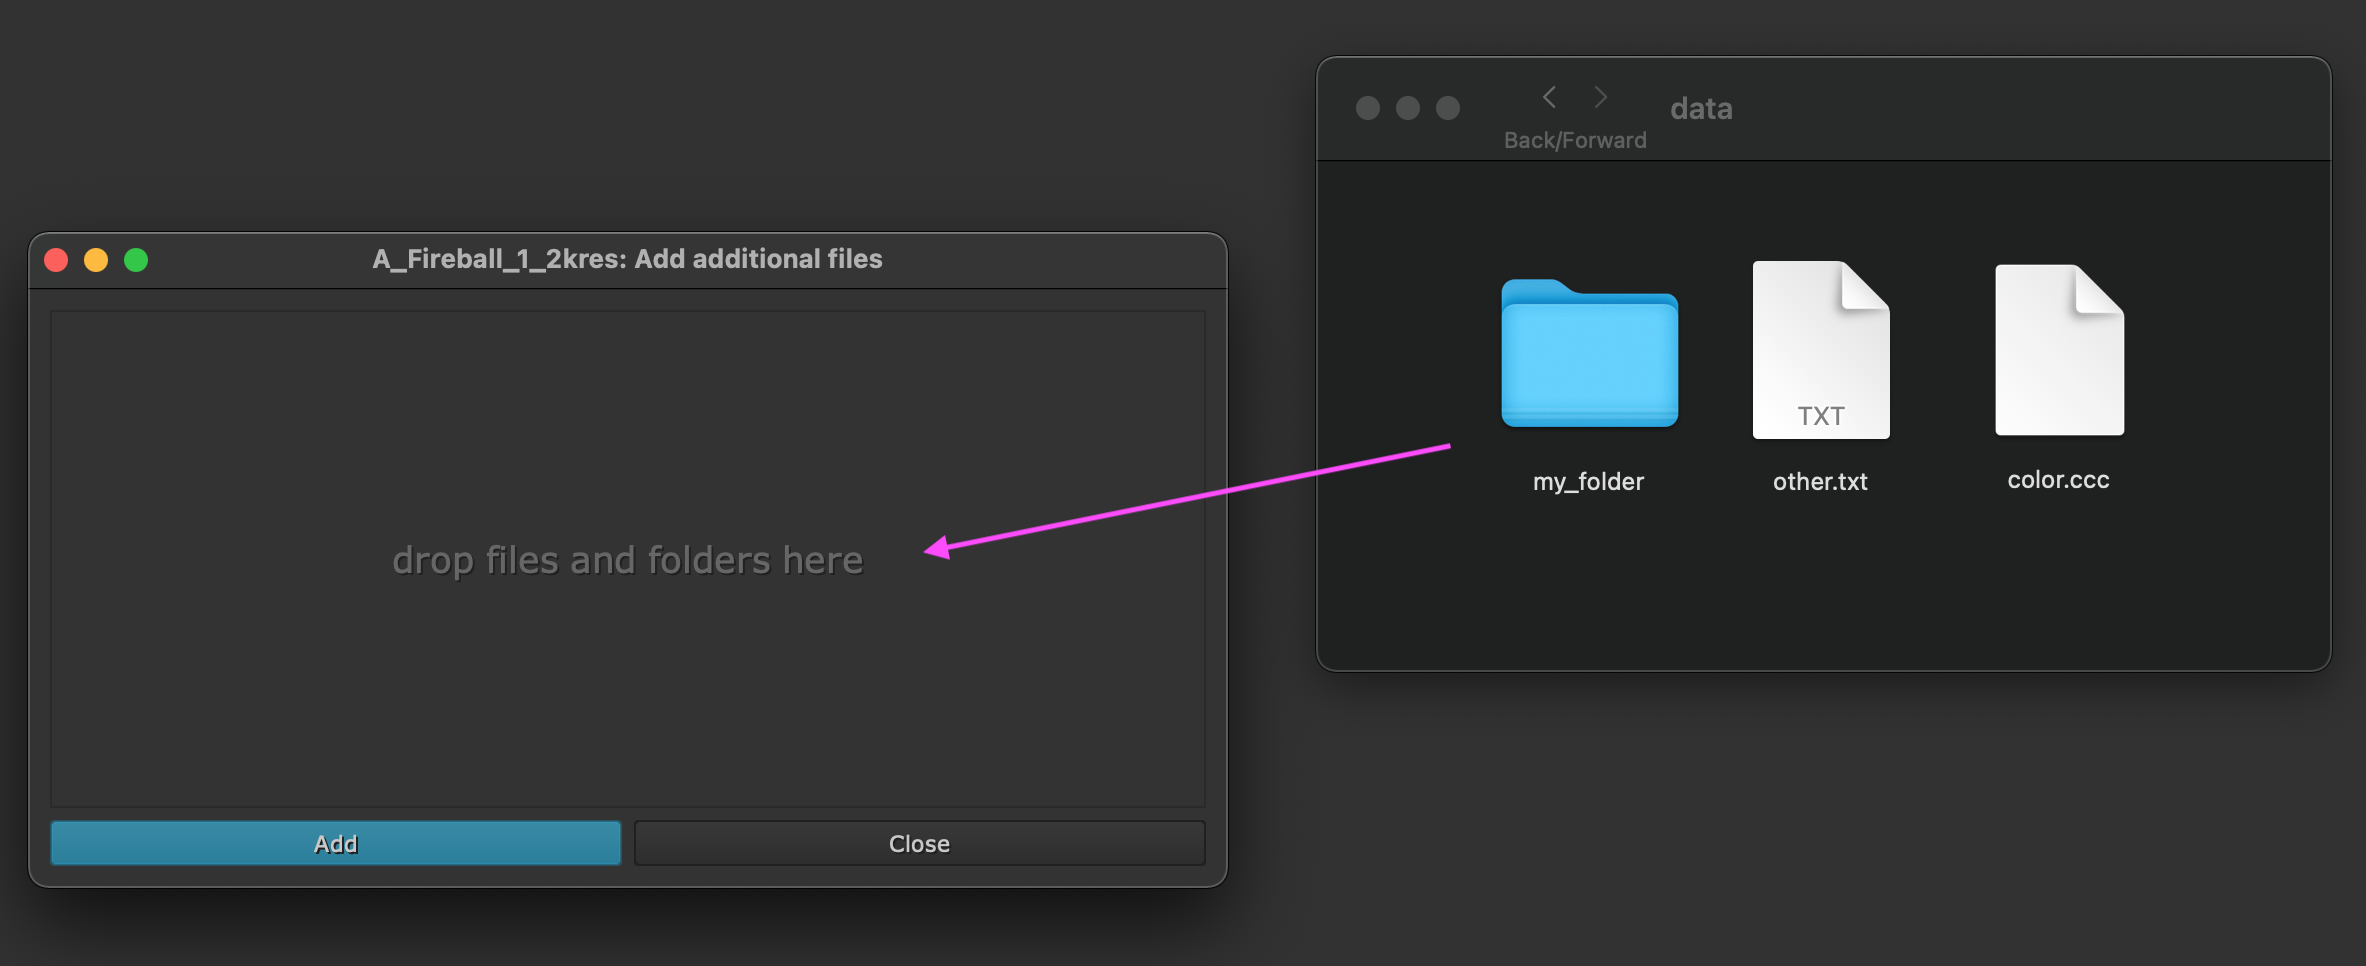
Sometimes it is desirable to store any additional data to an element, e.g. color file, license file, footage for toolsets, etc. This update lets you do that. Right click an element and choose ‘Add additional files’ from the context menu:
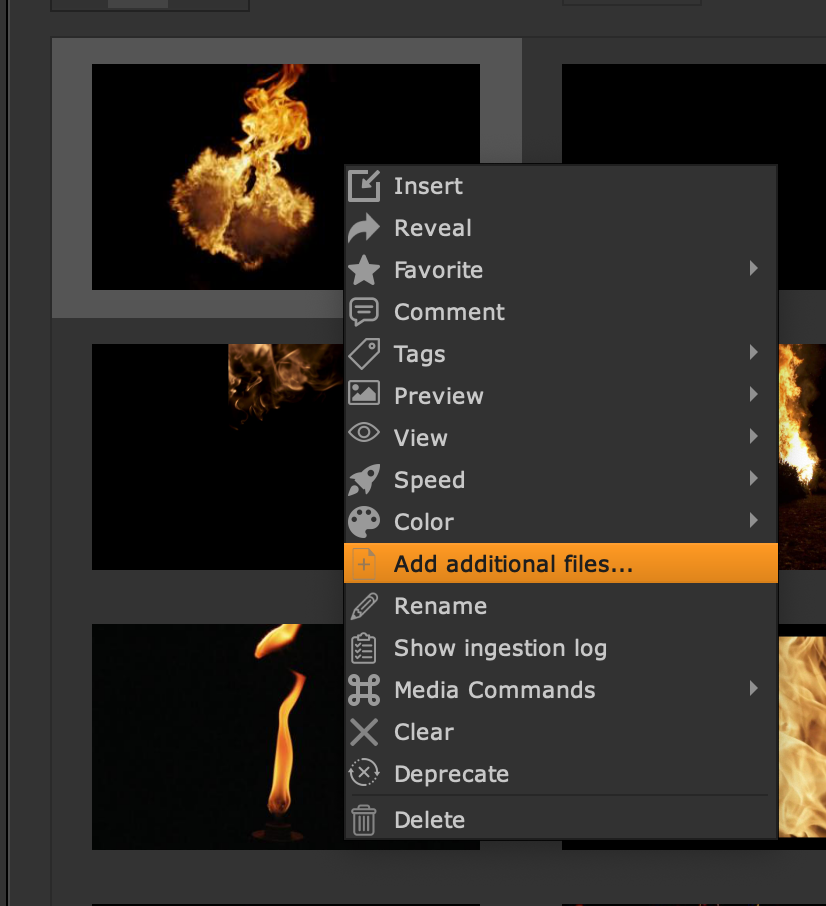
Drag and drop any files and folders into the upcoming window. Everything will be copied into the element directory.
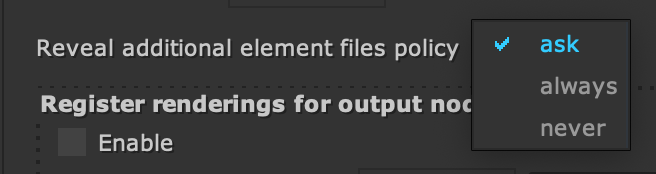
When bringing an element into your DAG that contains additional element files you will be asked if you would like to reveal the additional element files:
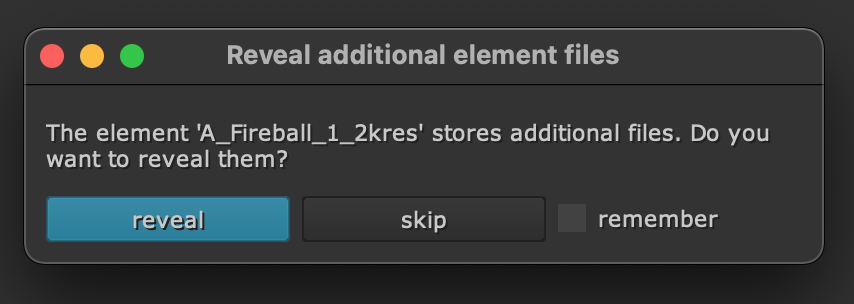
In smartElement’s settings you can change that policy from ‘ask’ to reveal to ‘always’ reveal or ‘never’ reveal:
Keep info window fully in screen
Hover over an element and hold the Alt key to get additional information about the element in the element info window. In previous versions the info window was moved under the current mouse cursor position, however when the library is located near the bottom of the screen then the info window was cut off. We removed moving the info window under the current mouse cursor position.
Version 2.21.0
Update to nuke-14
Version 2.20.0
Implement favorite sync to view favorites from other users
You can now view favorites from other users. To do that perform the following:
In smartElement’s settings enable the Favorite Sync option and set it to a root directory that other users can access as well.
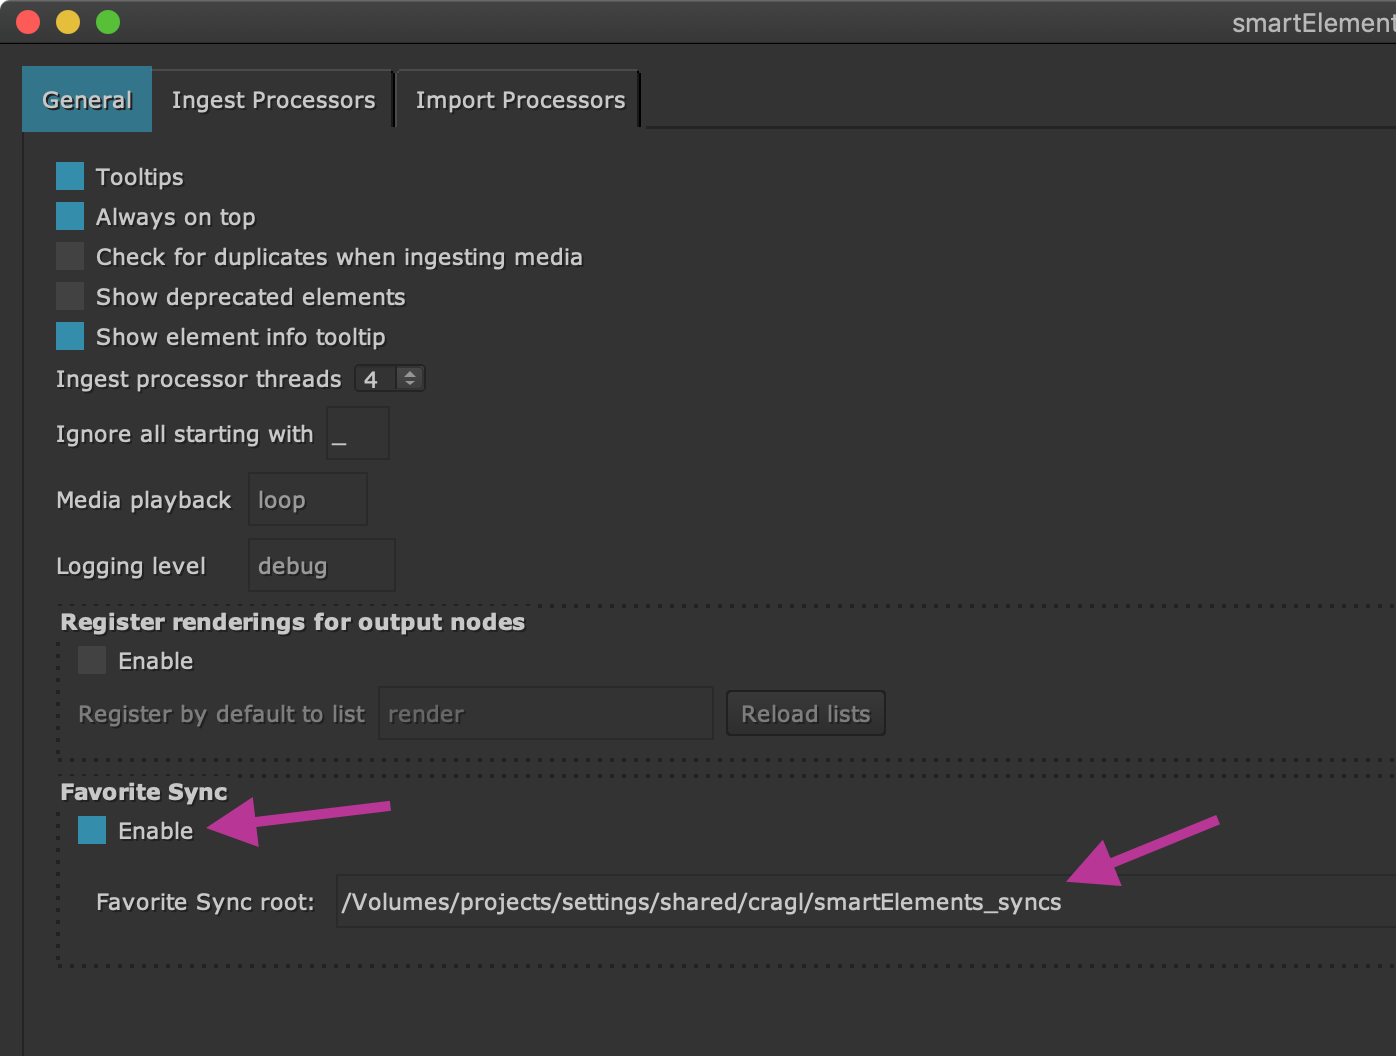
All other users need to enable Favorite Sync and point to the same directory, too.
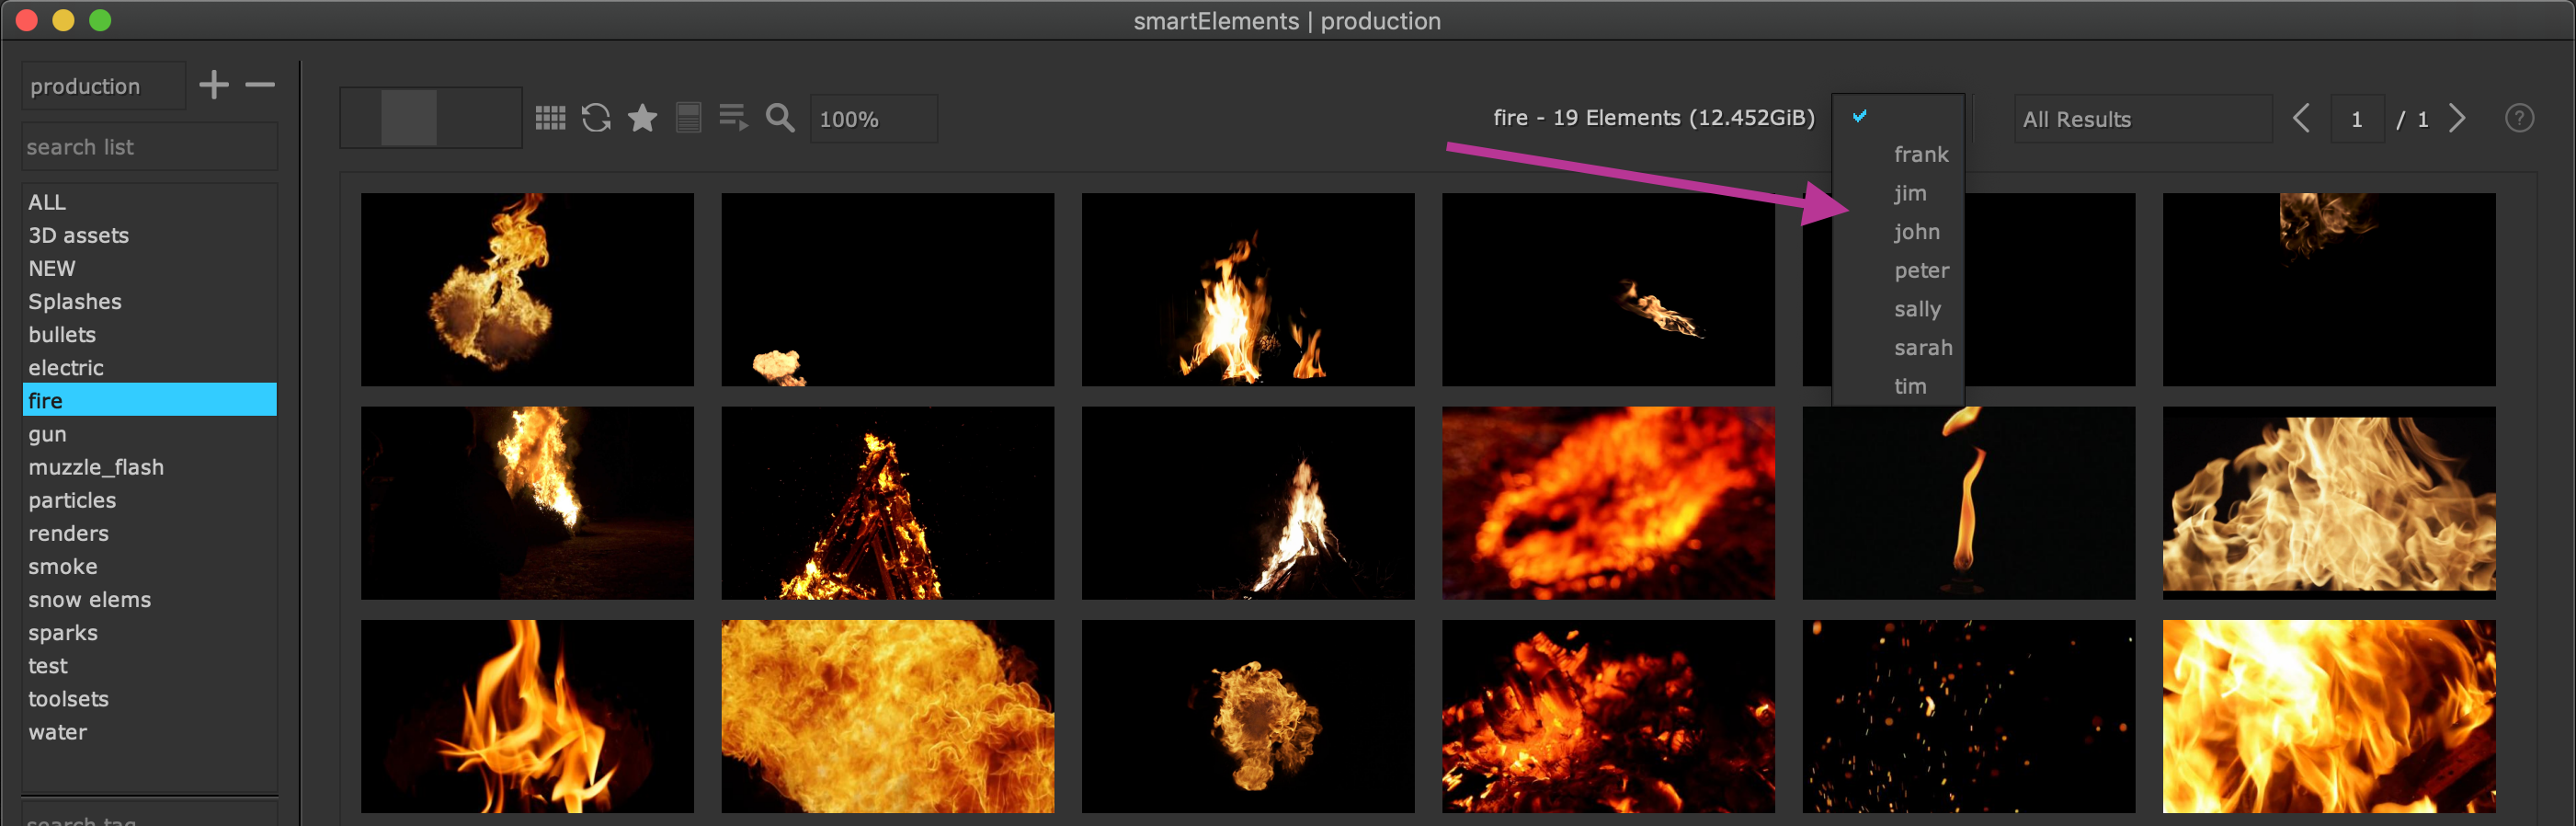
Enabling Favorite Sync will now expose a new dropdown menu as seen in the image below. Use it to switch to the favorites list of the other users so that you can view favorites from other users. Choose the empty entry at the top of the dropdown to change back to your own favorite list.
Note
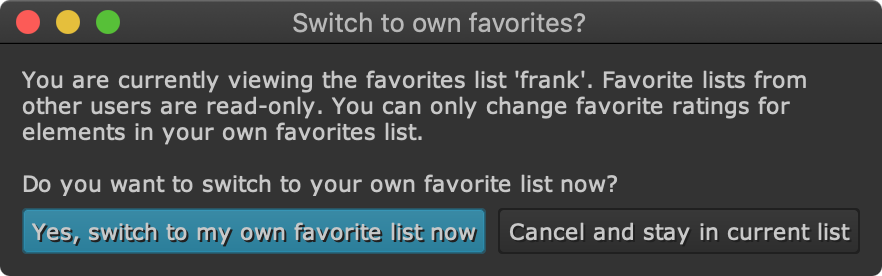
Favorite lists from other users are read-only. If you are currently viewing favorites from another user and then try to mark an element as favorite (pressing 1-5 on your keyboard or setting a favorite rate using the element’s right click menu) then you get notified about it:
Add ‘All’ list that shows all elements of a stack
The first list is now a special list called ALL This list contains all elements from all other lists of your current stack. With that you can view all elements of your current stack if you want to.

The ‘ALL’ list contains all elements of all lists of yor current stack.
Version 2.19.0
Add ‘jkl’ shortcuts to rewind, play/stop, forward for video widget
Hold ctrl/cmd and press j and l to rewind/play in sub steps. When bringing an element into node graph the speed mode gets applied to the node as well using a Retime node. The UI also gained a playback speed dropdown to adjust the current video playback speed. Note that this dropdown as well as the shortcuts are only available when setting the playback mode in smartElement’s settings to ‘loop’. When being in ‘scrub’ mode this won’t be applied.
Toggle flip flop mode for videos using shortcut ‘f’
Hover over a video and press f to toggle between normal viewing mode, flip, flop and flip-flop. When bringing an element into node graph the viewing mode gets applied to the node as well using a Mirror node.
Version 2.18.0
Implement media playlists
smartElements lets you collect any elements from any stack and any list into a playlist. This is useful to group elements from various locations into one spot. playlists can then be shared within your team. You can create as many playlists for you and your team as needed.
For more information about working with playlists please also have a look at the working with playlists section.
Version 2.17.0
Enhance overall performance and speed up ingesting elements
smartElements has gained an additional performance boost. Especially ingesting elements should now be a lot faster and smoother.
Ingestion live feedback: Add progressbar for ingesting jobs
When ingesting elements, you will now see a progress bar for each element that is currently ingested. This helps you getting a better sense of where the ingestion currently is and how long it will last:
Each ingestion contains now a progressbar directly below the element
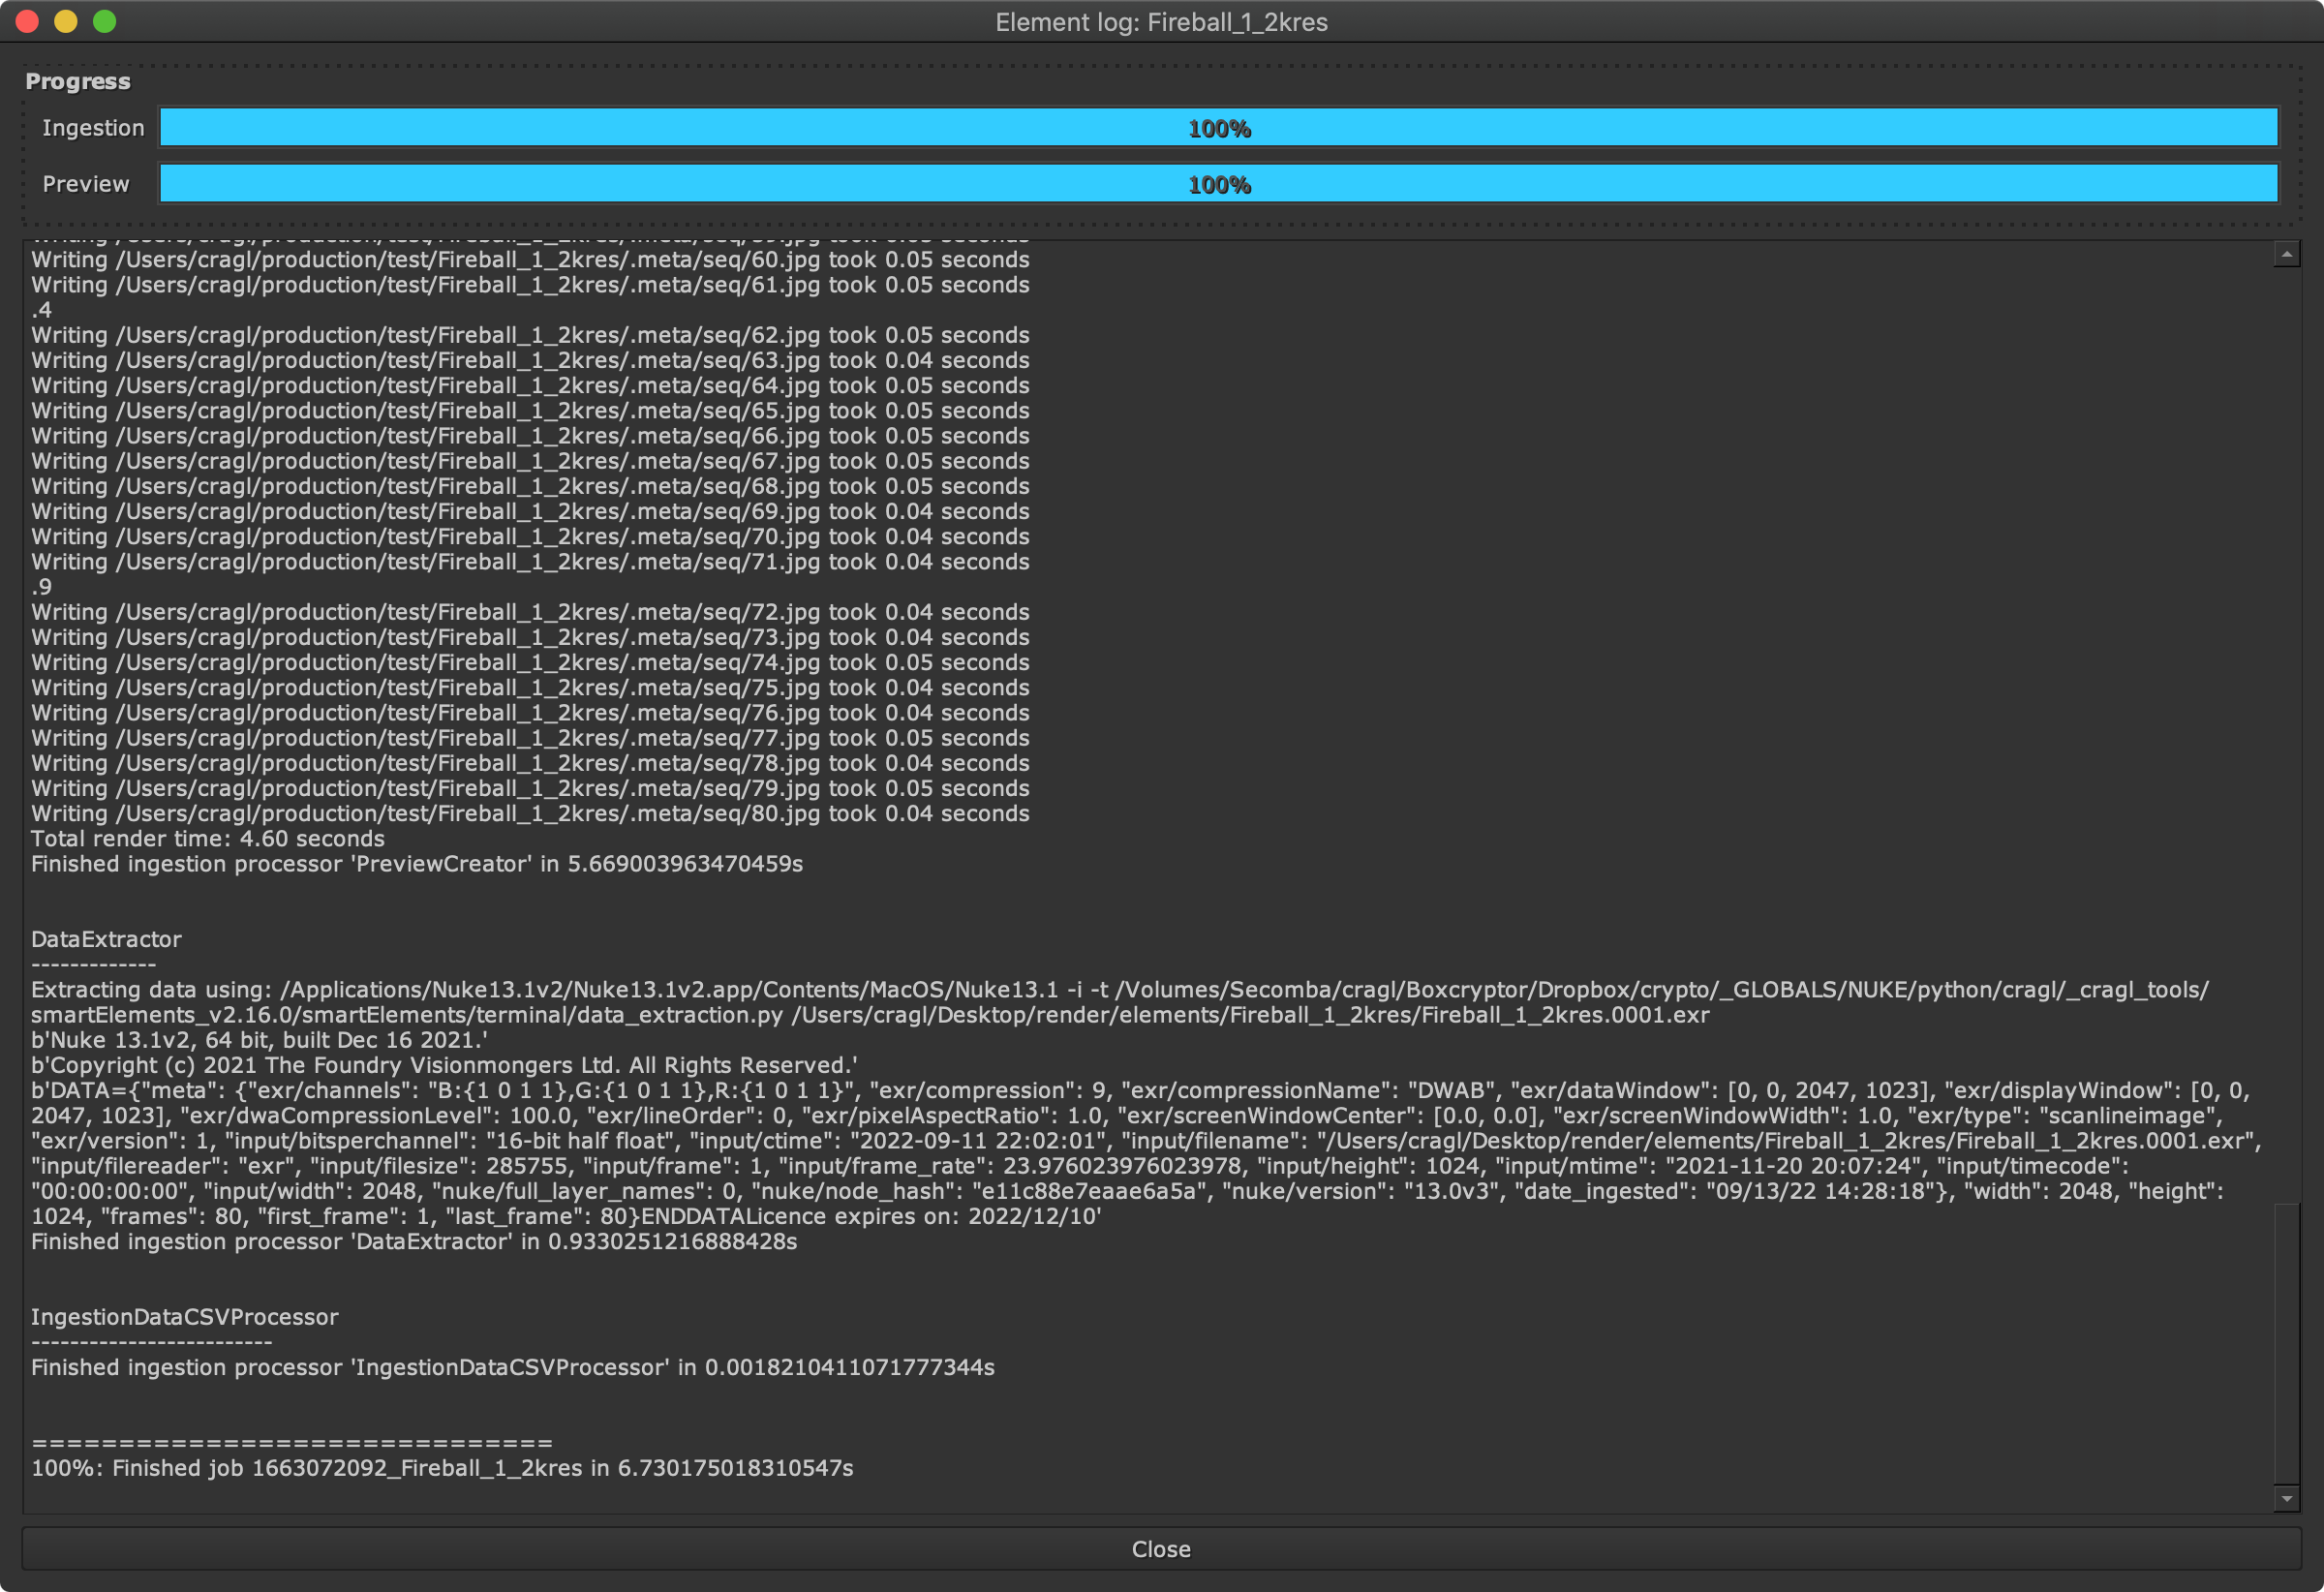
Ingestion live feedback: Add element live log
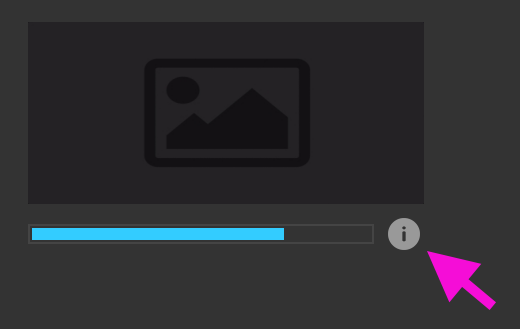
The ingesting log can now be viewed live. Besides the progress bar this gives you more transparency where an element is in its current ingestion stage. When an element is ingesting, click the info button next to the progress bar:
Click the element log button to get a live feedback for the ingestion.
The element log gives you information about all ingestion stages:
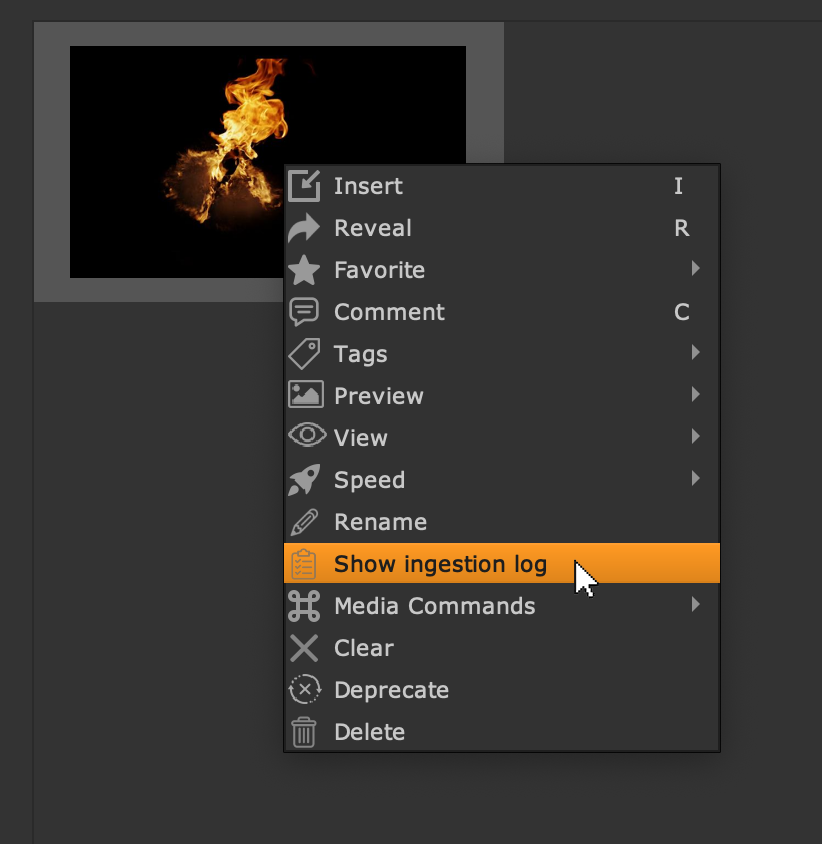
Show element log context via right click menu
Right click an element and choose ‘Show ingestion log’ from the context menu to show the ingestion log of that selected element:
Show element info as tooltip
You can now enable element info as tooltip. Whenever you hover over an element, important information for the current element will be displayed immediately:

The element info tooltip shows you all important element information.
By default, this new feature is turned on. You can however also unset it in the settings. For that uncheck the ‘Show element info tooltip’ in the ‘General’ settings tab:
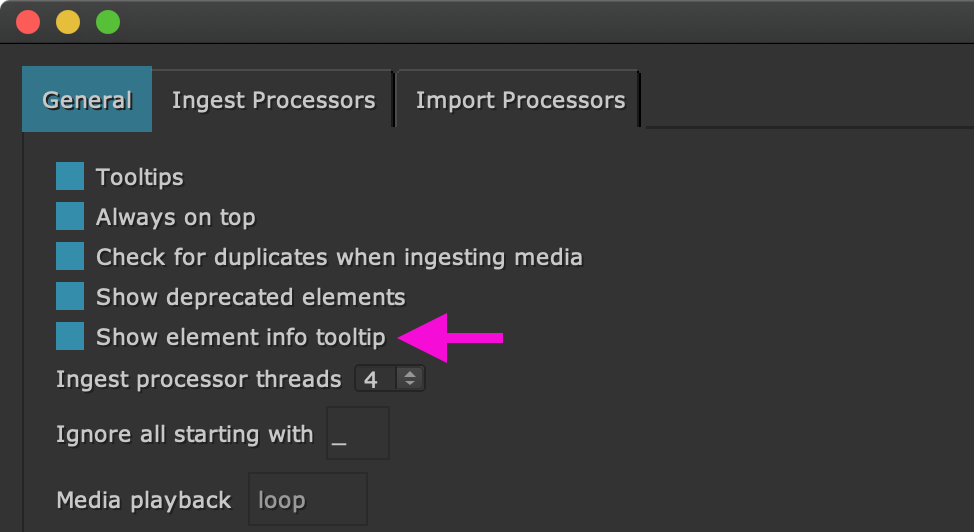
This checkbox lets you turn element info as tooltip on and off.
The element information is available for gallery view and filmstrip view. For list view it does not make too much sense to show it as this view itself contains already all these information, so we decided to make it available only for gallery and filmstrip view.
Show current stack in window title
The window title shows now the currently used stack.
Lock selected stacks via environment variable
You can lock particular stacks from modification while keeping others
modifiable. This is for example useful if a supervisor wants to provide an
element stack for their artists as read-only stack that can be used by all
artists but cannot be modified by them.
In order to lock a stack, its absolute path must be added to the environment
variable CRAGL_SMARTELEMENTS_LOCKED_STACKS. Concatenate multiple paths
with the operating system’s path separator, i.e. colon for Linux and
MacOS and semicolon for Windows. For more information on this environment
variable please also refer to our
environment variables
section.
When a stack is locked for the user, it gets also marked in the window title like this:

The window title indicates that the currently selected stack is locked from modifications.
Version 2.16.0
Add sidebar info panel on the right
We have added a sidebar info panel to smartElements. It is available in all three viewing modes (gallery, list, filmstrip):
Clicking the sidebar info button on the top left launches the sidebar info panel on the right:
This widget gives you more information about the currently selected element and lets you trigger certain actions like inserting it into your DAG, setting favorite rate, exploring in explorer, adding tags and comments, etc. You can also use the shortcut Ctrl + -> to show the sidebar and ctrl + <- to hide it.
Add documentation button
A documentation button was added to the top right of the smartElement’s main window. Clicking it browses to smartElement’s online documentation.
Other
Fix: Metadata is not correctly ingested when ingesting elements under Nuke-13
Version 2.15.0
Add functionality to mark elements as deprecated
This update adds functionality to mark selected elements as deprecated. With that you can better inform your team not to use certain elements anymore. Deprecated elements can even be forced to hide from the user. Read the deprecating elements section to get more information about how to deprecate elements.
Version 2.14.0
Ingest from .txt file
Drop a .txt file containing one media path per line and smartElements will ingest all these stated media elements into the currently selected list. For each path you can use any frame available, smartElements will handle the sequence detection automatically. This feature lets you gather several elements from various locations so that you can then ingest all of them in one go.
Other
Fix: Filmstrip view does not display the last element (#78)
Version 2.13.0
Implement filmstrip viewing mode
smartElements offers a thumbnail view and a list view to view elements. Now, it gained another view - the filmstrip view. This view contains thumbnails in a horizontal layout and a large video player. This view helps you to quicker watch all elements in a larger format and in more detail. Use your arrow keys to cycle through all elements. As with the previous update, the filmstrip view also contains a fullscreen playback. Simply select an element and press your spacebar to enter fullscreen mode. Use your arrow keys to navigate in fullscreen mode and press spacebar again to leave fullscreen mode.
The video player automatically resizes on window resize. Additionally, you can view any video flipped, flopped, flip-flopped and change the playback speed to better as needed. When bringing the element into your nodegraph this data gets transferred into Nuke as well using Nuke internal Mirror and Retime nodes.
Filmstrip viewing mode
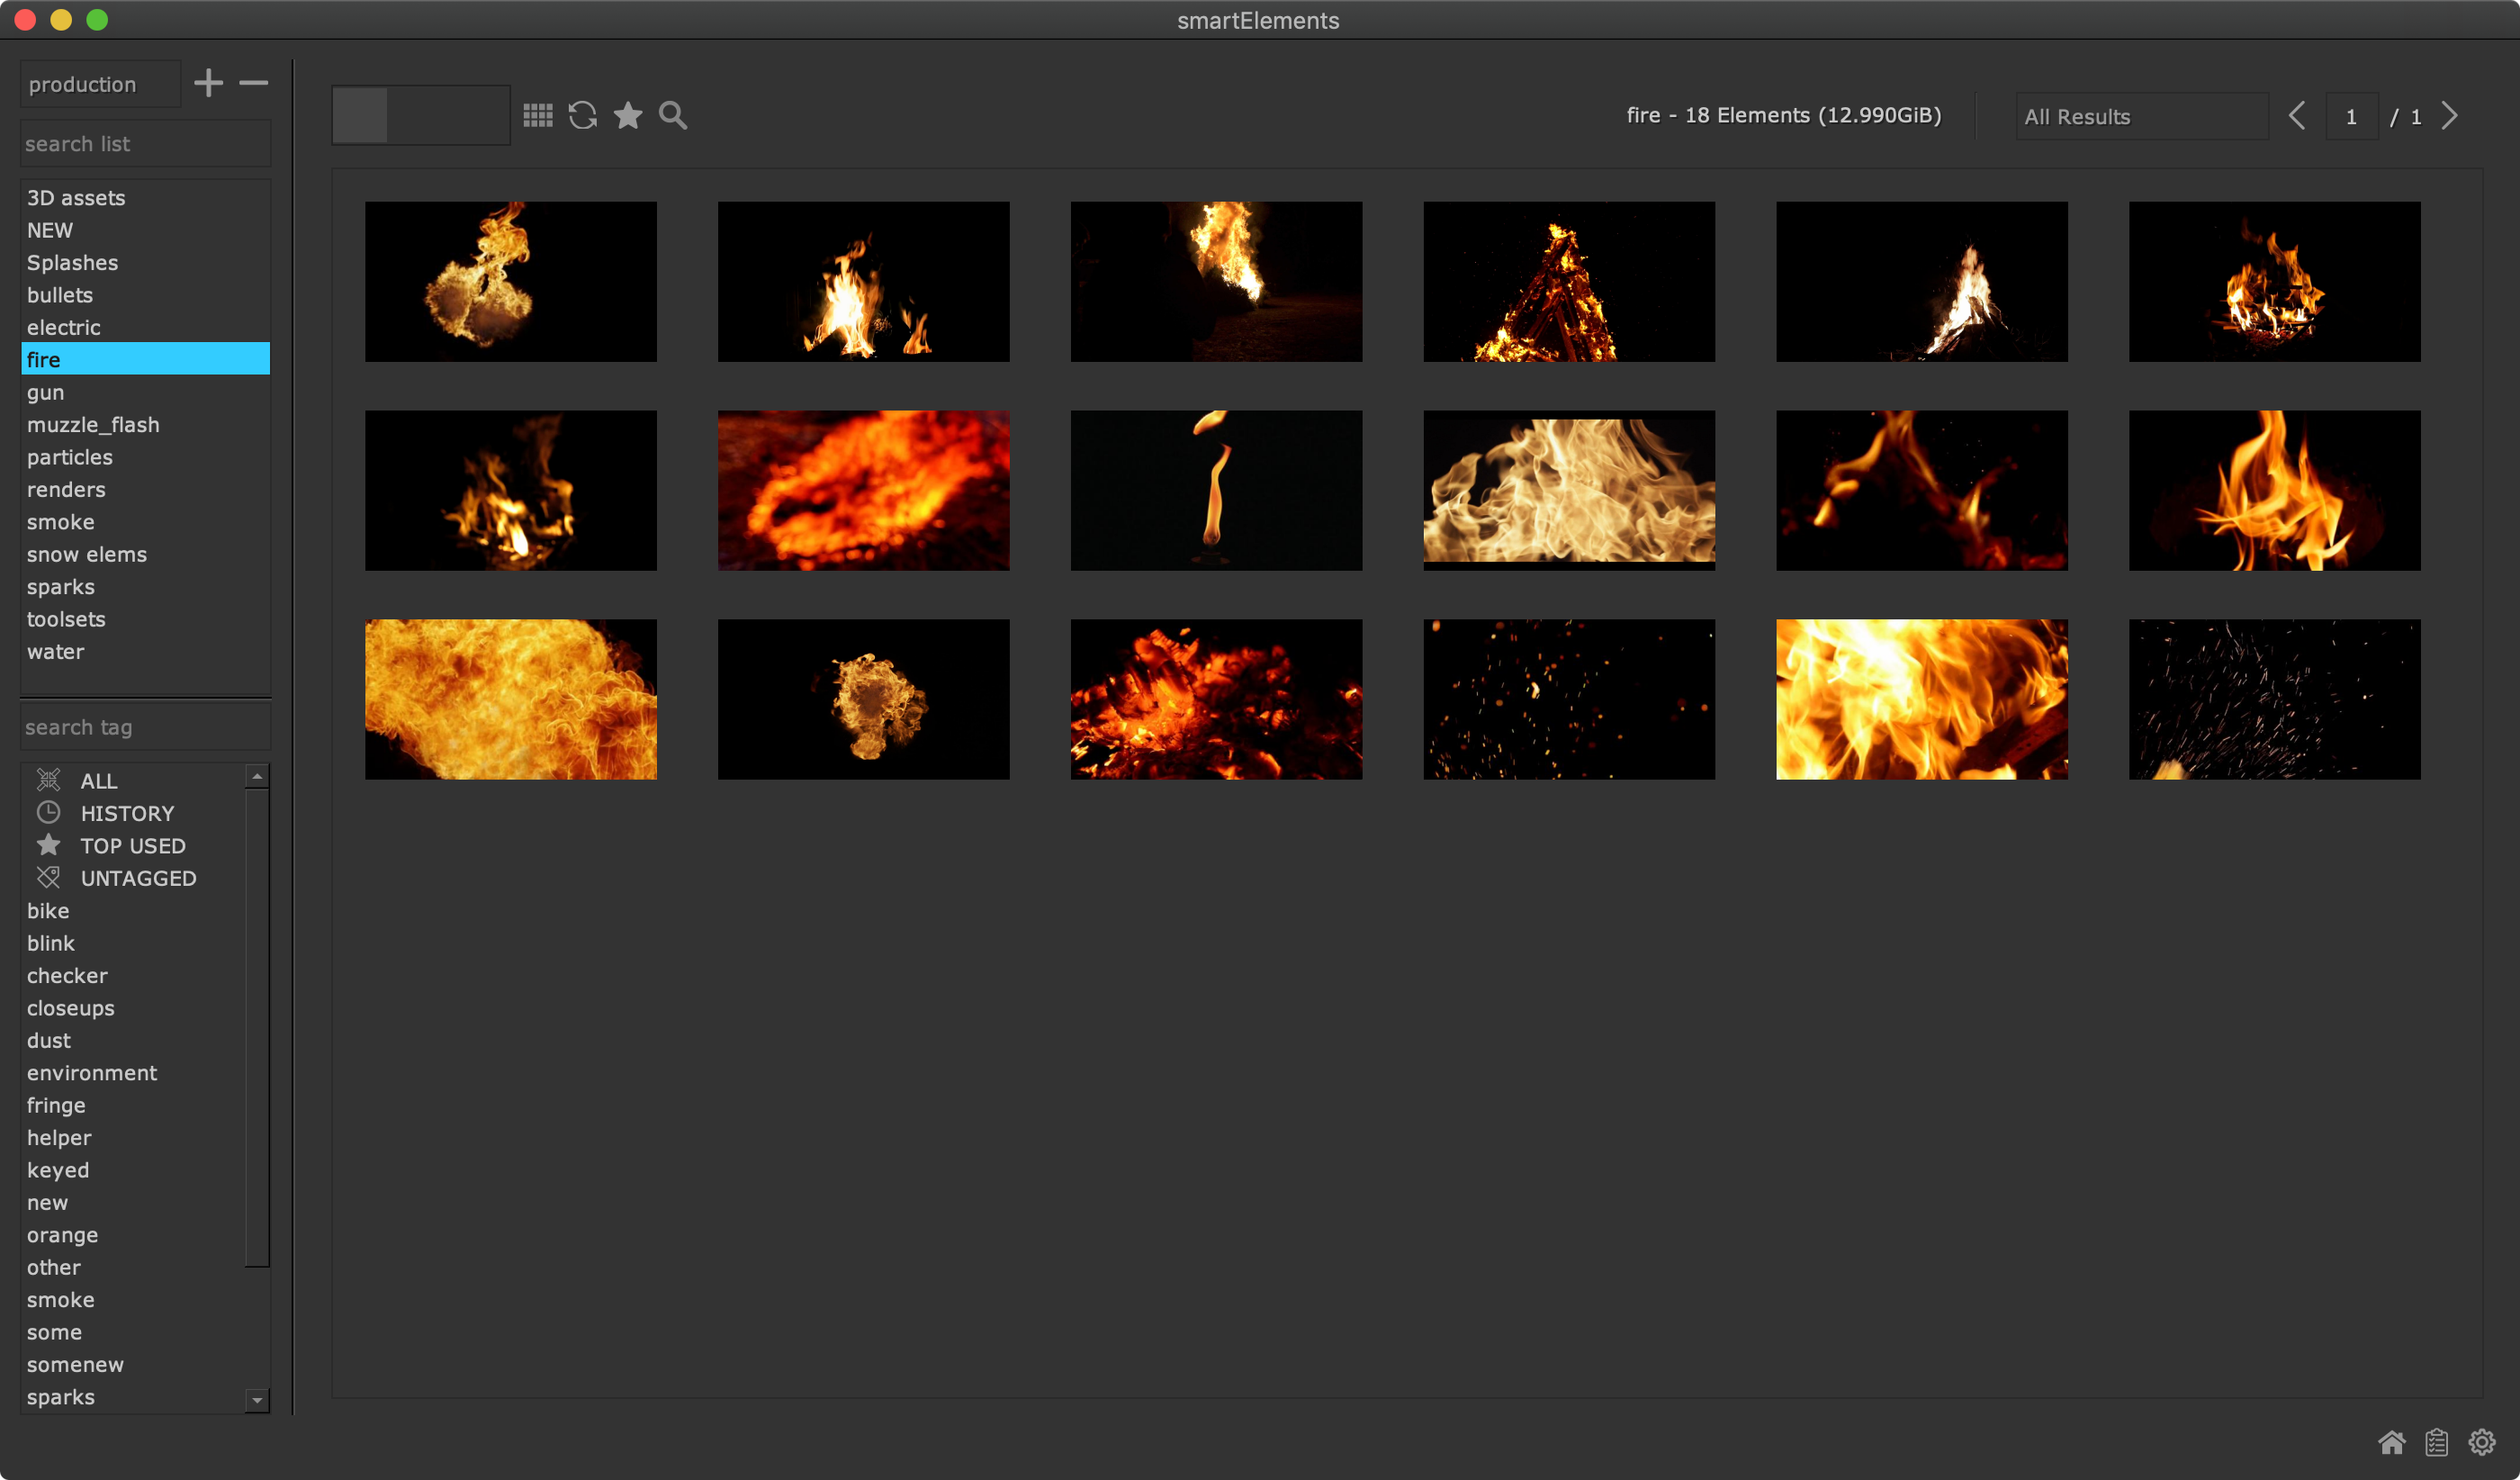
Thumbnail viewing mode
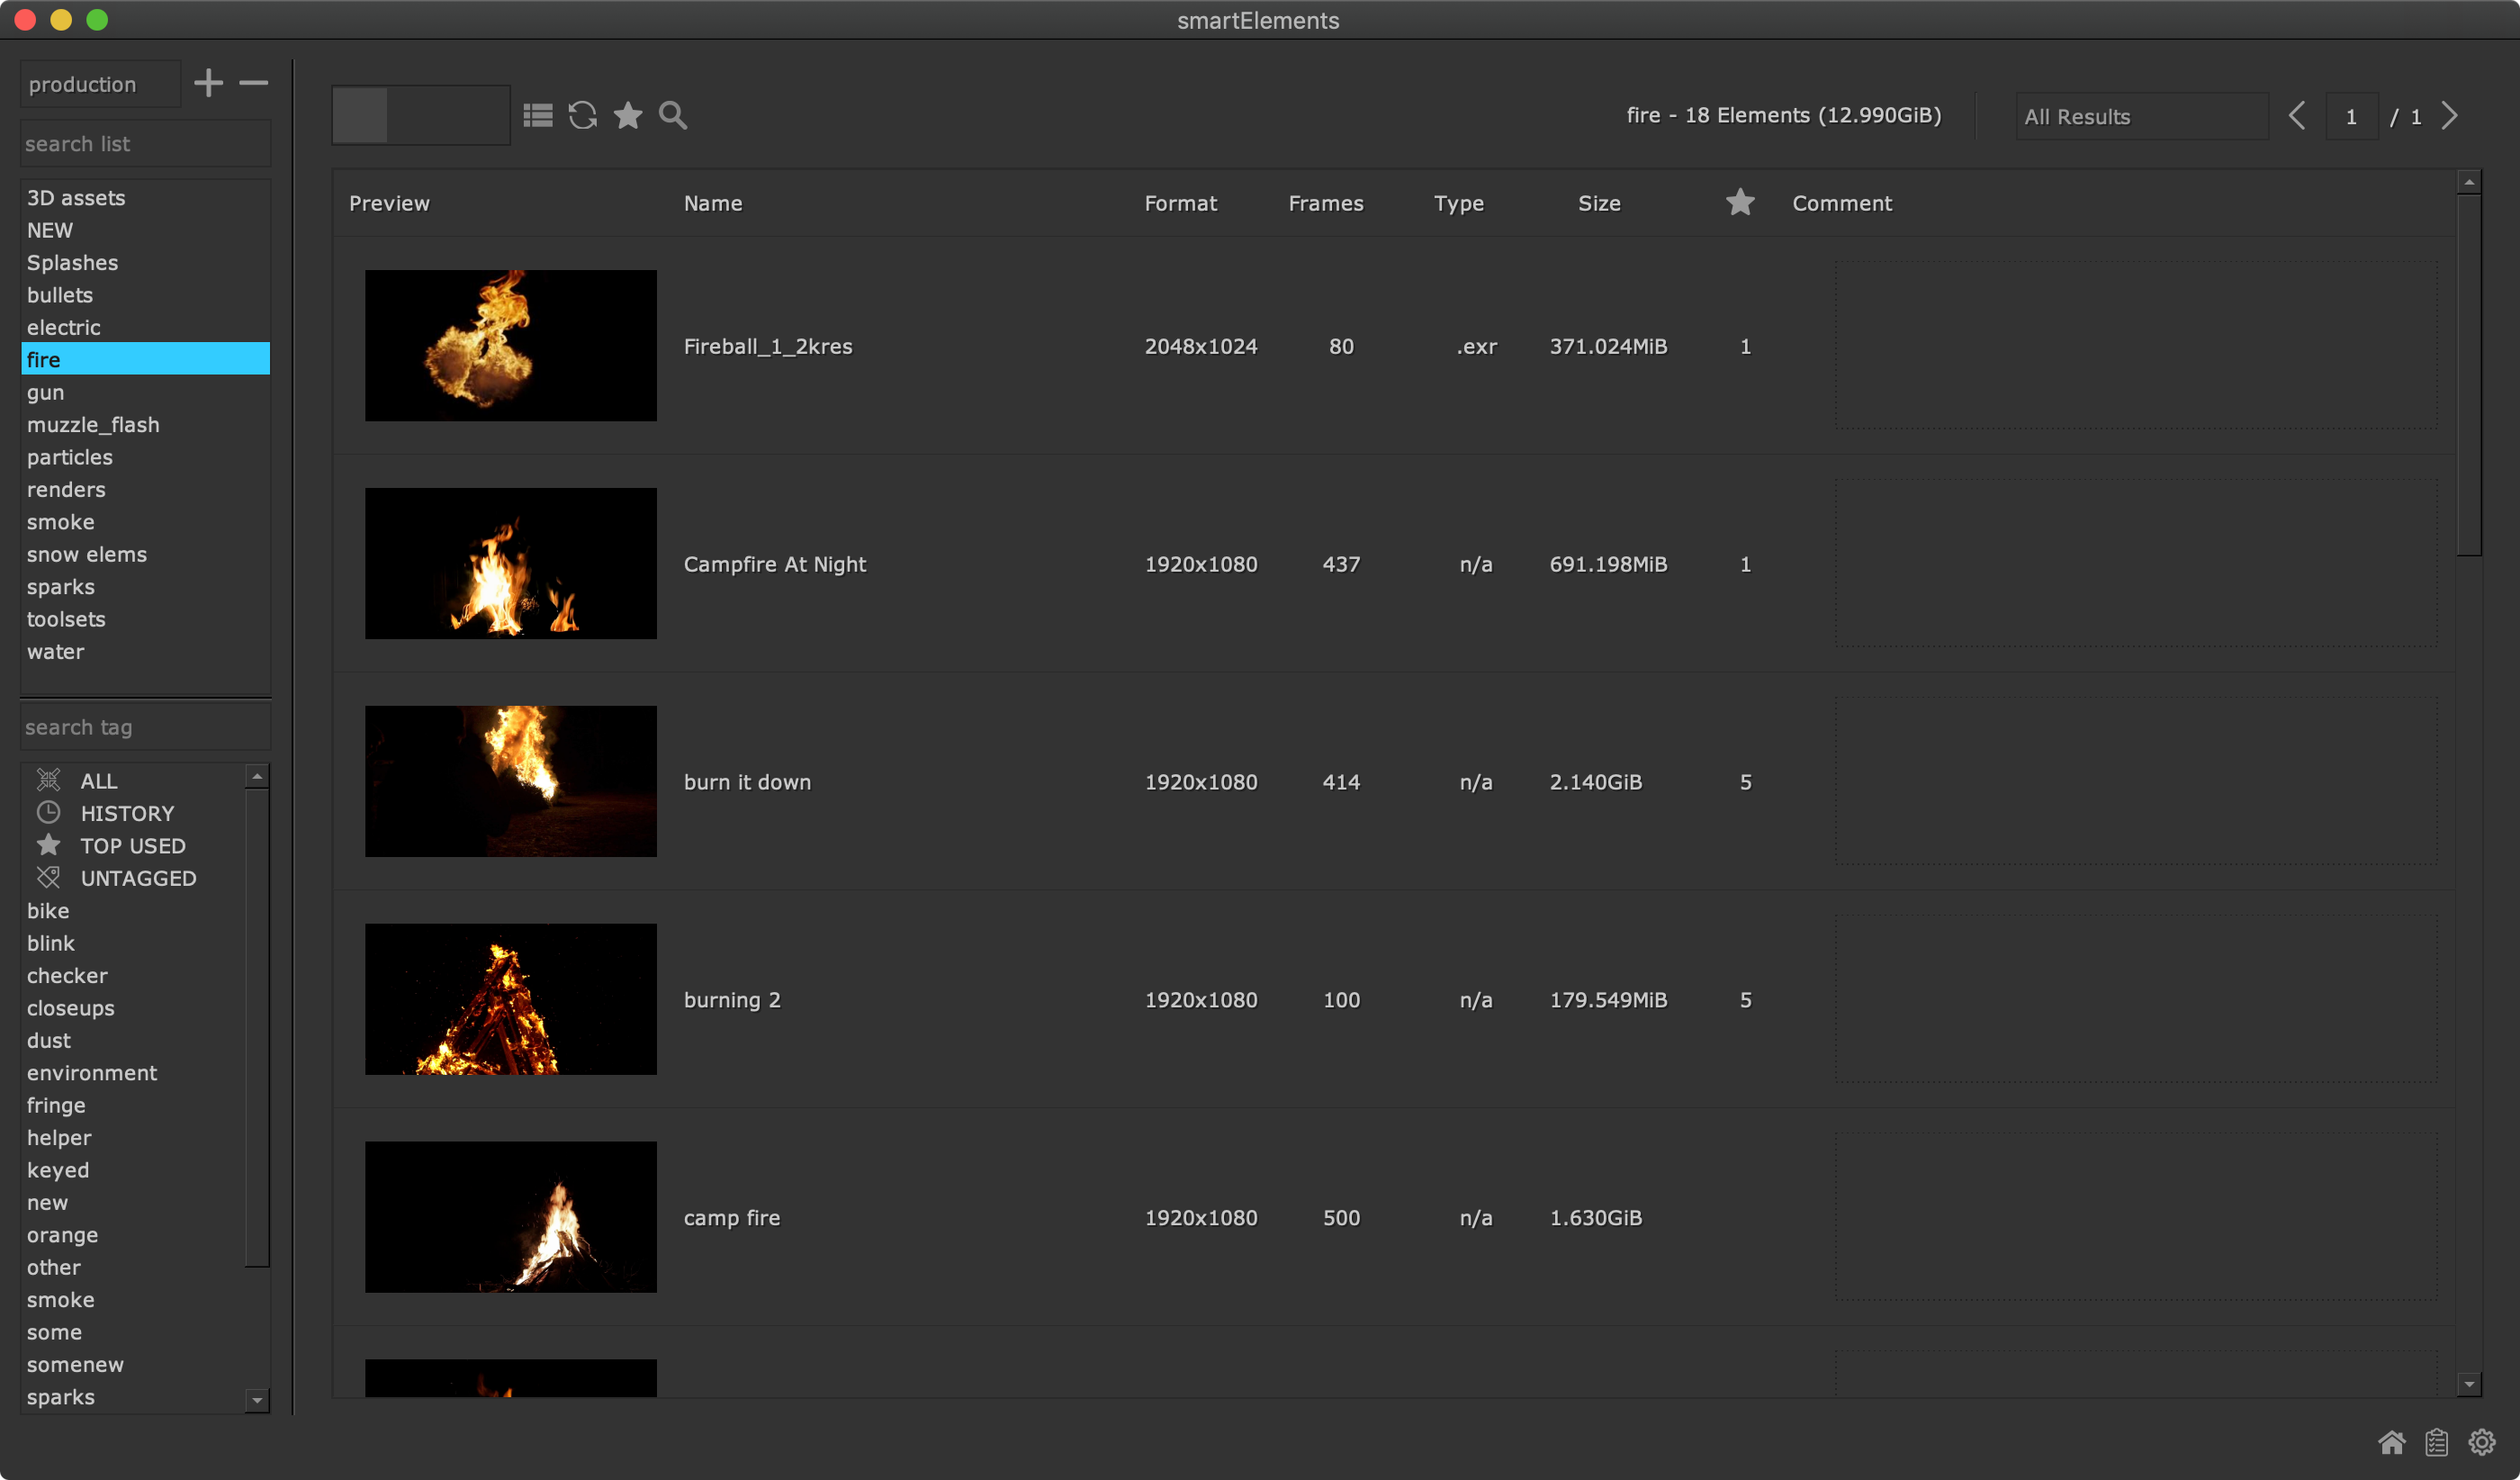
List viewing mode
Version 2.12.0
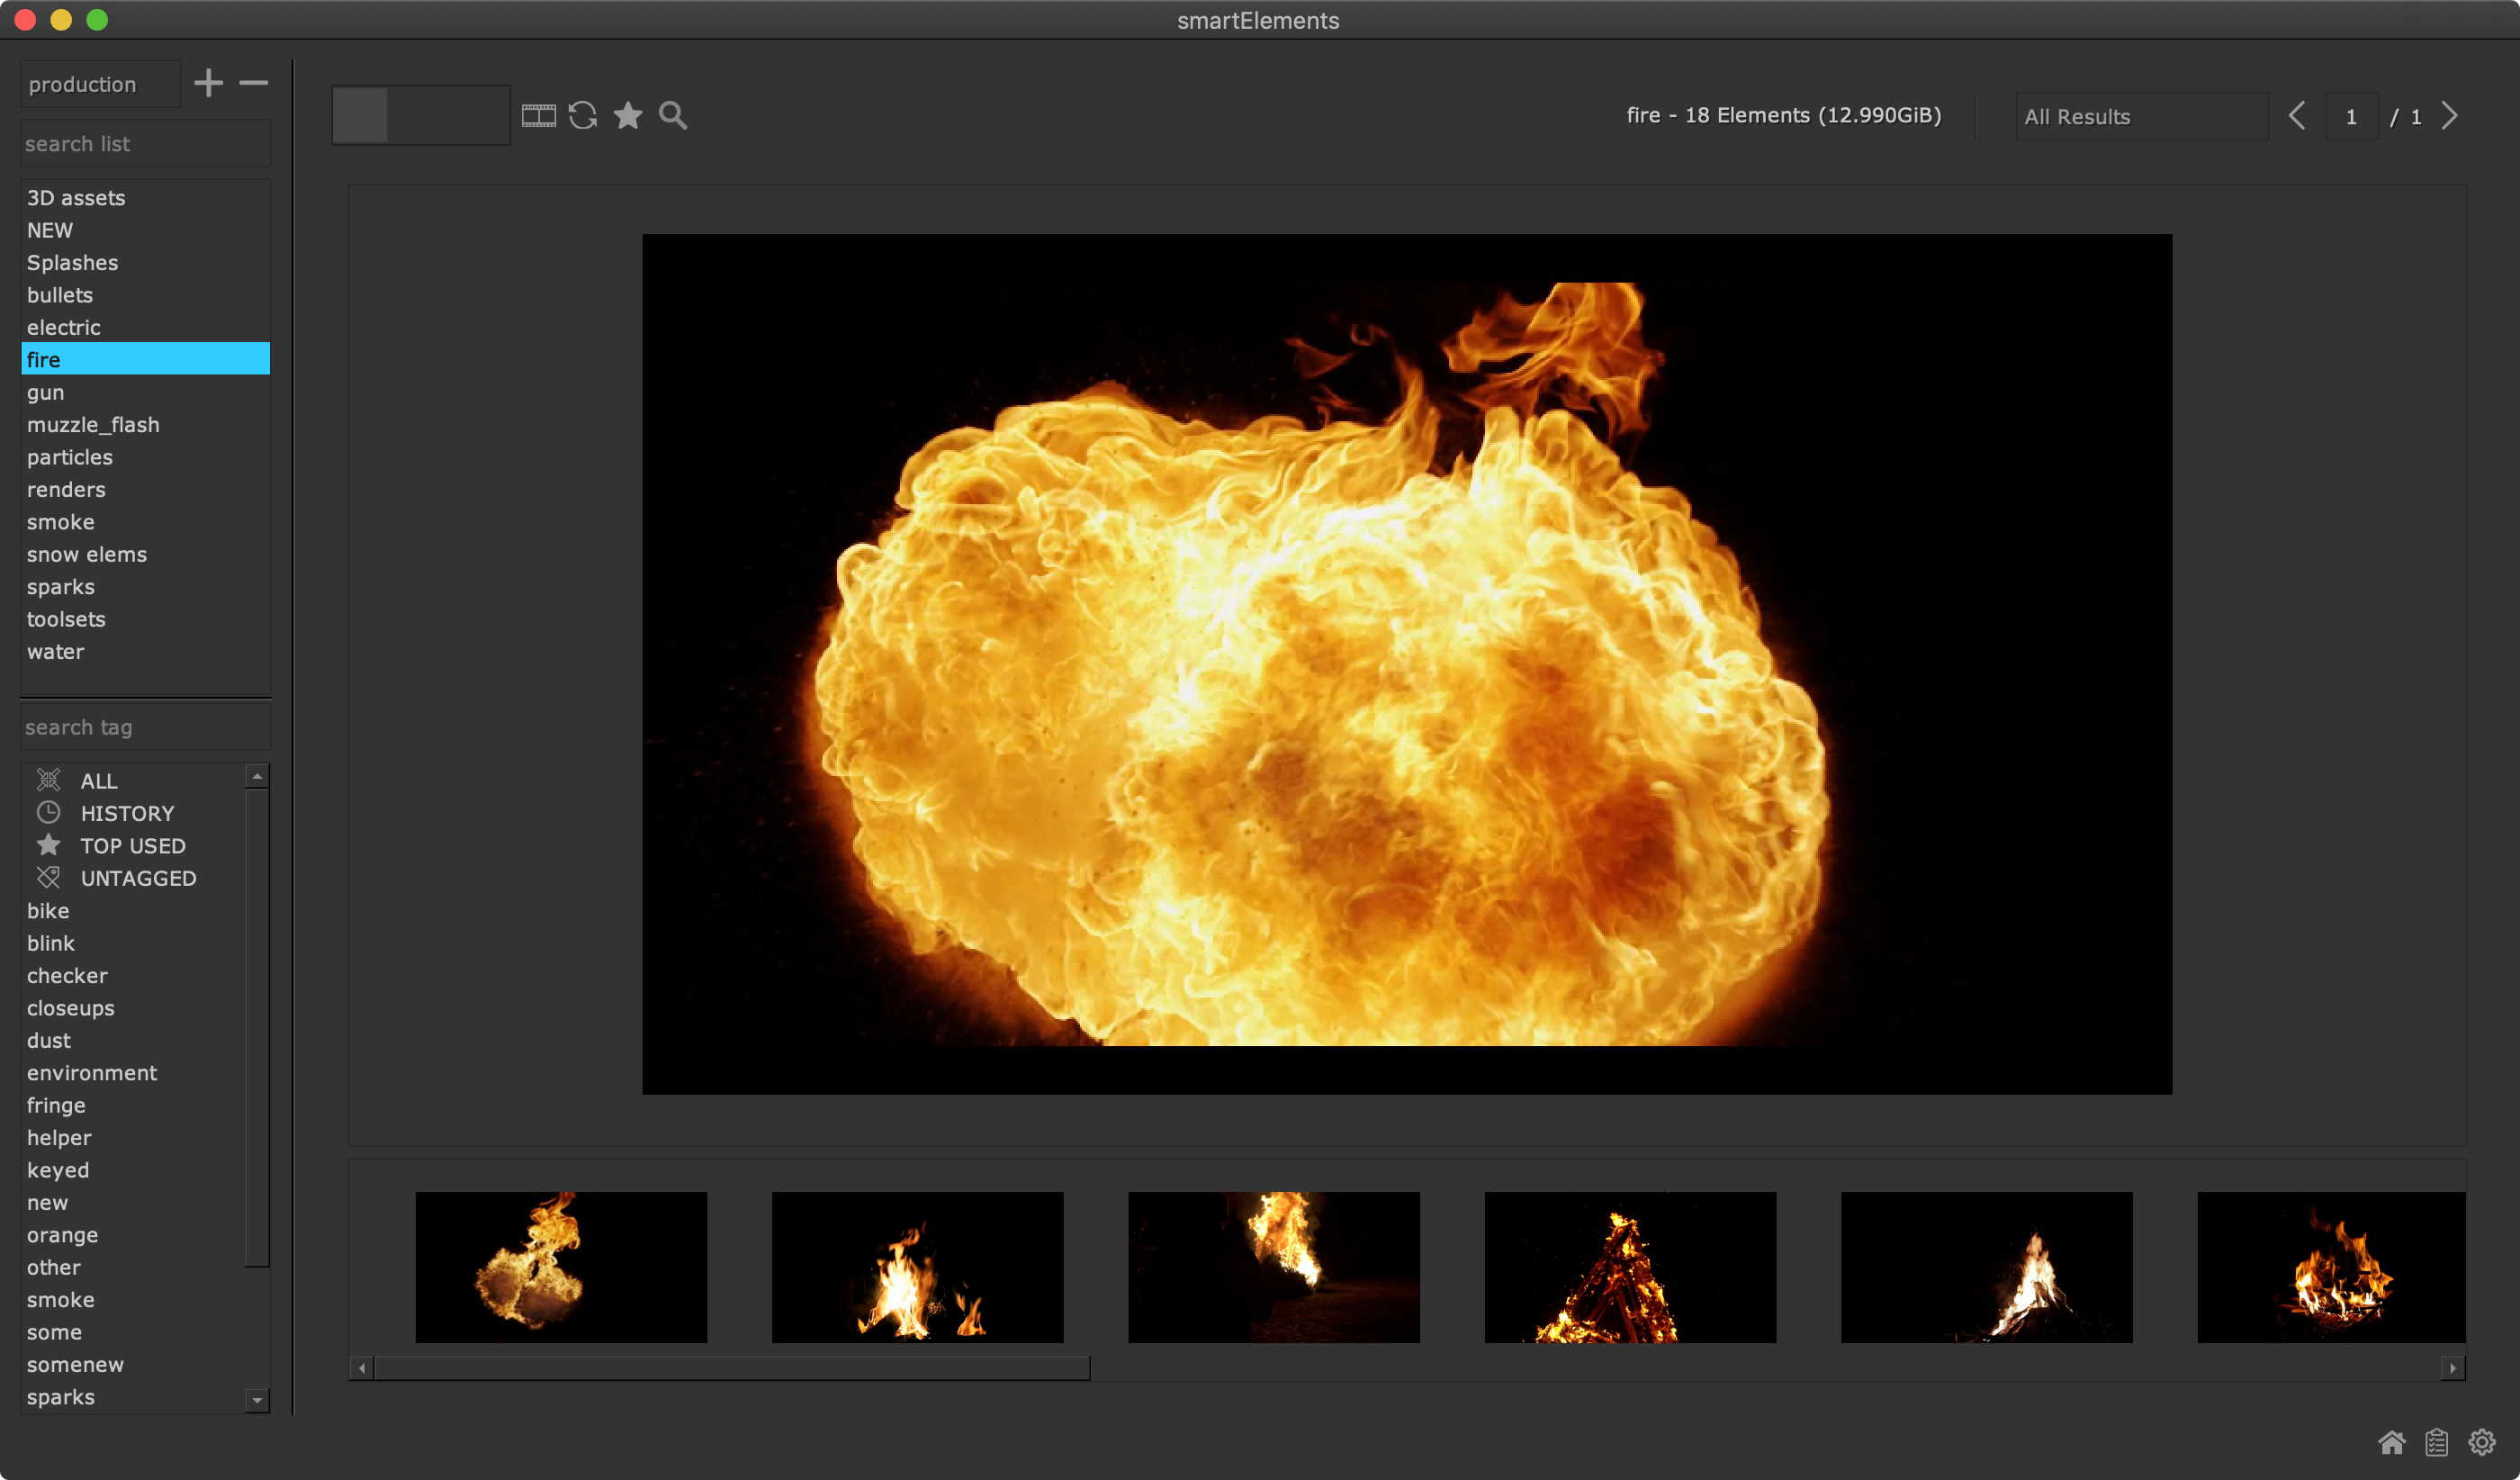
Add fullscreen player mode
Select an element from the library and press the spacebar to view it in fullscreen mode. Press the spacebar again to leave fullscreen mode. While in fullscreen mode you can also use the arrow keys to cycle through different elements.
Note that so far by default, smartElements has been using a low resolution for preview files. By having introduced the fullscreen feature with this new version, you can however easily regenerate the preview files to a larger resolution as this is what gets played in the fullscreen player.
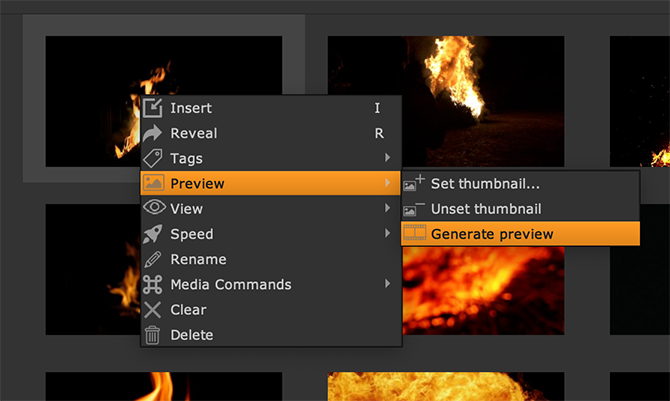
To do so navigate into the smartElements settings (ctrl+3), click the ‘Ingest Processors’ tab and increase the ‘width’ in the ‘PreviewCreator’ ingest processor setting:
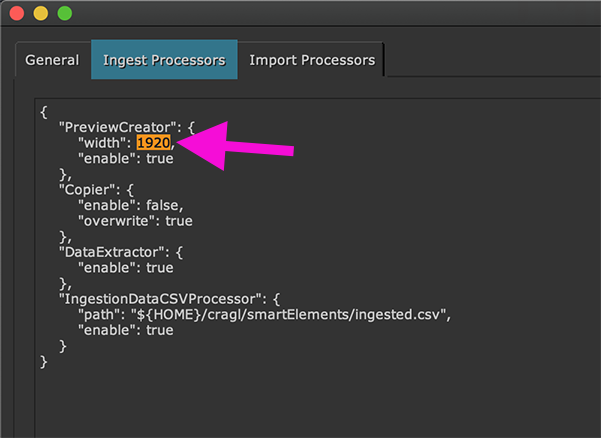
Then, right click an element and choose ‘Preview -> Generate preview’. This will re-render a larger preview in the background.
Add comment to element in thumbnail view
Comments can now also be added in thumbnail view so you don’t need to switch to
list view to enter a comment. Right click an element and choose ‘Comment’ to
enter/update a comment on the currently selected element in thumbnail view.
Hotkey: C:
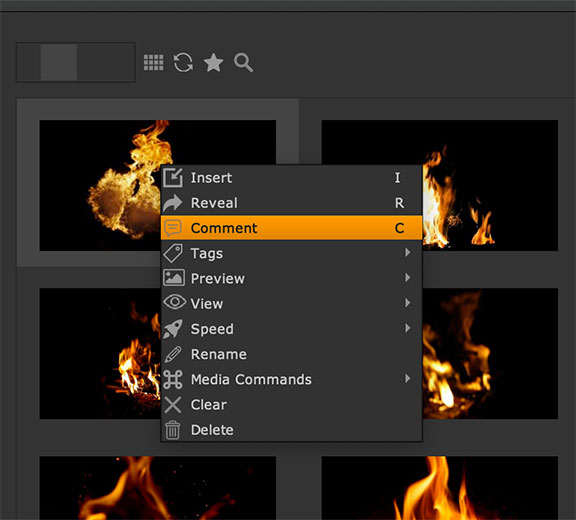
A comment adds useful information for you and others and you can search for elements by comment.
Improve favorite rating system
In previous version an element could either be set as favorite or not. Now, each element can get a rating from 0 up to 5 stars and you can individually view elements of these ratings to better differentiate between favorite elements.
To add a rating, select one or several elements, right click and choose the desired rating from the Favorite menu:
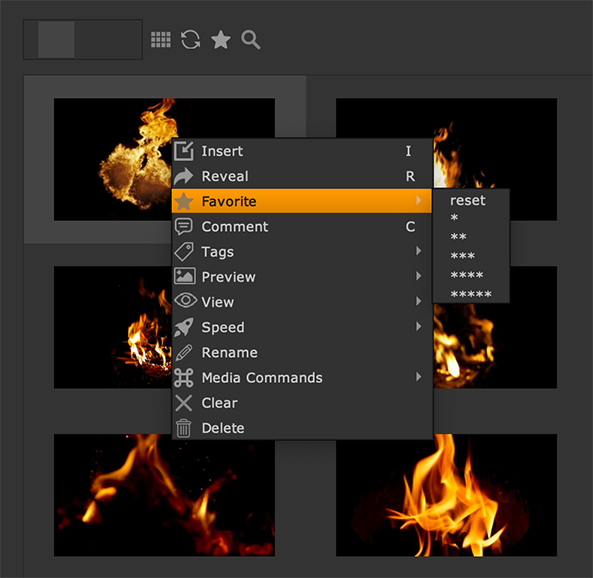
or simply press 1-5 on your keyboard. Pressing 0 will remove the rating.
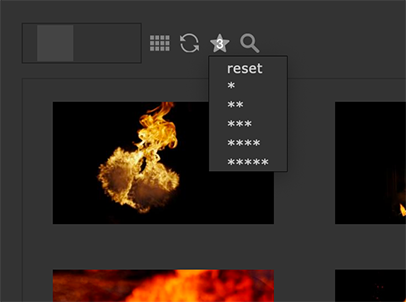
To filter elements with a specific rating click the star icon at the top and choose the desired rating:
Version 2.11.0
Version 2.10.0
This update is all about enhancing the user experience when loading elements from lists. It speeds up loading and accesses direct viewing and using of elements while still loading.
Show progressbar when loading elements
When loading elements, this update will now show a progress bar at the bottom left, indicating the current loading progress.

Use continuous loading for elements
In previous versions, -all- elements of a list had loaded in the background before displaying. With this update we use a continuous load approach in order to quicker serve you with using elements.
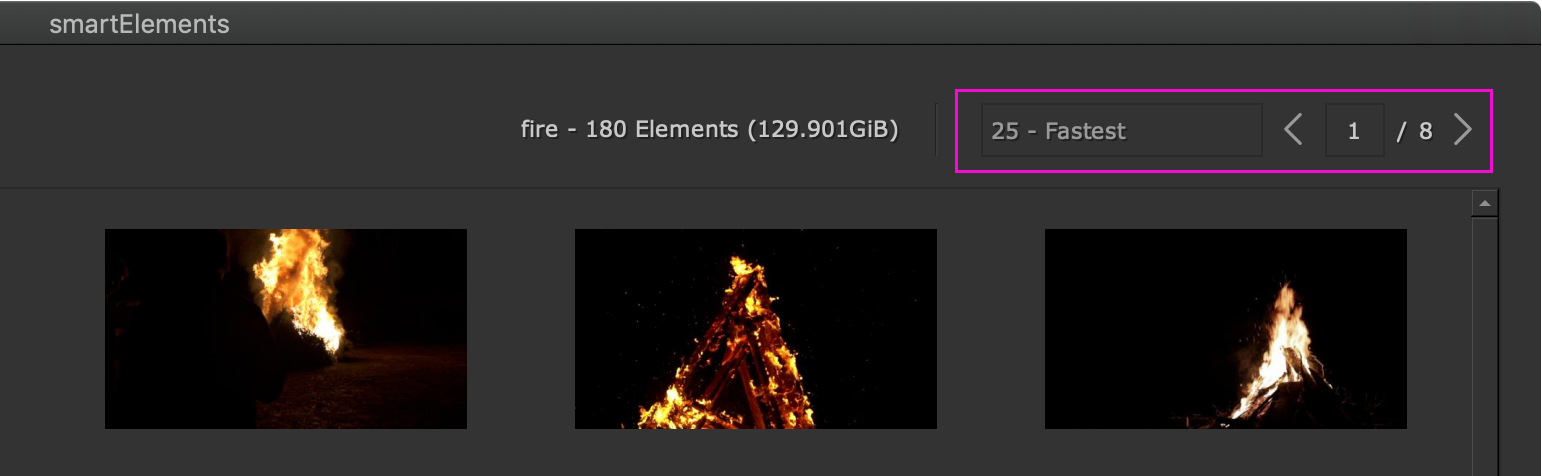
Add elements view limit
At the top right of the smartElements main window you will now now find widgets to limit loading by n elements in order to quicker serve you with using elements.
Version 2.9.0
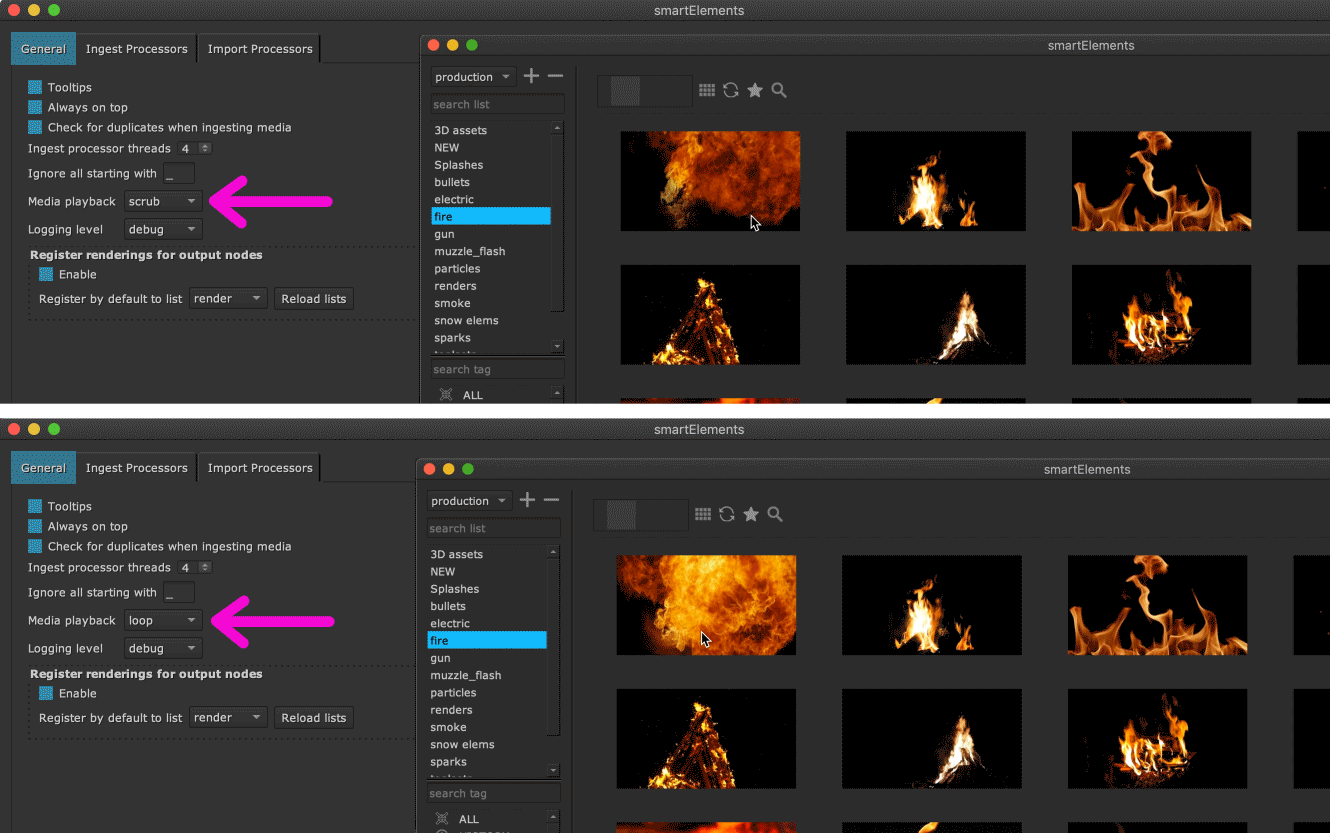
Introduce media playback option, implement to scrub media
In the settings section you can now configure the behavior of media playback. Setting it to ‘loop’ will loop the media as long as you hover over it. Use ‘scrub’ to scrub through the media by moving your mouse.
Other
Support ingesting R3D files
Fix creating full length preview when ingesting .mp4 files
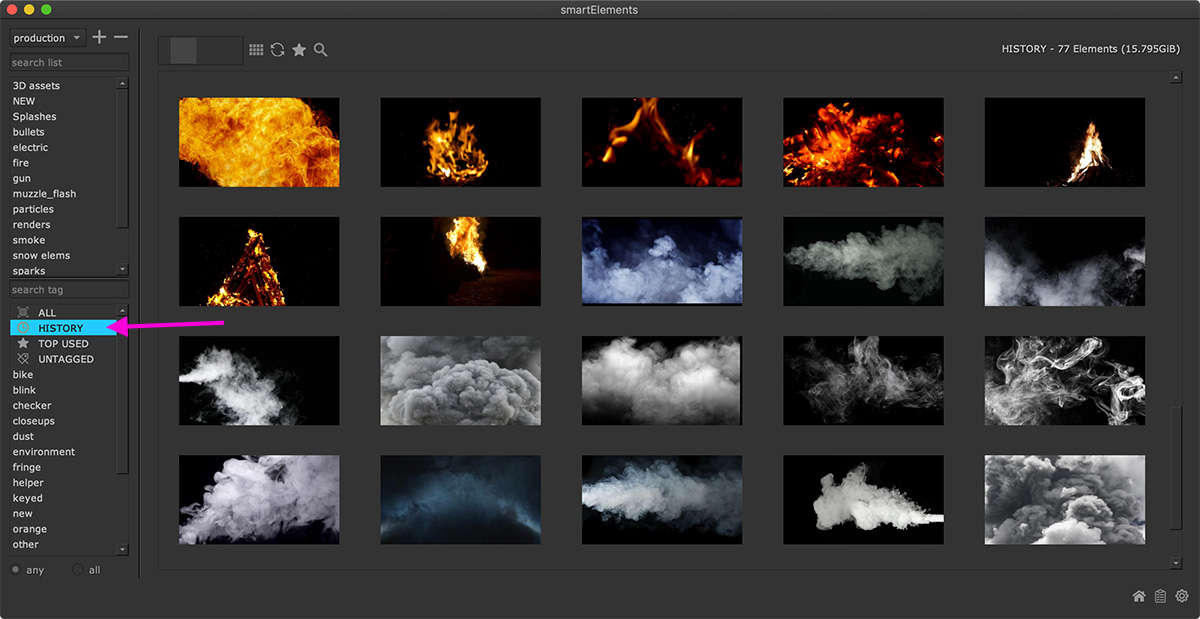
Add history section
The tags section contains now a section that shows you recently ingested media. Latest elements get listed at the top. This is great to keep in touch and get notified about new elements.
Add top used section
The tags section contains now a section that shows you the most used media. Media that got referenced the most gets listed at the top. This is great to be aware of elements that are frequently used.

Version 2.8.1
Other
Fix dropping license into license window raises UnicodeDecodeError
Version 2.8.0
Other
Fix reading trial license data fails decrypting
Version 2.7.1
Other
Make Nuke-13 ready
Fix: Paste tag from clipboard needs Nuke restart to show tagged media
Show media in alphabetical order in tag view mode
Fix: Sending media with white space to RV does not resolve to path
Fix: Use multiple video files when it has a file sequence like naming
When ingesting videos that contain a file sequence like pattern, i.e. same file name base and increasing counter, the Media class recognizes these video files as one sequence. This should not happen to videos as a video should always have exactly one source path.
Fix: Setting thumbnail for toolset does not process under Windows
Upload custom thumbnail: lower file extension to check for
This allows to upload for instance .JPG files as well as .jpg files.
Version 2.7.0
Add custom media commands to trigger custom code on selected media
smartElements lets you now trigger any custom commands on selected media. These commands are available in the ‘Media Commands’ menu of the context menu that appears when right clicking any media inside smartElements:
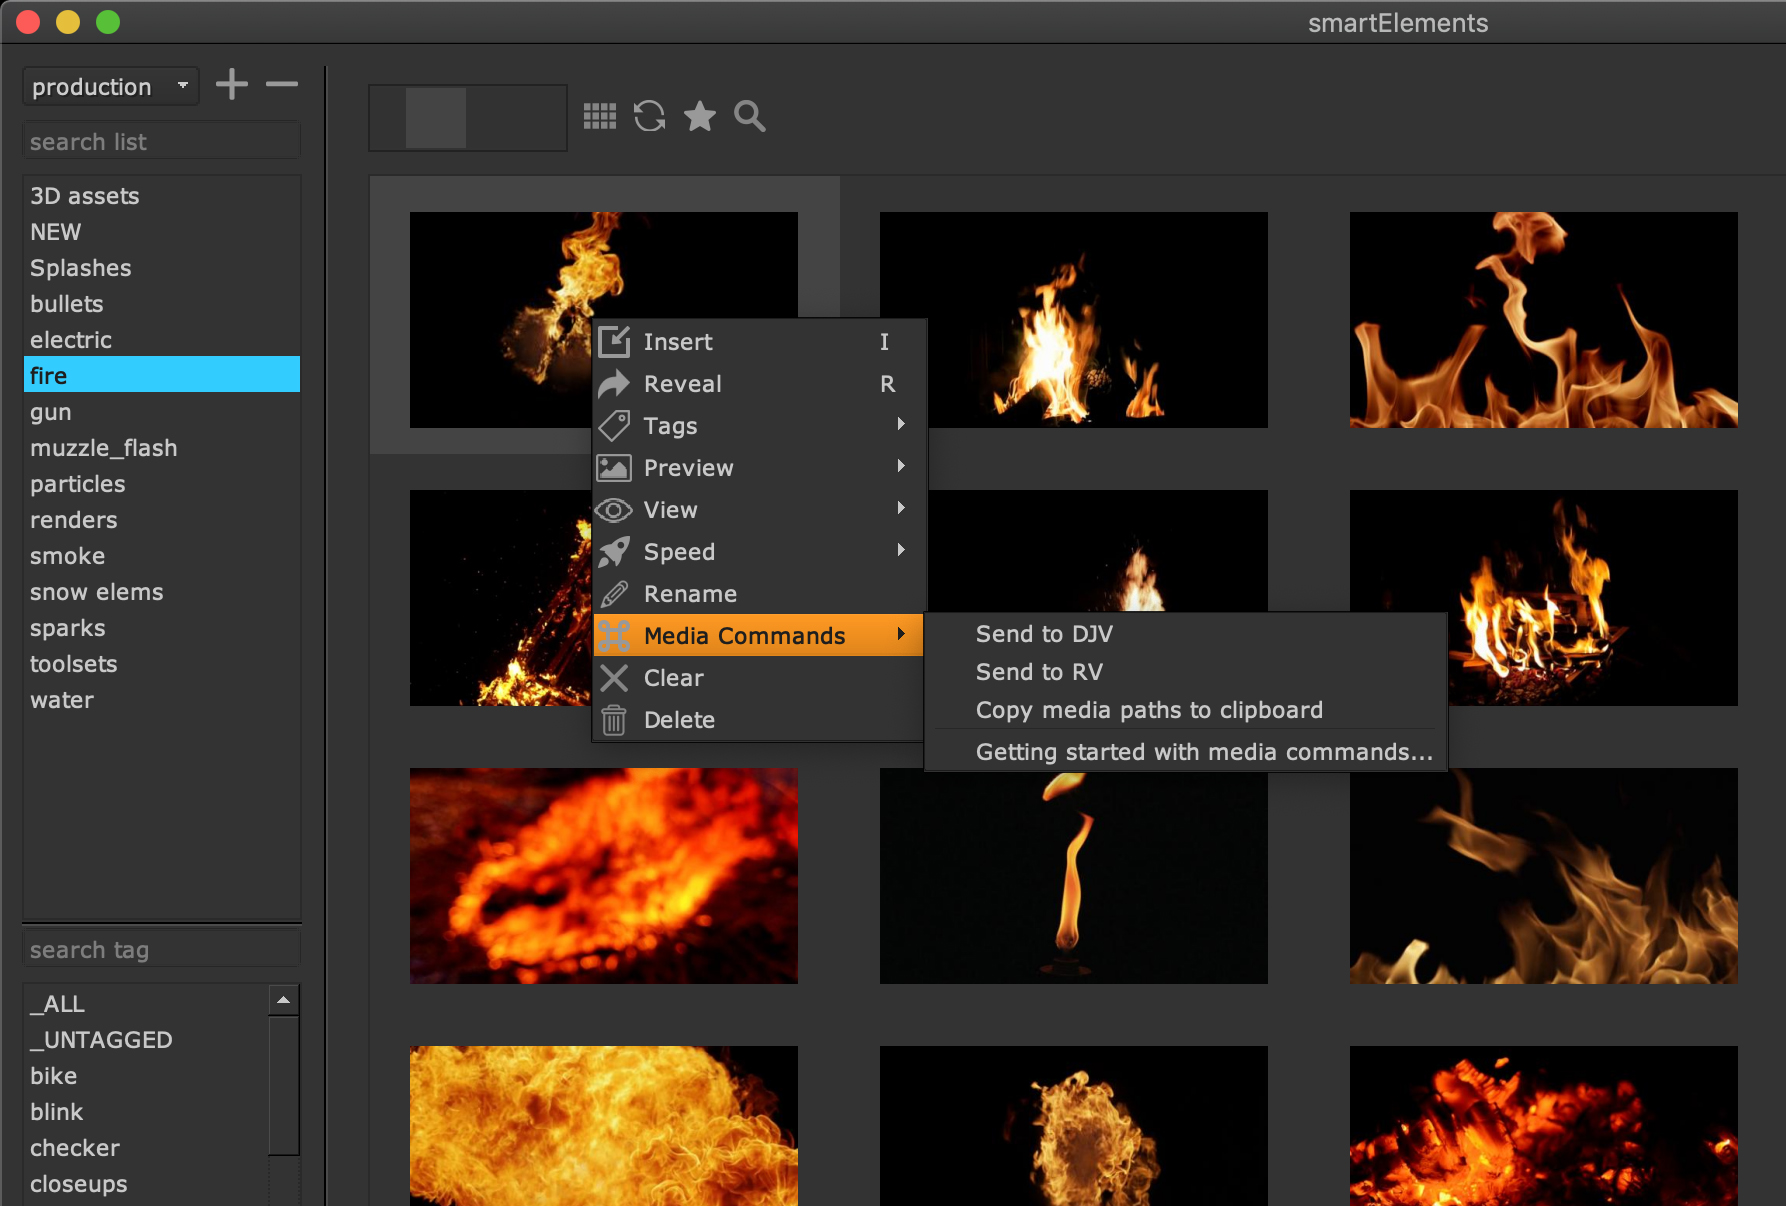
You can select multiple media and trigger any custom action. By default we provide three media commands:
Send to DJV
Send to RV
Copy media paths to clipboard
You can easily add any additional custom commands. More information about how to write your own custom media commands can be found in the advanced section.
Version 2.6.2
Other
Disable register renderings by default (#49)
We changed the default value to register renderings to disable it. If you want to use this feature you can enable it in the settings.
Version 2.6.1
Other
Fix: Search does not contain matching elements
Remove non matching elements in search in list view
Version 2.6.0
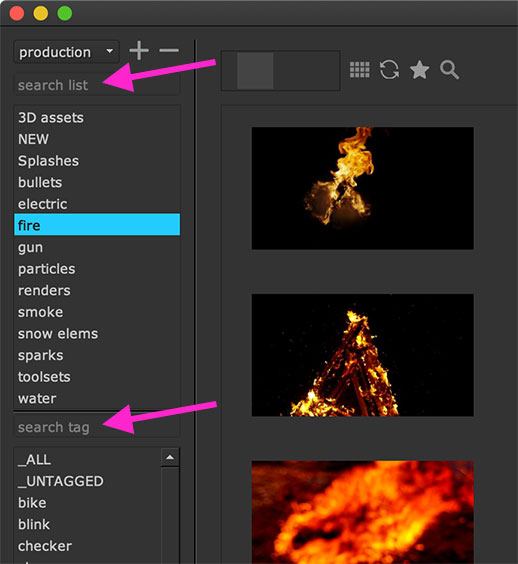
Search lists and tags
The main window contains inputs to search for lists and tags. This is primarily useful if you have lots of lists and tags.
Add functionality to rename an element
This update adds a ‘rename’ command to the media’s right click menu to rename the selected media:
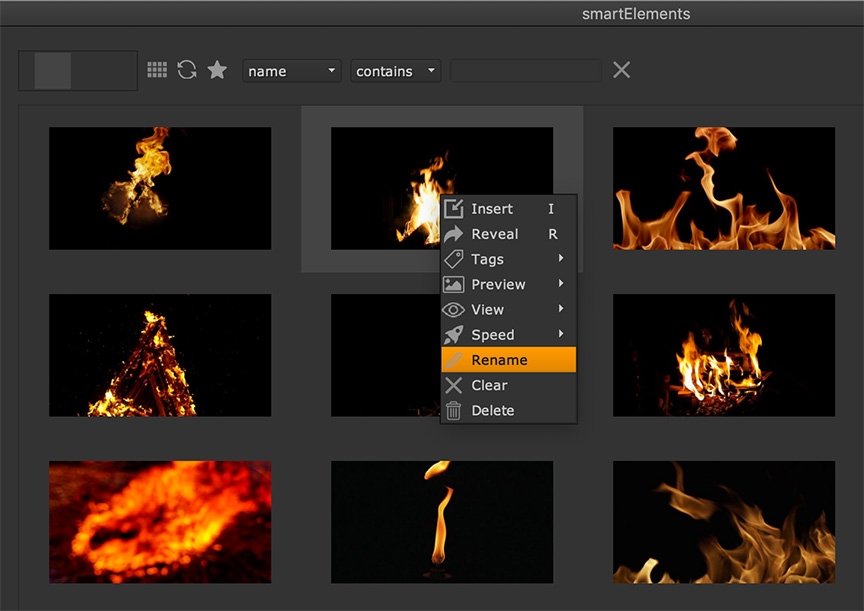
Please note: This will rename the element’s name in the meta data only so that it will only be renamed in the UI. This will not rename the physical files, otherwise this would raise the risk of making media offline in case the media is already referenced in other working files.
Add additional stacks via environment variable
The stacks drop down menu gains additional paths when having the environment
variable CRAGL_SMARTELEMENTS_ADDITIONAL_STACKS set. Similar to adding
paths to the PATH and PYTHONPATH environment variable, you can
specify multiple paths by concatenating them using the operating system
path separator. Under Linux and MacOS this is a colon. Under Windows
this is a semicolon.
This feature is primarily useful for a studio in case you want your artists
to have access to additional stacks without the need to add them manually
per machine.
As an example, when the above mentioned environment variable is set stating two additional paths as seen below…

… and when launching Nuke, then these two additional stacks show up in the stacks drop down menu:

Keep in mind that stacks show only up when they exist on disk.
Other
Fix: Clicking cancel button will still perform deletion
Fix: Move Tag window and Info window onto the top under Linux
Fix: Typing
Tinto the tag window’s input closes the tag window
Version 2.5.0
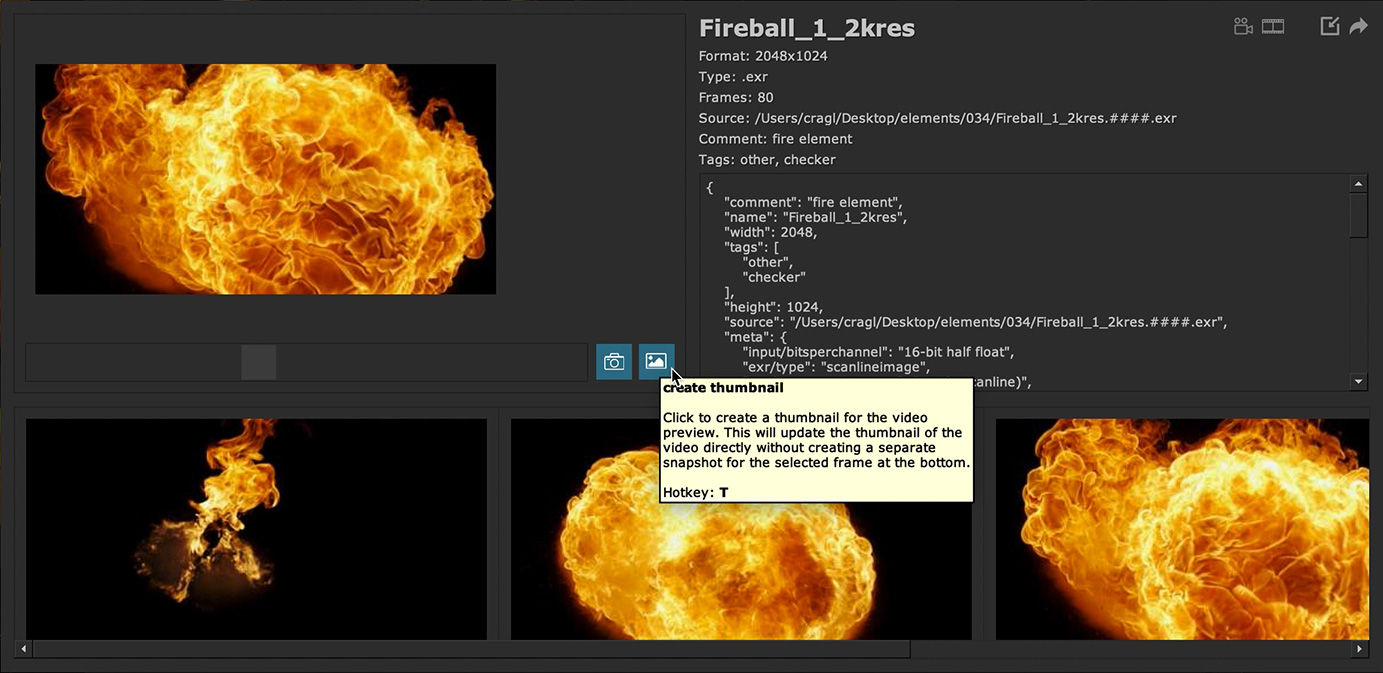
ItemInfo widget: Update thumbnail directly without creating snapshot
The ItemInfo widget that you launch by hovering over a media and holding the Alt key contains now an additional button that lets you directly update the media’s thumbnail. In previous versions, you had to create a snapshot first, then right click the created poster and choose ‘use as thumbnail’ from the context menu. This right click command remains, but you can now directly update the media’s thumbnail without creating a snapshot in the first place. In order to update the thumbnail directly, simply scrub to the frame that you want as a new media thumbnail and click the thumbnail button right next to the snapshot button or simply press T on your keyboard.
Version 2.4.0
Speed up running in offline mode
Version 2.3.0
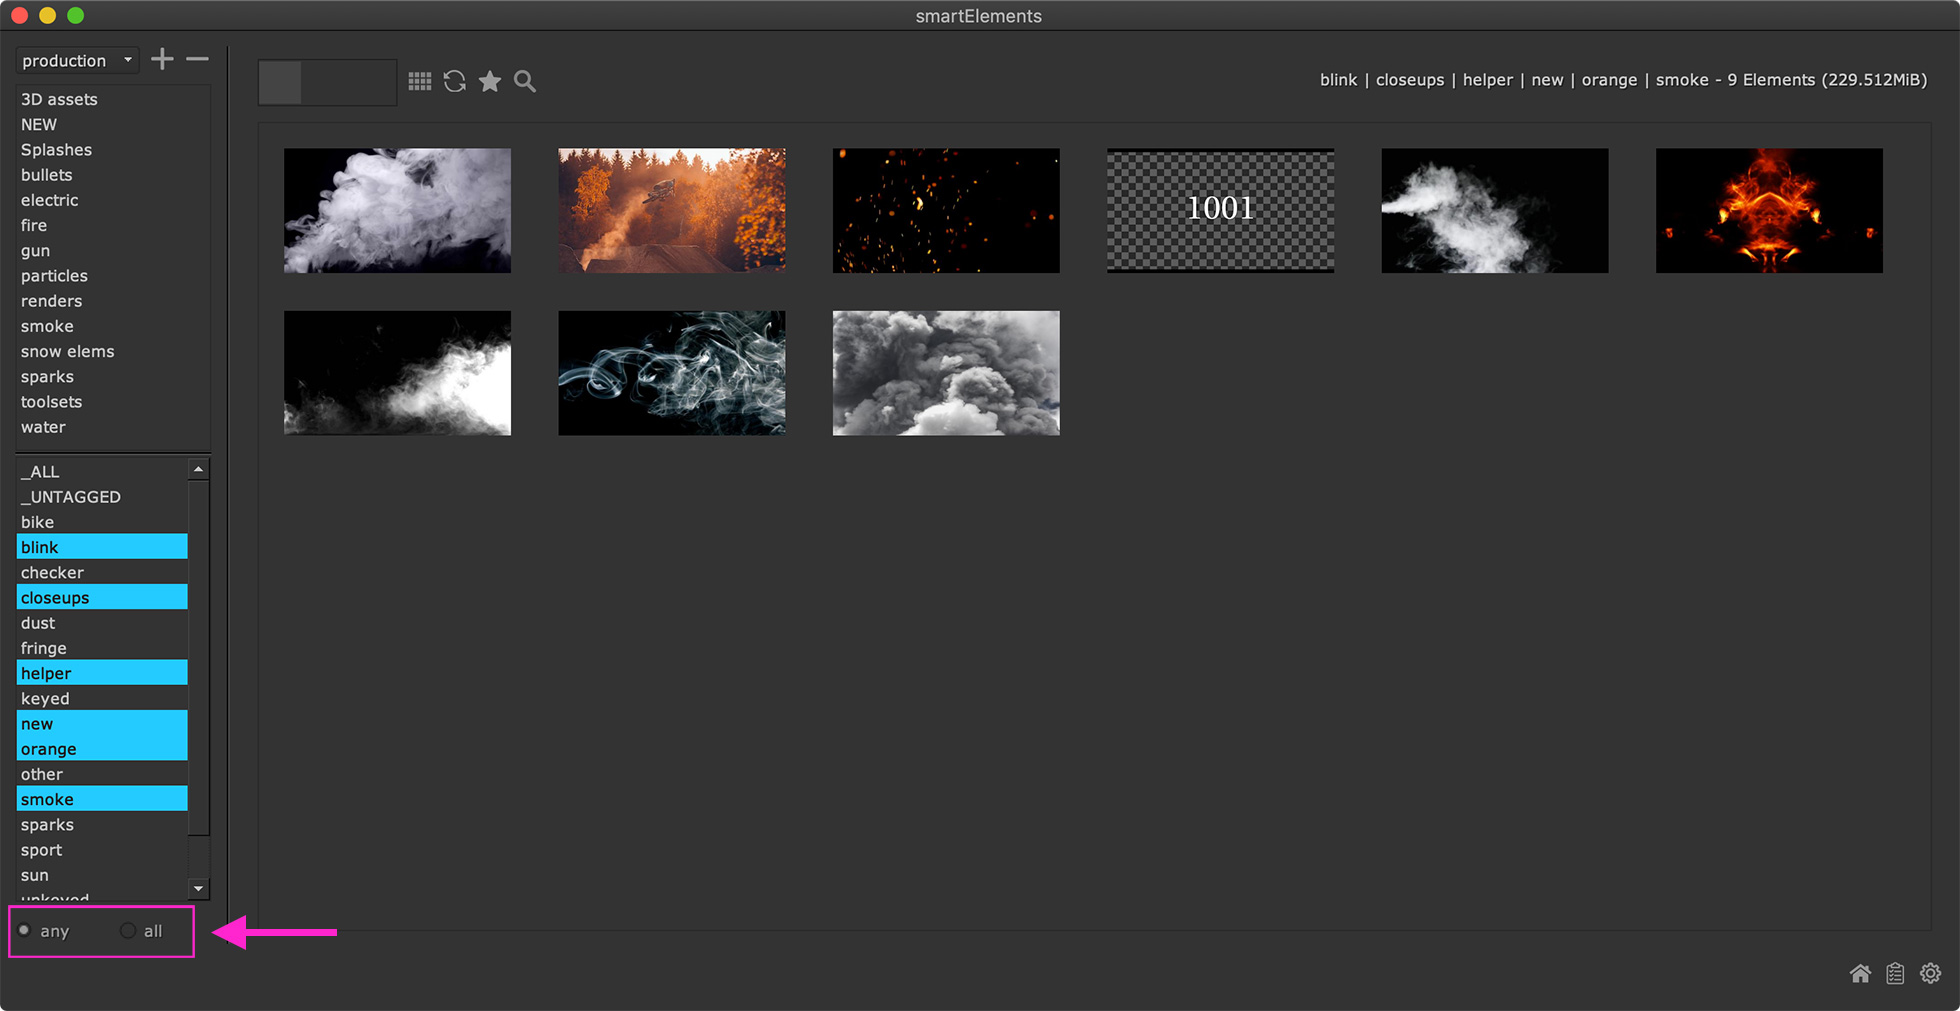
Filter elements by selected tags using an ‘any’ / ‘all’ mode
When being in tag filtering mode, the tag list contains two radio buttons that let you choose how to view elements for the selected tags:
any: Show all elements that contain any of the selected tags.
all: Show only elements that contain all of the selected tags.
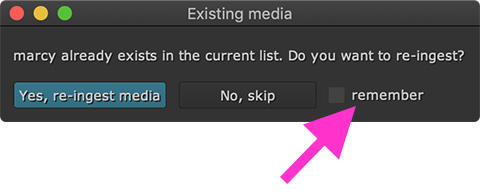
Add remember function when asking for re-ingesting or skipping media
When ingesting multiple media that is already contained in another list then you can check a ‘remember’ checkbox that will apply your clicked decision about ingesting or skipping to all dropped elements. The remember function works for the currently dropped elements. Then same remember mechanism applies for asking about re-ingesting media that is already contained in the currently viewed list.
Additional
Fix: Ingesting a mov file shows frames count 1 in metadata Fix: Re-ingesting existing media in gallery mode hid the whole row
Version 2.2.0
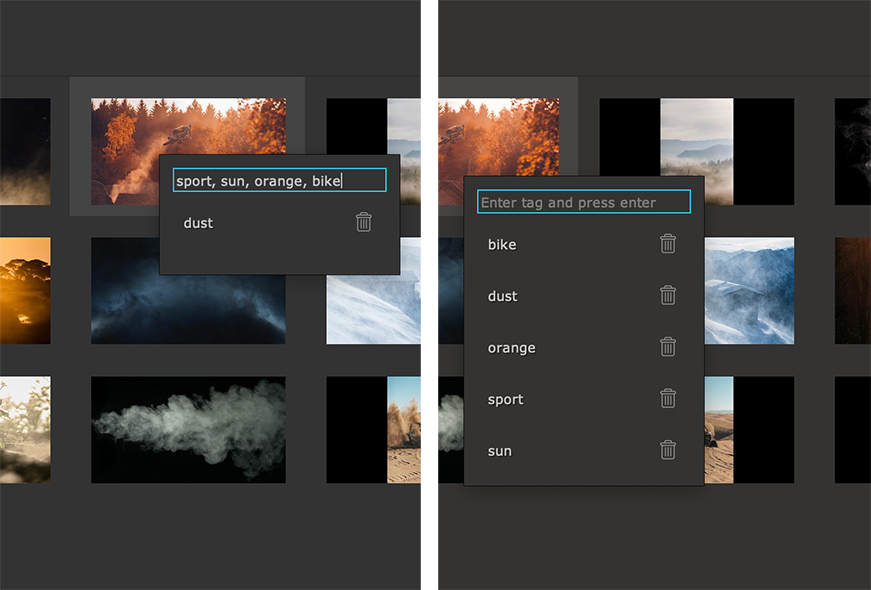
Add multiple tags at once by concatenating them with comma
You can add multiple tags to one or multiple selected elements in one go. Simply concatenate multiple tags using a comma in the tag editor.
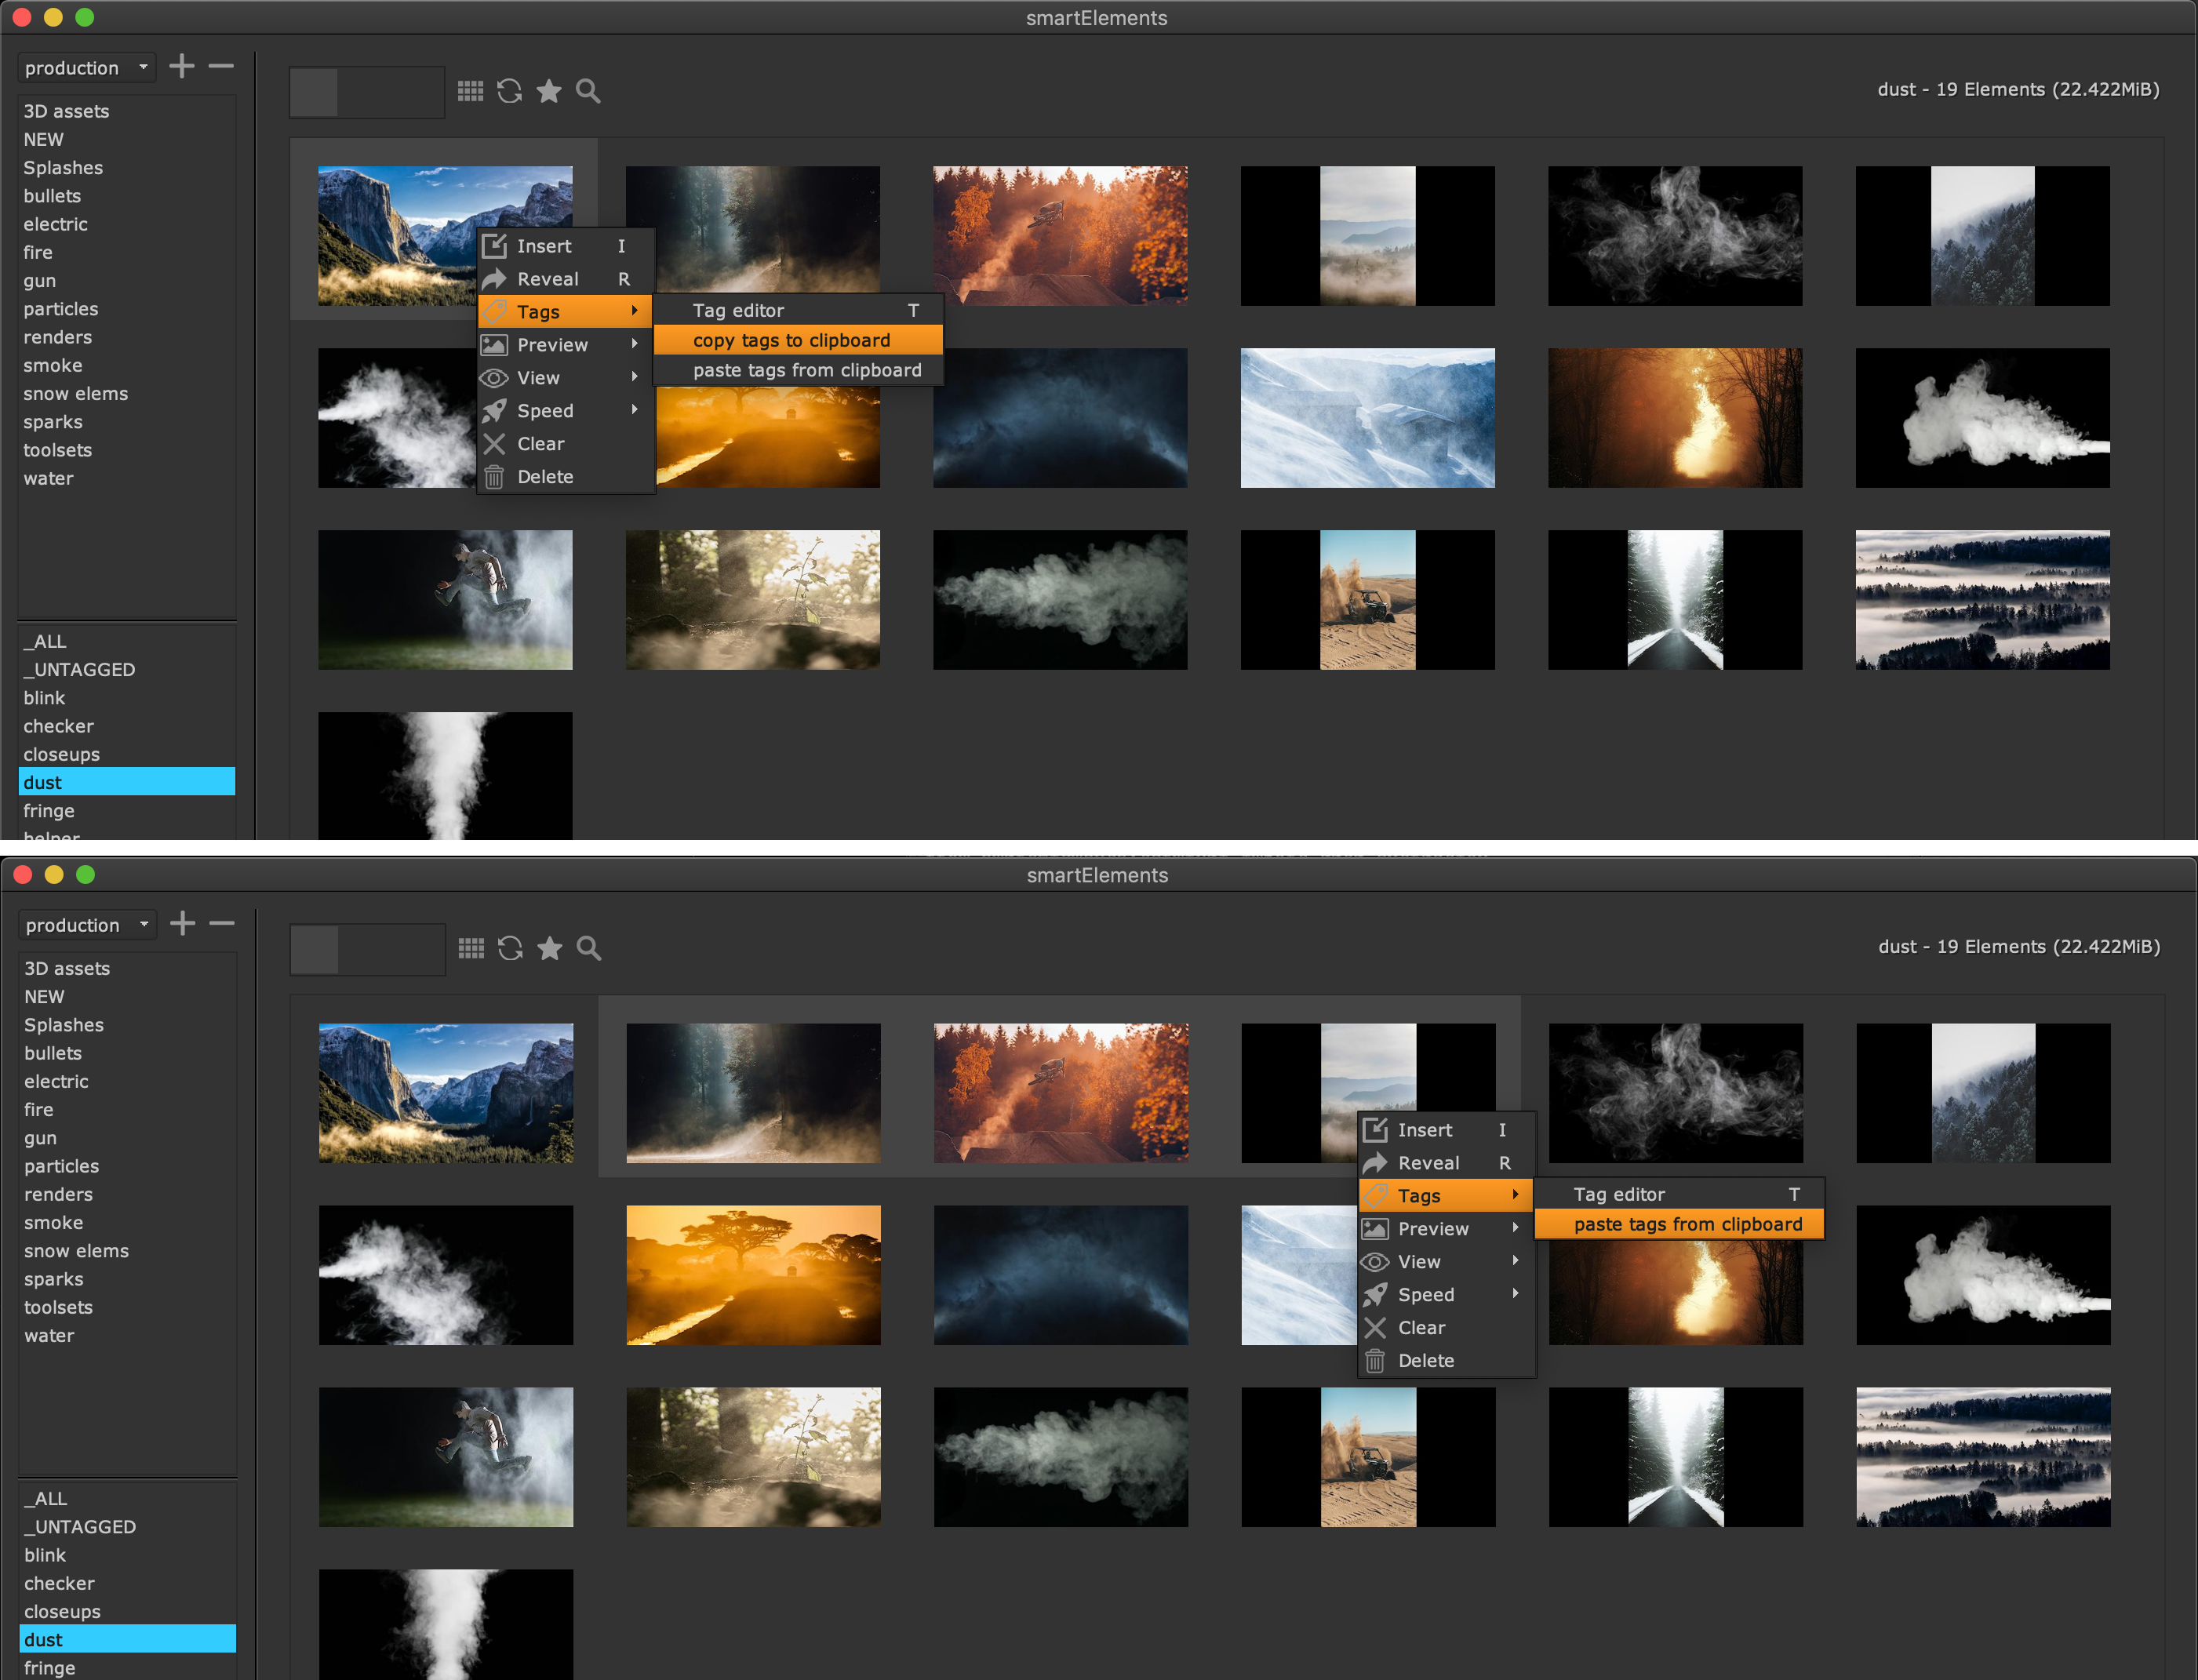
Copy tags, paste tags from one element to another
You can copy all tags from one selected element into your clipboard and paste tags from your clipboard to multiple other selected elements.
Additional
Close tag editor when moving mouse cursor out of the tag editor window
Close current tag editor when opening another tag editor
Version 2.1.0
Add tagging system
You can now organize your media by using a tagging system. The element browser contains now a tagging list at the bottom left. This gives you the freedom to not depend on any sorting on your hard drives anymore - You can ingest and simply sort afterwards. An element can contain several tags and an element can occur in several tag lists. This gives you more flexibility in organizing your media if required. In order to tag elements, select one or multiple elements and press ‘T’ or choose ‘Tag’ from the context menu. In the upcoming pop up you can edit and update a media’s tags.
Note that you can view elements from multiple tags simultaneously. Simply select several tags from the tag list and press enter or choose Load from the context menu.
Keep original aspect ratio of media previews
When ingesting media that is not in an aspect ratio of 16/9 the preview image got distorted in previous versions. Previews get always generated in an aspect ratio of 16/9 in order to have an even layout. In case media is outside of this aspect ratio, we use a letter/pillow box for the preview. The actual media’s aspect ratio stays of course untouched.

Restrict modifying permissions when having environment variable set
Having the environment variable CRAGL_SMARTELEMENTS_ALLOW_MODIFICATIONS
set to ‘True’ or having explicitly not set this environment variable (which is
the default) will allow all modification operations (i.e. creating lists,
ingesting media, updating media, deleting media, etc.). Having this environment
variable explicitly set to ‘False’ (note: use a string value ‘False’ as
this is an environment variable that only accepts string types) will disable
any modification functionality. This might be the wanted behavior for larger
studios where not all users should be given the ability to modify any elements
data. A studio can then decide if they want to restrict their users to be able
to modify data or not by setting this environment variable globally and then
overriding the permissions per user where needed.
Note that we keep modification permissions enabled for all users by default as we believe all users should be responsible users. If permission restrictions are however needed in your facility then feel free to adjust as needed by setting the above mentioned environment variable. Set the environment variable using your specific pipeline tools or simply in any init.py.
Version 2.0.0
Revamp media video player
Media videos should now play out of the box regardless the Nuke version. No additional codec installation is necessary anymore.
Note: Revamping the media video player means a major version update because we not only refactored a lot of code, we also dropped a lot of code due to simplifying the video player widget, which created an API breaking change. The previous limitation of the used Nuke version and having an h.264 decoder and encoder installed on your machine should now not be necessary anymore.
Please note: If you have been using any smartElements version 1 then you can get a preview for your already ingested media generated by right clicking your media in the elements browser and choosing: Preview -> Generate Preview
The previews will then be created in the background.
Add functionality to set one or multiple poster frames for media
The item info widget (hold your Alt Key while hovering over a media in the browser) contains now the functionality to create custom poster frames. This is useful if you would like to bookmark iconic still images for your media. This is particularly useful for muzzle flashes where only a few frames are iconic. Use the slider to scrub through your video. Click the postage button next to the slider to create a poster. This poster will be shown at the bottom. Select one or multiple poster, right click and choose ‘delete’ from the context menu to delete the selected posters. Choose use as thumbnail to use the poster as a thumbnail in the elements browser.
Add hotkeys to item info widget
F1: Toggle showing/hiding the video/static image
F2: Toggle showing/hiding the poster thumbnails
F3 or I: Toggle Insert the media into the node graph
F4 or R: Toggle Reveal the media in your explorer
Add hotkeys to insert and reveal element
I: Insert the elements that are currently selected in the table into your node graph
R: Reveal the elements that are currently selected in the table in your file explorer
Set media’s viewing (normal, flip, flop, flip-flop) and playback speed
The video player’s context menu contains two new menus ‘View’ and ‘Speed’. ‘View’ lets you flip, flop and flip flop the selected media. ‘Speed’ lets you choose the playback speed of the media. When bringing the selected media into your node graph then the viewing mode and playback speed will be adjusted accordingly by creating the additional nodes Mirror and Retime.

Version 1.2.0
TimeOffset import processor
This update adds an additional import processor called ‘TimeOffset’. By
default it is turned off. In order to enable it navigate to smartElement’s
import processor settings and set TimeOffset’s enable flag from
false to true.
This import processor creates a dialog on media insertion and asks the user if they want to let the media start at a specific frame or if they want to time offset the media to a specific value. The dialog contains a ‘remember’ checkbox that will remember the entered values and apply them to all upcoming media insertions as long as smartElement’s media browser stays open.

Fix: After render copies from non existent paths under Windows
Due to the fact that Windows uses back slashes which Nuke does not understand, files were not copied to the correct location after the render had finished.
Version 1.1.0
Enter import processors
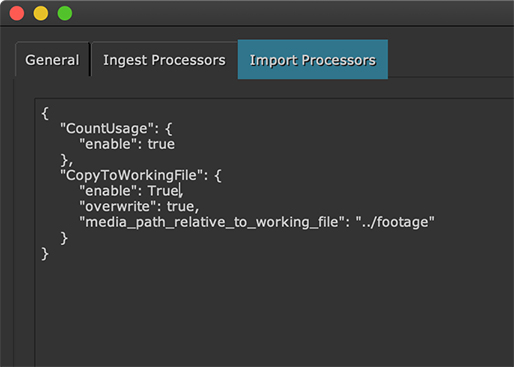
smartElements contains now a mechanism to create custom import processors. These run when importing media into the DAG by dropping one or multiple elements from the smartElements browser into the DAG or by right clicking them in the elements browser and choosing ‘Insert’ from the context menu. Import processors can for example be used to copy media over to a folder that is close to the current working file to keep all used dependencies of a working file in one location. There are multiple other scenarios that you can use this feature to your advantage. For example, you could register the use of the media in a database or any other file to get a sense of the most used elements. Or you could also keep track which elements get referenced by which working files and many more.
For more information see the import processors section.
In order to keep readability, we renamed the second settings tab to “Ingest Processors” (previously called “Advanced”) and have added a third settings tab called “Import Processors”.
Fix render whole frame range of video when ingesting a video
In previous versions when ingesting videos, the preview did not contain the whole footage’s frame range. This has been fixed.