Advanced
smartElements contains a few advanced features to customize it to your needs. smartElements is build up on processors. These run when ingesting media into smartElements and also when you bring media from smartElements into your DAG. If you have some programming knowledge then you can create your own processors and further customize smartElements to your needs. Keep in mind that these features require programing knowledge. You should be familiar with the basics of programming and should know what object oriented programming is as the concept of processors builds up on it. The features of custom processors get discussed in the following.
Ingest Processors
Whenever ingesting media to smartElements, there are several steps going on
under the hood. These steps are performed by processes that run in separate
threads so that neither smartElements nor the user nor Nuke get blocked in
any way. All processors are defined in smartElement’s processors Python
package. All processors derive from the BaseProcessor class being defined in
the base_processor module. You can define custom processors in the
custom module.
The custom module serves to initialize and register custom processors that run on each ingestion job -before- the main ingestion processors and/ or -after- the main ingestion processors. Each ingestion gets done via a smartElement’s job instance. A job instance runs multiple processors. The main ingestion processors are run in the following order:
smartElements.processors.copier.Copier: Copy all media files to destination.smartElements.processors.preview_creator.PreviewCreatorCreate a preview for a media.smartElements.processors.data_extractor.DataExtractorExtract information about the media.
You can basically do anything you need before and/or after the main processors run. As an example what about writing additional information to a csv about ingested jobs. Or injecting additional information to each media meta data. Or what about Copying the preview videos to some additional spot. Or what about adding a LUT to the preview files.
Each processor holds a job argument that contains detailed information about the media to ingest.
A job contains the following attributes, methods and properties that you can refer to if needed:
Attributes
media->smartElements.media.Media: Media that gets ingested. Contains information about the frames to ingest including all frames of a sequence if the media is a sequence.settings->dict: All settings of all smartElements processors, including the main processors and custom processors.
Methods
add_to_job_report(str)->None: Add given string to the report.
Properties
parent_dst->str: The parent directory of the destination to copy to.meta_dir->str: Absolute path to meta directory for the media to ingest.report_path->str: Absolute path to report.
Each processor derives from the abstract BaseProcessor that can be found
in: smartElements.processor.base_processor. Each processor must implement a
process method. In here you can execute whatever needs to be executed for
the specific processor.
Please have a look at the above mentioned processors to see how the processors
work. In the custom module we illustrate an example processor that we add to
smartElements by defining its logic (in this case adding ingestion data to
a csv file) and adding it to the custom post processors by calling
osl.register_post_processor(IngestionDataCSVProcessor). In order to
register a processor as pre processor, meaning to run -before- the main
processors you can register a processor using osl.register_pre_processor.
Each processor can reference (but does not necessarily need to) some settings so that you can make it configurable. These settings can be stored in the smartElement’s settings. They can be found in the smartElement’s settings under the ‘Advanced’ tab.
Each ingestion job writes a job log file. Inside each processor you can call
the processor’s add_to_report method to write anything to the job log file.
In addition, each processor has a logger instance (that is defined in the
abstract base_processor) that you can use to your advantage to log certain
information when needed.
For more information about custom pre and post processors please have a look
at the custom module being located in smartElement’s processors Python
package as stated above as it contains an example custom processor to run. By
default, the custom processor is not enabled because the needed registering
is commented. In order to enable it, you need to register it at the bottom of
the module. To do so, simply un-comment the registering at the bottom of the
module.
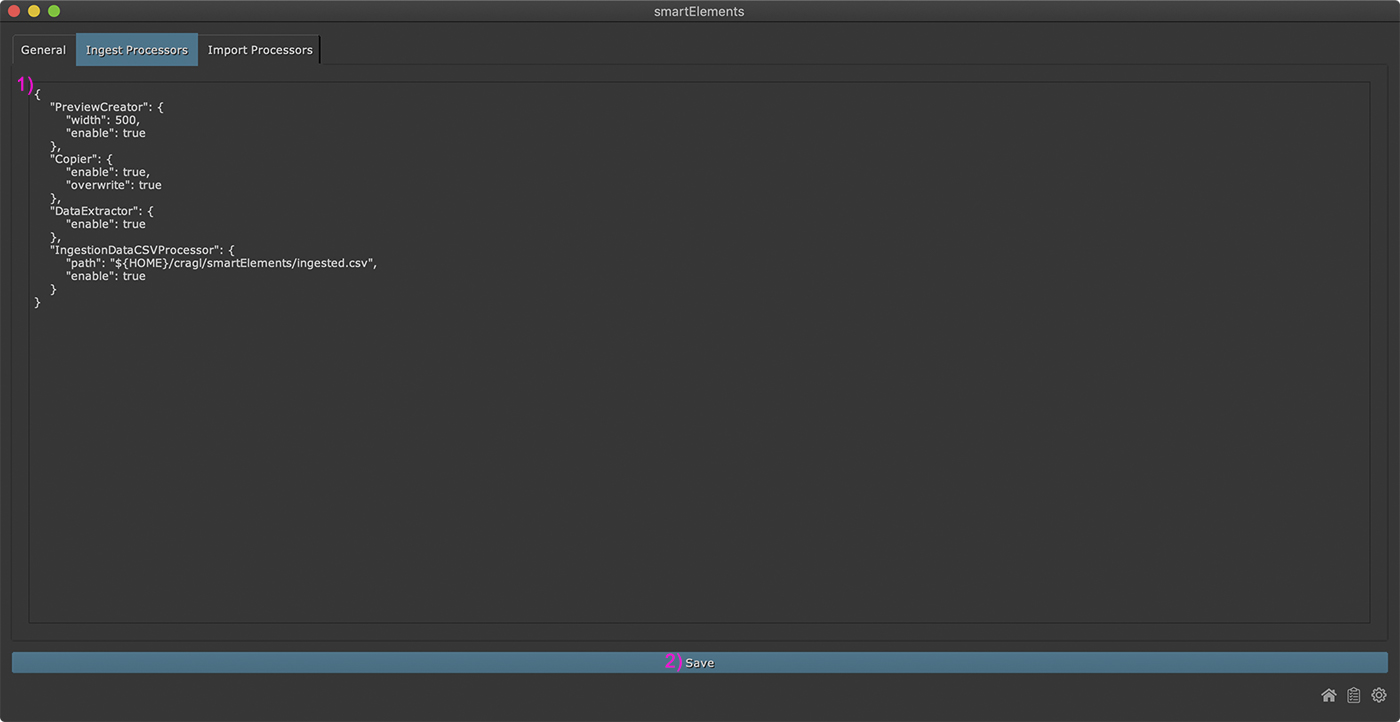
Ingest Processors Settings
As discussed previously in the advanced settings section, your custom processors can be driven by custom settings. These settings get defined in the Ingest Processors tab of the settings section. Here, you can also adjust the settings for the main processors if needed. An example of what you can do gets discussed in the next section. When you create a custom processor you can add its preferences in here and control it then from here.
{
   # The Copier ingest processor copies the source to the element folder.
   # This is the footage that you will be using in your comp then. You can
   # drive using hard and soft copies by enabling / disabling this ingest
   # processor.
   "Copier": {

       # Set to true in order to create a physical copy of your source when
       # ingesting elements, a.k.a hard copy. Set to false to reference the
       # source footage directly, a.k.a soft copy.
       "enable": true,

       # If set to true then this will overwrite existing media when ingesting
       # an element that already exists in smartElements. If set to false then
       # existing media will not be overwritten.
       "overwrite": true,
   },

   # The PreviewCreator ingest processor creates a playable media preview.
   # This preview gets played when hovering over the element.
   "PreviewCreator": {

       # If set to true then this will create a preview sequence.
       # ! This should always be set to true, otherwise you won't get any preview.
       "enable": true,

       # The width to use when creating the thumbnail preview. The height will
       # be set automatically per element. The higher the value the better the
       # preview frame quality, but the longer it takes to load elements.
       # ! We recommend keeping this number low.
       "width": 500,

       # When ingesting then this will also set the thumbnail frame for each
       # element. Here you can configure which thumbnail frame to use.
       # Choose from: 'start', 'middle', 'end', 'auto'.
       # 'start' uses the first frame as thumbnail.
       # 'middle' uses the middle frame as thumbnail
       # 'end' uses the last frame as thumbnail.
       # 'auto' will set the most representable frame for each element automatically  for you.
       "thumbnail_frame": "auto",
   },

   # The DataExtractor ingest processor extracts metadata and other relevant
   # data (resolution, file type, etc) for each source when ingesting.
   "DataExtractor": {

       # If set to true then this will extract metadata from from sources
       # when ingesting.
       # ! This should always be set to true.
       "enable": true
   },

   # The IngestionDataCSVProcessor ingestion processor creates an ingestion
   # history in form of a .csv file on disk so you keep record of your
   # ingested sources.
   "IngestionDataCSVProcessor": {

       # When set to true then this will create an ingestion history csv file
       # in the specified path. Set to false when you don't want an
       # ingestion history.
       "enable": true,

       # The path where to create the ingestion history csv file to. You can
       # use environment variables in the format ${ENV_VAR} which get
       # expanded, e.g. ${HOME} which points to your user home directory.
       "path": "${HOME}/cragl/smartElements/ingested.csv"
   }
}
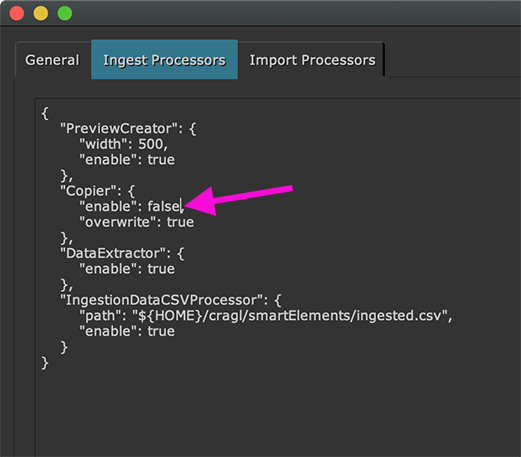
Example for a custom ingest processor setting: Hard Copy Soft Copy
If you come from an autodesk flame background, you will be familiar with the
concept of hard and soft copies. When ingesting media, by default the media
will be hard copied to the selected list inside the currently selected stack.
That means, your media will not be moved, instead a physical copy will be made.
In many cases, that might be what you want because this ensures that you will
have all media in one location. However, there might be situations, when you
don’t want to create a physical copy of your media and instead you want to
reference the original media. smartElements lets you do so. For that, you need
to adjust the processor’s settings. Navigate to the smartElement’s settings
section and click the advanced tab. In here, make sure that the enable
key inside the dict of the Copier key is set to false. This will
disable copying over files when ingesting media and will then instead reference
the original media when dragging it into your DAG.
Triggering an ingest processor via code
Each ingestion processor that got registered as a pre- or post processor will run automatically when ingesting media. While developing, it is however desirable to trigger an ingestion processor via code so that you don’t need to repeat ingesting media by dropping it into smartElements. The below code shows you how you can trigger your ingestion processors directly using code.
The following shows an example how to develop an ingest processor and run it on the fly within Nuke. Triggering an ingest processor by code speeds up developing as you run the processor directly from code instead of re-ingesting over and over again just to test your ingest processor. The following example shows how to create a media representation and some settings, generate a job out of it and feet that data to the ExampleProcessor.
 1 >>> from smartElements.job import Job
 2 >>> from smartElements.media import Media
 3 >>> from smartElements.ingest_processors.example import ExampleProcessor
 4
 5 >>> media = Media("path/to/render.1001.exr")
 6
 7 >>> settings = {
 8 ...     "ExampleProcessor": {
 9 ...        "enable": True,
10 ...        "some_key": "some_value",
11 ...        "another_setting": 10,
12 ...        "and_another_setting": 400
13 ...     },
14 ...     "general": {
15 ...        "list": "/path/to/my/currently/selected/list"
16 ...     }
17 ... }
18
19 >>> job = Job(media, settings)
20 >>> my_processor = ExampleProcessor(job)
21
22 >>> my_processor.run()
At the top we import all needed classes, Job, Media and
ExampleProcessor (L1-L3). Note that ExampleProcessor does actually
not exist and is listed here only for demonstration purposes. Next, we generate
a Media instance using the path to our media that we want to get processed
by our ExampleProcessor (L5). Next, we define a settings dictionary (L7-L17).
In case your ingest processor uses settings, you can add them to a new key with
the same name of the ingest processor that you are going to create. In that
case that is ExampleProcessor. The ExampleProcessor’s settings must be a
dictionary itself. Keep in mind that the settings contains one more key
general (L14) which provides additional settings that are used across all
ingest processors. Make sure to add a list key that contains the absolute
path to your currently selected list. This path is needed to calculate the
directory where to generate data (image files and meta data) in.
Once we have a Media instance and the settings dictionary defined, we
can create a new Job instance and pass both to it (L19). This Job instance
holds now information about the media to process data on and generate data for
as well as the settings to apply when it comes to processing the job. Finally,
this job instance gets feet into your ingest processor instance, in this
example an instance from the ExampleProcessor class (L20). The ingest processor
can then be run by calling its run method (L22).
Keep in mind that the above mentioned code clock is only meant for getting
quick feedback while developing an ingest processor. As long as you have its
enable settings set to true and have it registered as pre- or post
processor as described above, the ingest processor will run automatically for
you the next time you ingest media.
Import processors
Whenever importing media into your DAG, processors run in the background which
perform additional steps. All import processors live in
smartElements.import_processors. All import processors derive from the
BaseImportProcessor that is located in
smartElements.import_processors.base_import_processor. This is an abstract
class that sets up the base layer for an import processor that can be used for
all kinds of import processes. We set up a few things that you can use to your
advantage so that writing custom import processors should be easy to
accomplish. When inserting media into the DAG (either by dropping media from
smartElement’s element browser into the DAG or by right clicking media and
choosing ‘Insert’ from the context menu) then all import processors are
triggered. When creating a new import processor, we advise to inherit it from
the BaseImportProcessor. Afterwards, make sure to register it in
smartElements.import_processors.__init__.py by calling:
osl.register_import_processor(<NAME OF IMPORT PROCESSOR CLASS>)
Each import processor must implement a process function. This function
defines the custom logic to run when triggering the import processor. Your
custom import processor will be set up with multiple attributes automatically
that you can use to your advantage:
path
nodes
is_toolset
is_3d
is_image_data
Please refer to the BaseImportProcessor’s doc string for further information on
these. Use the three attributes is_toolset, is_3d and is_image_data
to handle custom logic if needed. As an example, have a look at the
CopyToWorkingFile’s process method. In here we exit early when we are
handling a toolset, as it does not make too much sense to copy over a toolset.
In addition, the BaseImportProcessor provides other properties that you might need in your process method. This base class provides these so that you don’t need to invest time creating these yourself:
name
media_root
meta_json
Please refer to the properties doc strings as found in the BaseImportProcessor class below. The following two import processors are provided by default:
smartElements.import_processors.copy_to_working_file.CopyToWorkingFile
smartElements.import_processors.count_usage.CountUsage
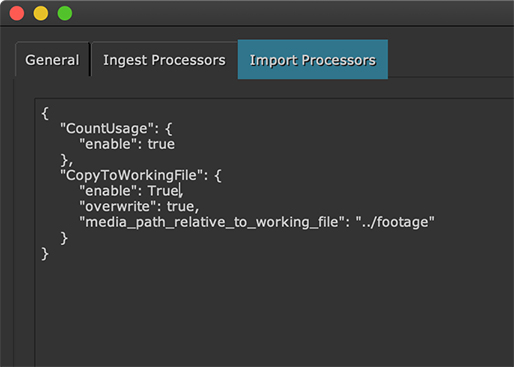
Import Processors Settings
Similar to the ingest processors, the import processors are driven by configuration. In the Import Processors tab of the settings section you can adjust the import processors settings if needed.

{
   # The CopyToWorkingFile import processor copies media next to the working
   # file which helps packaging Nukescripts.
   "CopyToWorkingFile": {

       # If true this enables this import processor so it will copy inserted
       # elements next to the working file. Set to false to disable copying
       # any element.
       "enable": false,

       # The path relative to the working file where to copy to. Use '..' to
       # go a directory up, '../..' to go two directories up, etc. Using the
       # default value '../footage' this will copy the element to a footage
       # folder on working file level. Missing directories will be created.
       "media_path_relative_to_working_file": "../footage",

       # If true and element to copy already exists then this will overwrite
       # the element. If false and element to copy already exists then it will
       # be skipped and not overwritten.
       "overwrite": true,
   },

   # The CountUsage import processor increases a counter for each element that
   # gets inserted into the DAG. This helps you and other users can get a
   # better overview on elements that are often used.
   "CountUsage": {

       # If true enable this import processor, if false disable it and don't
       # increase and element's counter on element insertion into the DAG.
       "enable": true
   },

   # The TimeOffset processor adds a dialog that lets the user choose to start
   # the inserted media at a specific frame or to time offset the inserted
   # media to a specific value.
   "TimeOffset": {

       # If true then enable this processor. If false then disable it and
       # don't offer any dialog for time offsetting media when bringing it
       # into the DAG.
       "enable": false,
   },
}
Example for a custom import processor setting: Copy media next to working file
Sometimes it might be necessary to copy over the media from the smartElements media browser to a location that is near the current working file. This makes for instance sense if you require to have all your media contained closely to your working file, for instance when you need to ship it to some other vendor or if you require to archive your working file afterwards. By default, smartElements already offers a custom import processor for that. It is located here:
smartElements.import_processors.copy_to_working_file.CopyToWorkingFile
This import processor will copy the media into a footage folder next to your working file and will remap your Read node to read this location.
In the settings section, enable the processor by setting the enabled flag
to true you can decide where you would like to store media relative to your
working file. In the media_path_relative_to_working_file settings section
you can set the path to copy the media to. This path is relative to you current
Nuke working file. By default it is set to ../footage. This means, we will
go up one directory of the directory in which the current working file is
located and then copy the data into a folder called footage. Inside this
folder we create a folder that uses the base name of the media. Inside this
folder we will copy all the data. If this folder does not exist, we will create
it on the fly. You can go up as many directories by using ../.
As an example, if we are working in Shot 10 with the following working structure we copy over the fire_element into a folder that lives now in our shot root directory:
- SH010
- scripts
SH010_v001.nk
SH010_v002.nk
SH010_v003.nk
- footage
- fire_element
fire_element.1001.exr
fire_element.1002.exr
fire_element.1003.exr
…
Keep in mind that you can adjust the directory to copy to to your needs.
Tip
All import processors log certain information in the background in debug
level. By default, the logging level is set to Info level. Switch it
in the smartElement’s settings section to Debug to get additional
information about the import processors printed to your terminal.
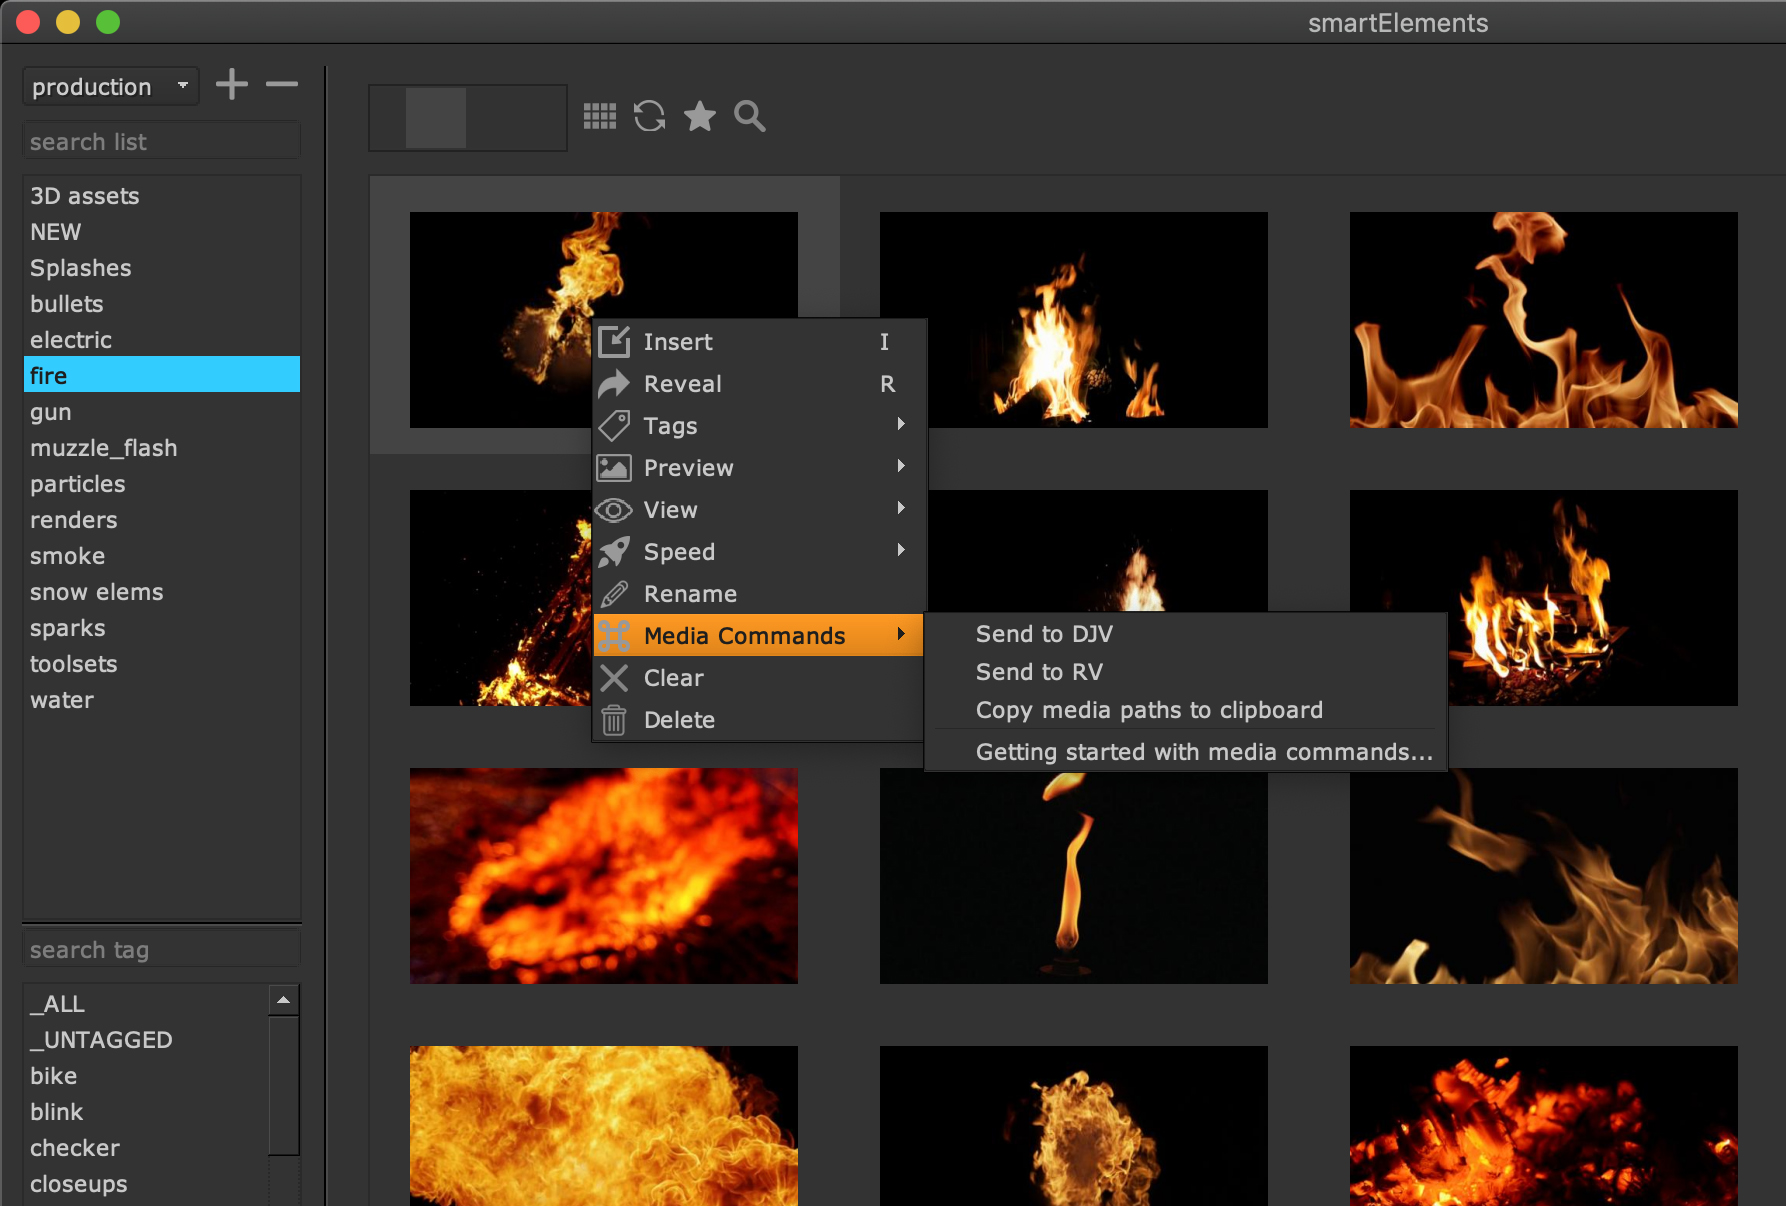
Media Commands
smartElements lets you trigger any custom commands on selected media. These commands are available in the ‘Media Commands’ menu of the context menu that appears when right clicking any media inside smartElements:
Keep in mind that you can run media commands on multiple selected media, so you are not limited to one selected media.
By default we already provide 3 custom media commands:
Send to DJV: Sends the selected media to the DJV media player. Keep in mind that the DJV application needs to be installed on your machine and you need to set the environment variable
CRAGL_SMARTELEMENTS_DJV_EXECUTABLEwhich should point to the absolute path of the DJV executable.Copy media paths to clipboard: Copies the media paths of all selected media to your clipboard.
Send to RV: Sends the selected media to the RV media player. Keep in mind that the RV application needs to be installed on your machine and you need to set the environment variable
CRAGL_SMARTELEMENTS_RV_EXECUTABLEwhich should point to the absolute path of the RV executable.
Writing custom Media Commands
All media commands classes are are contained in the media_commands python
package that is located in: smartElements.media_commands. Each media
command is located in a separate module and all media command classes inherit
from the abstract BaseMediaCommand class which is located in:
smartElements.media_commands.base_media_command.BaseMediaCommand.
This abstract base class provides base functionality for all media command classes. When creating a new media command you can simply inherit from this abstract base class. You will need to implement the following abstract methods:
label (None -> str): Return the label to show in the UI for this command.
process (:obj:`list` of :obj:`smartElements.media.Media` -> None): Process action for the selected media. This method dictates what to do when clicking the media command or executing it manually. When triggering the command from the smartElements context menu then the selected media will automatically be passed your custom command. If you want to execute your custom command via code please have a look at the example being provided in the module doc string of thebase_media_commandmodule.
You need to register the media command to smartElements so that it shows up
in smartElements . Navigate to smartElements.media_commands.__init__.py,
import your class and call
osl.register_media_command(<media command class>) at the end of the module.
Have a look at smartElements.media_commands.__init__.py for more
information as it already contains register examples.
Deprecating elements
After having worked with an element library for some time you might desire to deprecate certain elements, i.e. mark them as “Don’t use this element anymore”. Once an element has been ingested, it should however not be deleted anymore because it might eventually have been referenced in a production working file. Deleting an element might risk breaking existing working files that referenced these element. So how to handle this? In version 2.15.0 we have enabled a feature to mark an element as deprecated to inform users that they shouldn’t be using an element anymore. By not using it anymore, it gets deprecated over time and after some time it might be more secure to delete it. When to delete it and if ever deleting it at all is in your decision; We recommend not deleting anything once it has been ingested.
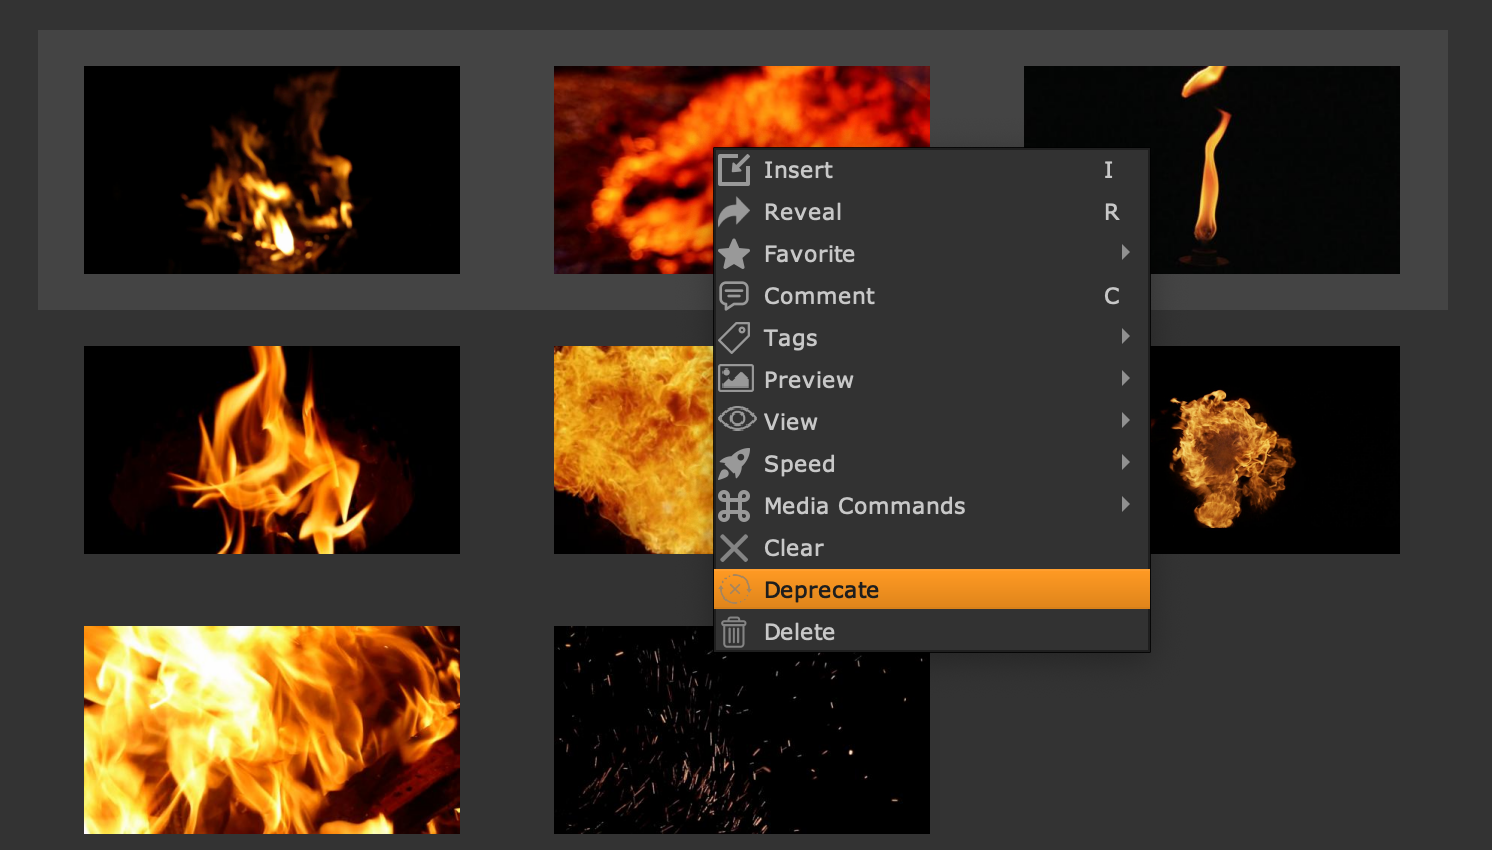
To deprecate elements, select one or multiple elements, right click and choose ‘Depreate’ from the contect menu:
In the upcoming window you confirm the deprecation of the stated elements. You can use the text field in the middle to give some reason why these elements shouldn’t be used anymore. Context helps yourself and your users.
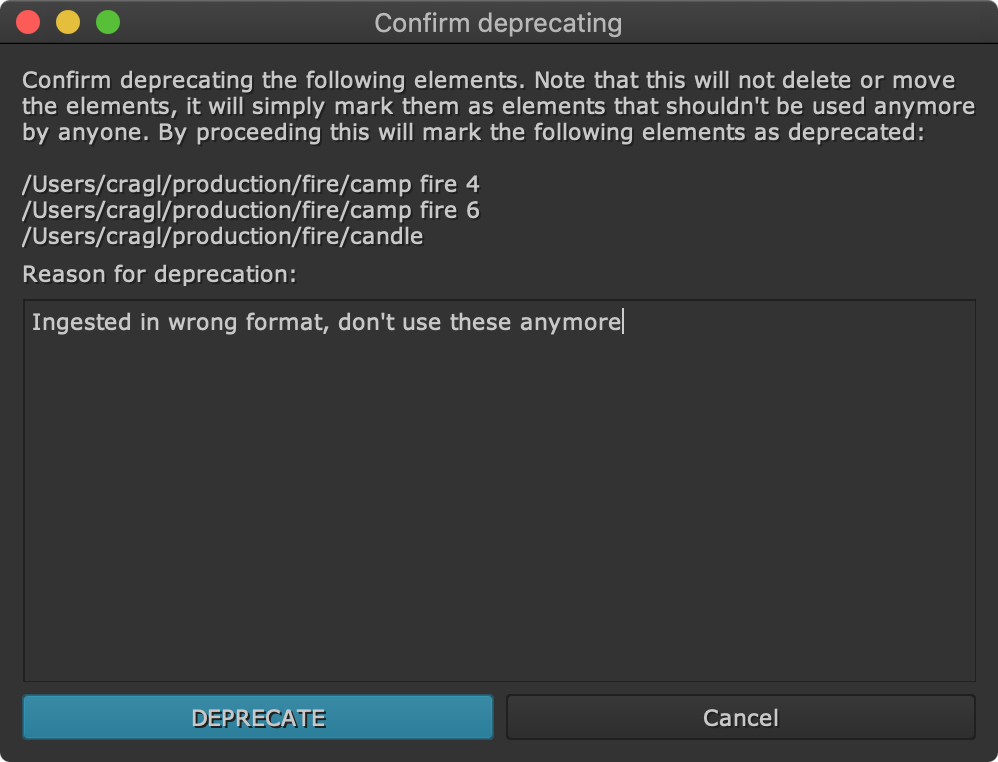
Confirm deprecating the elements by clicking the blue ‘Deprecate’ button.
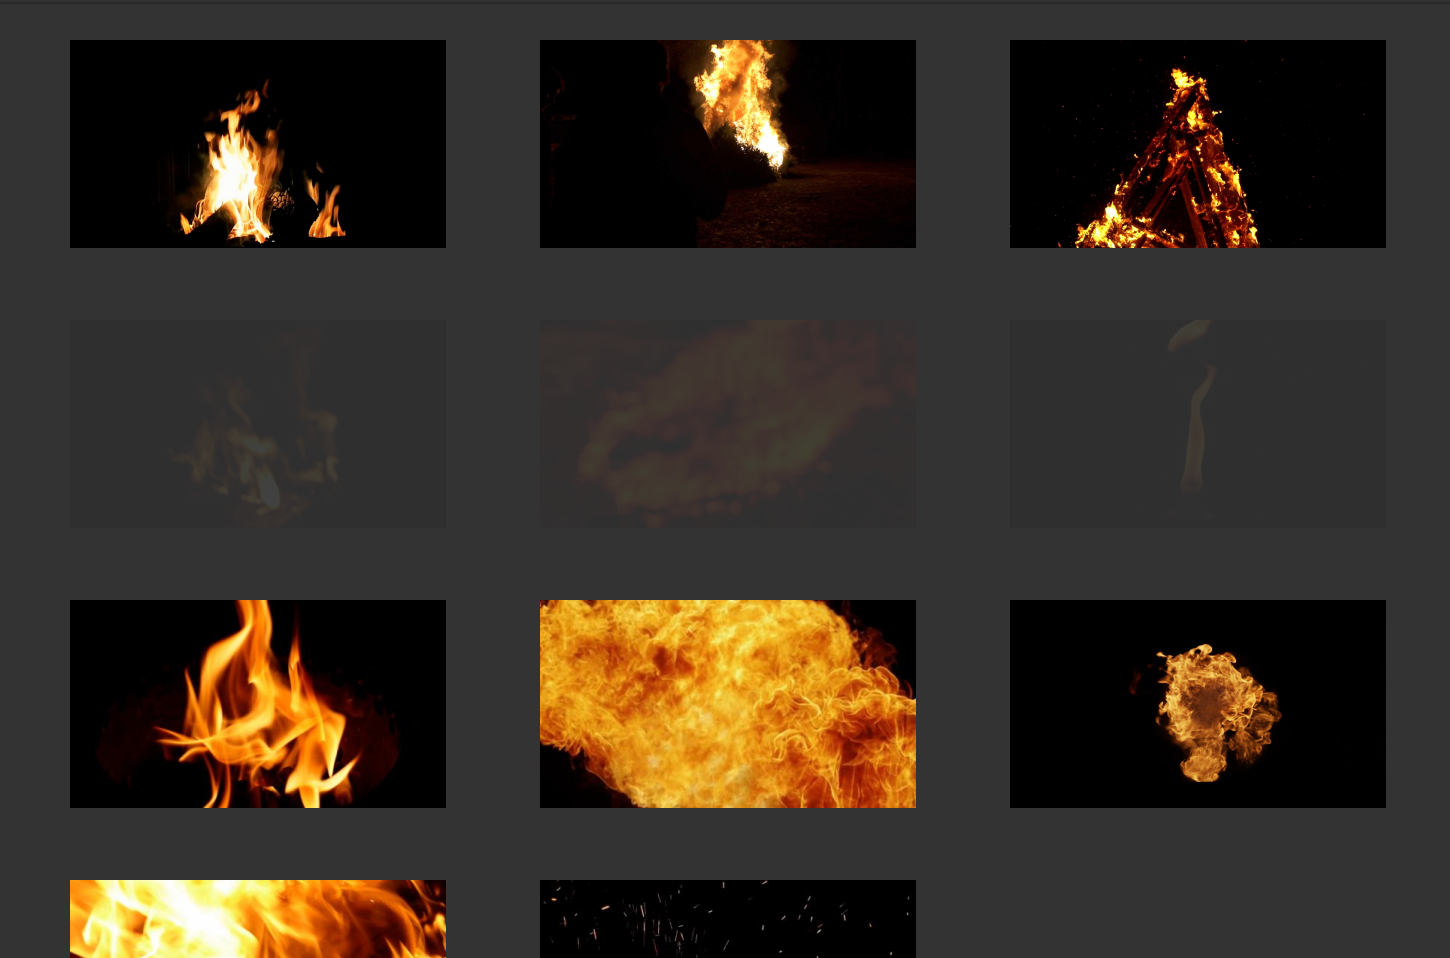
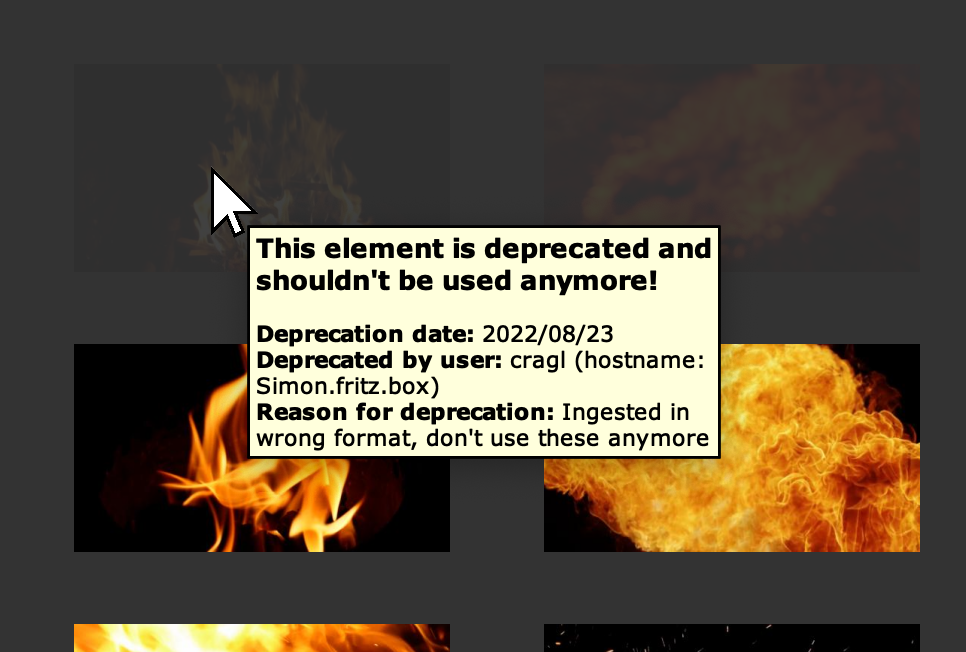
The elements appear now half transparent for you and your team:
You can still insert them into your working file but you will be remembered that this element shouldn’t be used anymore:
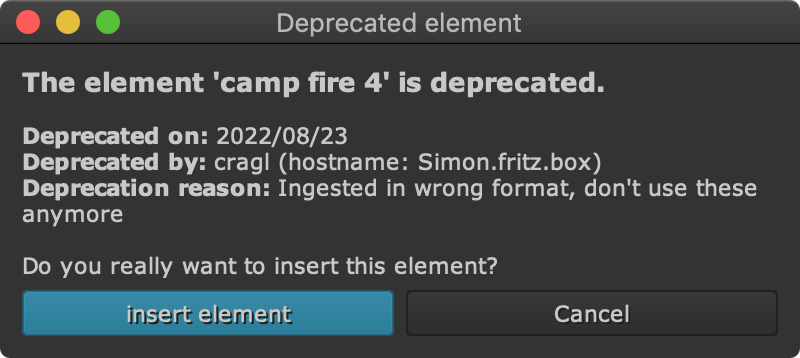
If you hover over a deprecated element in the element browser then you get more information about the deprecation:
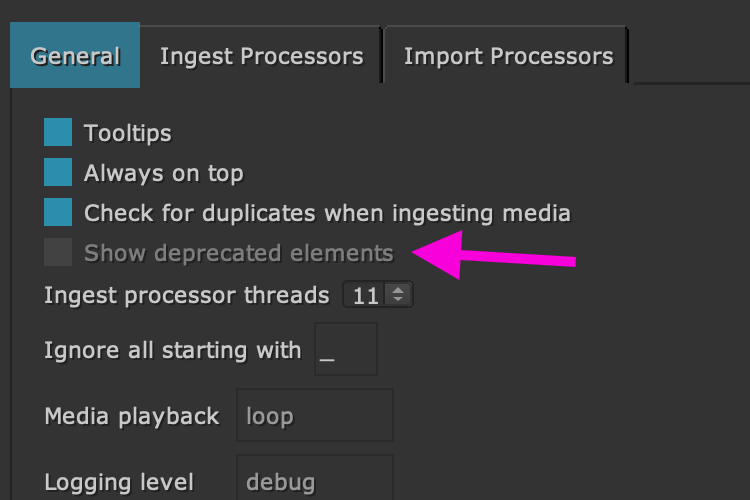
In smartElement’s settings you can also use the ‘Show deprecated elements’ checkbox to control if you would like to show deprecated elements or hide them.

Note
By setting the environment variable
CRAGL_SMARTELEMENTS_HIDE_DEPRECATED_ELEMENTS to the string value
True this will enforce to hide all deprecated elements. In that case
the above mentioned ‘Show deprecated elements’ checkbox in the settings
pane can’t be activated
Un-deprecating elements
There is no context menu command for un-deprecating an element as this might not be used often. If you come across the situation where you would like to revert the deprecation of an element then you can do this via the smartElements api:
>>> from smartElements import api

>>> element = api.get_element("stackname", "listname", "elementname")
>>> element.undeprecate()
Where stackname is the name of the stack that the element resides in,
listname is the name of the list that the element resides in and
elementname is the name of the element.
To find out more about the smartElements api please have a look at the api page.