cragl vfx tools | Nuke Python Tools and Plugins | smartShelves
smartShelves
Manage your node menus including nodes and gizmos in a clever and simple wayManage your node menues in a new way
smartShelves lets you manage you custom shelves including nodes and gizmos in NUKE in a simple fast and intuitive way. You can always add new nodes and gizmos, assign shortcuts to them and edit and delete items whenever you like. You can use smartShelves also for your custom repository. Just link to a custom folder and all gizmos are installed automatically on your machine.
No need to script anything anymore
To set up custom shelves you usually need some python scripting. smartShelves does that job for you. You can create custom shelves and add nodes and gizmos and don't need to script any line of code for that.
Features
• Shelves and gizmo manager for NUKE• Manage your node menus without any coding
• Easily install gizmos/ nodes and assign shortcuts
• Access the latest created nodes
Compatibility
Nuke11/12/13/14/15/16Linux, Mac, Windows
where to buy
download trial
browse changelog


1) Instal smartShelves
Like any other cragl product, SmartShelves can be installed with cragl connect directly inside NUKE.
Open connect and drag smartShelves to the right to reveal more information. Just click on "buy" and you will be located to the web page where you can purchase smartShelves. After purchasing you will receive a mail including an instal code. Now simply click on install, enter your received instal code and smartShelves will be installed automatically on your machine.
2) Access smartShelves
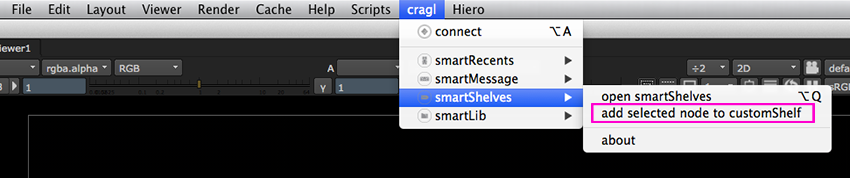
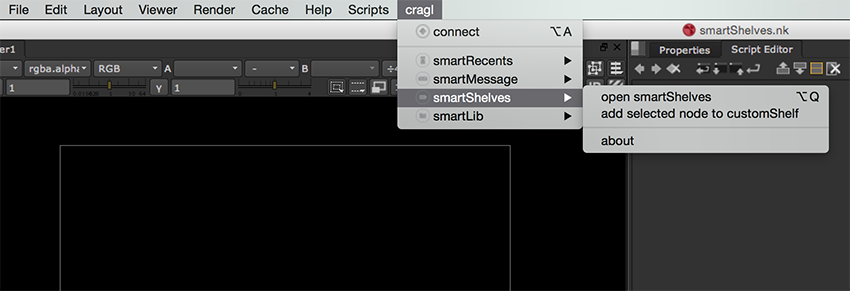 smartShelves can be accessed via NUKE's menu bar. Click on "cragl". In here you will now find the submenu "smartShelves" with its commands "open smartShelves", "add selected node to customShelf" and "about".
To access the main smartShelves window choose the option "open smartShelves". Alternatively you can hold alt or option and press Q.
smartShelves can be accessed via NUKE's menu bar. Click on "cragl". In here you will now find the submenu "smartShelves" with its commands "open smartShelves", "add selected node to customShelf" and "about".
To access the main smartShelves window choose the option "open smartShelves". Alternatively you can hold alt or option and press Q.
3) recentNodes
 recentNodes is a customShelf that is after installing smartShelves now available to you.
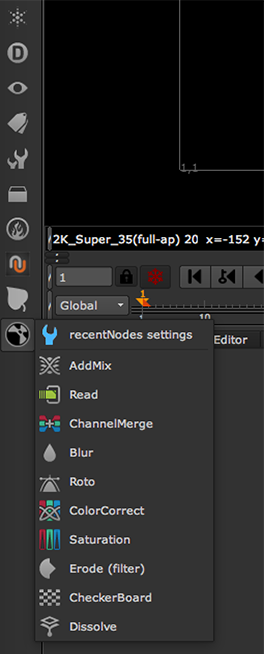
You find the shelf at the bottom of the nodes menu. Whenever you create a node, the node will be appended to this list. This gives you access to the recent nodes that you have used.
The nodes list is saved even after closing NUKE.
3.1) recentNodes settings
 To open the recentNodes settings click on the "recentNodes settings" command at the top of the list.
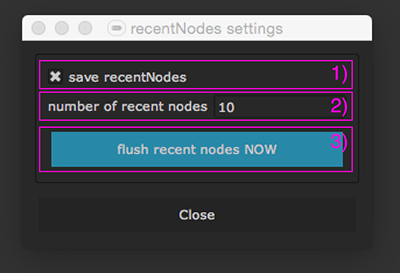
1) You can decide whether to save the recent nodes in the list or just have them lying in the list for the current NUKE session.
2) You can decide how many nodes to save in the smartRecents list. By default 10 nodes will be saved.
3) The "flush recent nodes NOW" clears the recentNodes list.
4) smartShelves display
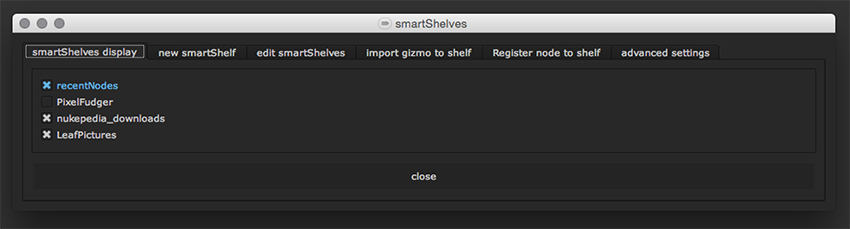 Here you can toggle on and of the visibility of customShelves to make more space in your interface.
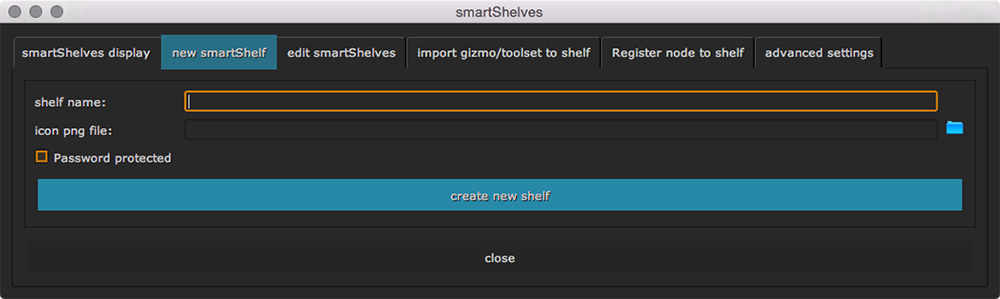
4.1) new shelf
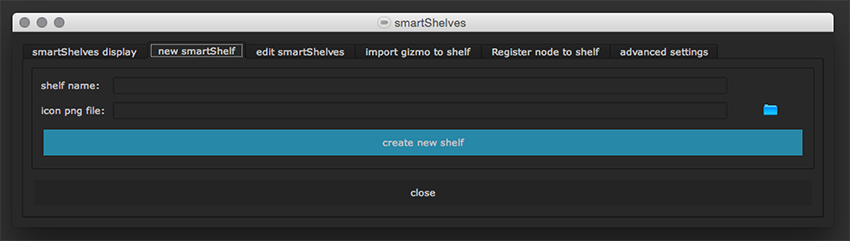 To add a new customShelf to your shelf menu switch to the second tab "new shelf". Enter a name for the new shelf. You can set an icon if you like. Finally click on "create new shelf".
The new customShelf will be added to your nodes menu and you can start populating it with nodes and gizmos.
To add a new customShelf to your shelf menu switch to the second tab "new shelf". Enter a name for the new shelf. You can set an icon if you like. Finally click on "create new shelf".
The new customShelf will be added to your nodes menu and you can start populating it with nodes and gizmos.
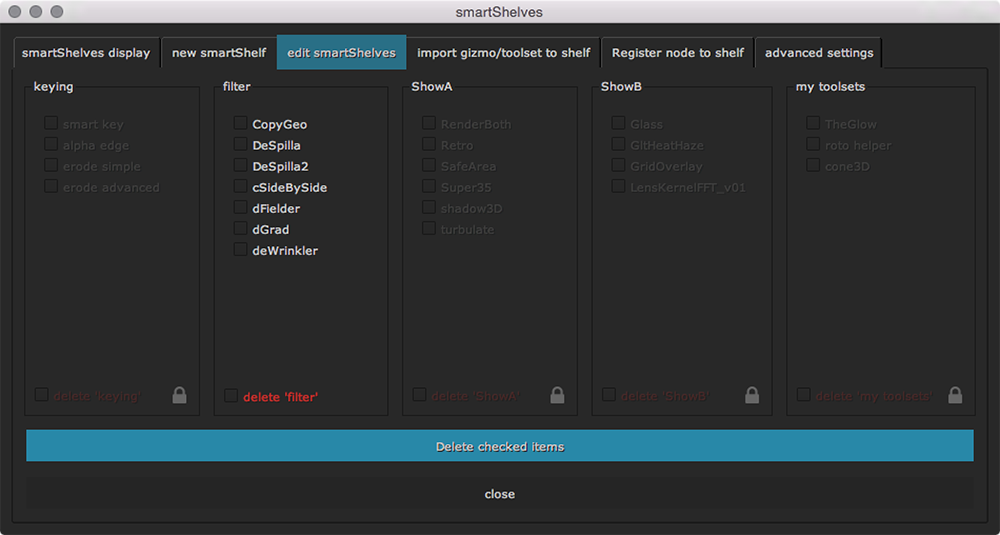
4.2) edit smartShelves
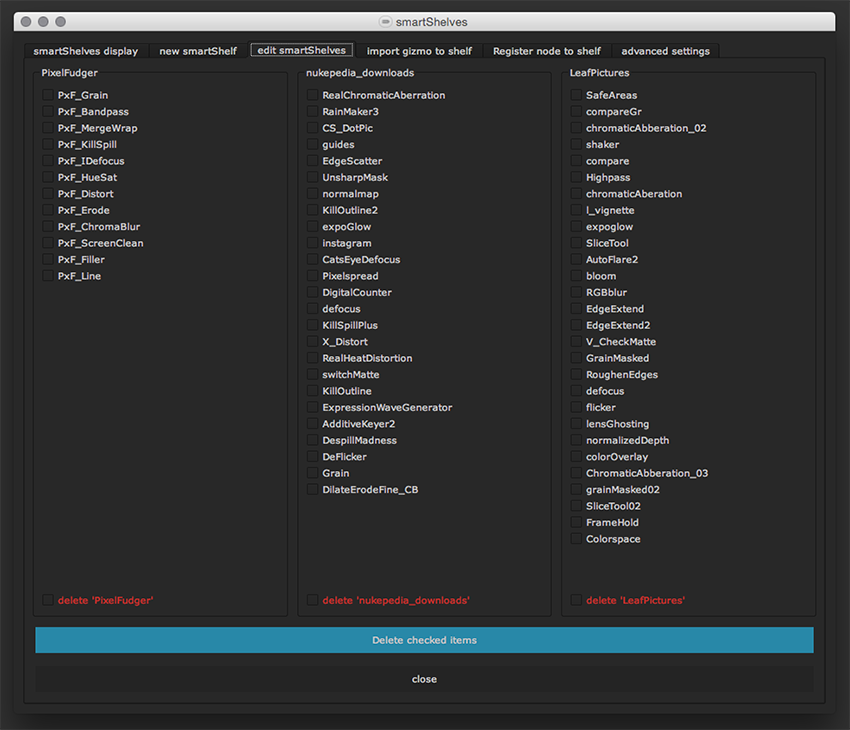 In the third tab you can edit your customShelves. This works by selecting the according checkboxes.
Here you find a list with all customShelves, in which every registered node or gizmo is represented with a checkbox.
To delete a node/gizmo from a shelf check the according checkbox and click the "delete checked items" button at the bottom. You can also delete a whole customShelf.
Just enable the according checkbox at the bottom and hit the "delete checked items" button. For your safety you have to confirm it. Please note: Deleting nodes, gizmos and whole customShelves cannot be undone.
In the third tab you can edit your customShelves. This works by selecting the according checkboxes.
Here you find a list with all customShelves, in which every registered node or gizmo is represented with a checkbox.
To delete a node/gizmo from a shelf check the according checkbox and click the "delete checked items" button at the bottom. You can also delete a whole customShelf.
Just enable the according checkbox at the bottom and hit the "delete checked items" button. For your safety you have to confirm it. Please note: Deleting nodes, gizmos and whole customShelves cannot be undone.
4.3) import gizmo to shelf
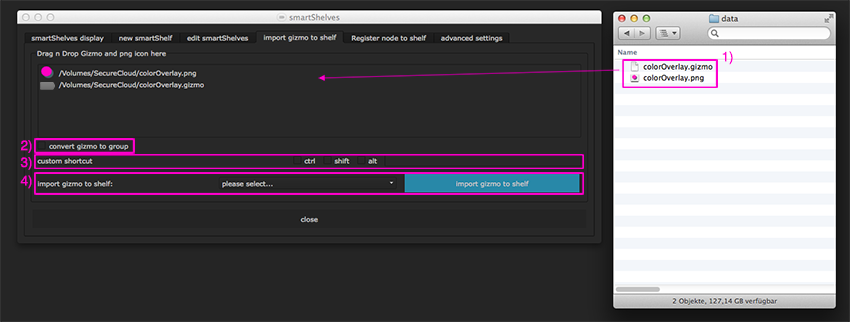 To add a gizmo to a customShelf switch to the fourth tab "import gizmo to shelf".
1) Simply drag and drop the gizmo from your explorer into the drag area at the top. If you have an png icon you can drag it into here as well. Alternatively, double click the drag area and you can browse for a gizmo and an icon.
2) Optional: If you like you can convert the gizmo to a group before adding it to your customShelf.
3) Optional: If you like you can set a shortcut for the new gizmo.
4) Finally choose the customShelf that you like to add the gizmo to and hit the "import gizmo to shelf" button.
You can also manually drag and drop a gizmo into the according customShelf directory in order to import the gizmo to your customShelf. For further information please see 6) Manually importing customShelves and gizmos.
4.4) Register node to shelf
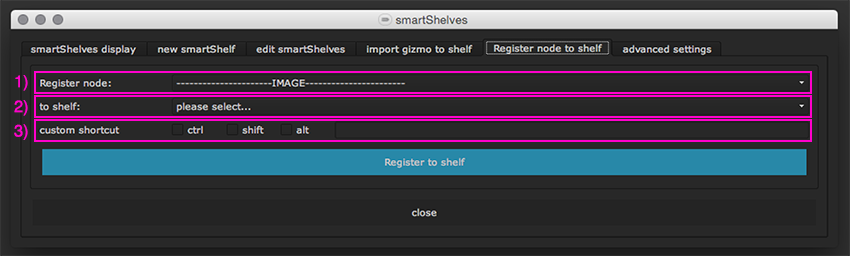 There are several ways to register a node to a customShelf. Please see also 5) Add a node to a customShelf
To register a node to a customShelf directly from within the smartShelves main window switch to the fifth tab "Register node to shelf".
1) Choose a node from the dropdown
2) Choose a customShelf that you like to append the node to
3) Optional: set a shortcut for creating that node.
4.5) advanced settings
By default smartShelves automatically creates a customShelf root directory in your user home directory which can be found here:
Linux: /home/[username]/cragl/smartShelves
Macintosh: /Users/[username]/cragl/smartShelves
Windows: drive:\Documents and Settings\[username]\cragl\smartShelves
Whenever you create a new customShelf a folder will be automatically created inside your customShelf root folder. the customShelf folder has the same name as your customShelf.
All gizmos that are imported to customShelves are stored in the according customShelf directory.
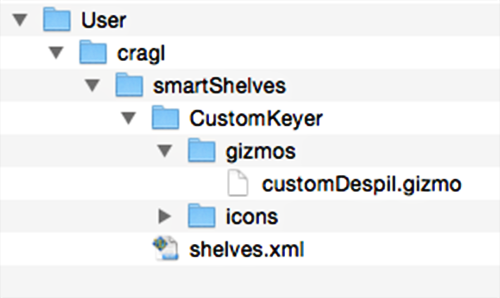
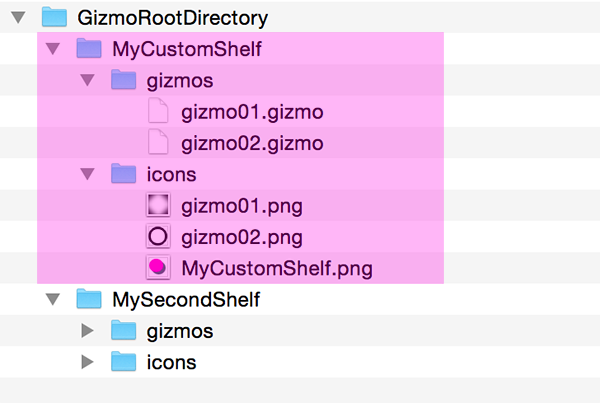
One example to illustrate this:
You created a customShelf called "CustomKeyer". In that customShelf you appended the gizmo "customDespil". So that means in your user folder you will find this folder structure:
 In the "advanced" tab you can customize the customShelf root directory and the path to your shelves xml in which all metadata about customShelves, nodes and gizmos is stored.
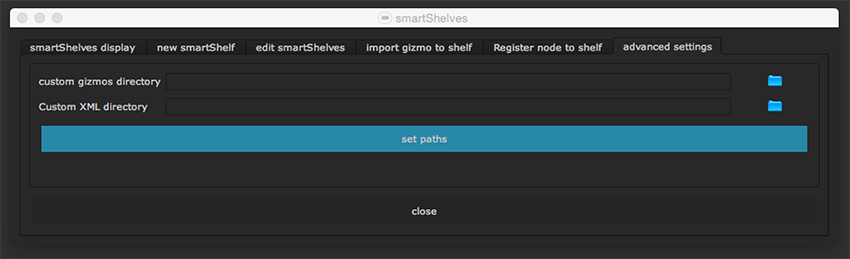 By default these inputs are empty which means that smartShelves creates the gizmos root directory in the folder "smartShelves" which is located in the "cragl" directory which is in your user home directory.
But you can also point to customized path. This can for instance be a gizmos repository on your server or in your cloud. All meta data for customShelves-, nodes- and gizmo settings will be saved to the shelves.xml which can also be set customized.
After setting these paths smartShelves will load all items automatically into your nodes menu.
By default these inputs are empty which means that smartShelves creates the gizmos root directory in the folder "smartShelves" which is located in the "cragl" directory which is in your user home directory.
But you can also point to customized path. This can for instance be a gizmos repository on your server or in your cloud. All meta data for customShelves-, nodes- and gizmo settings will be saved to the shelves.xml which can also be set customized.
After setting these paths smartShelves will load all items automatically into your nodes menu.
5) Add a node to a customShelf
 There are several ways to register a node to a customShelf.
To register a node directly inside the smartShelves main window Please see 4.4) Register node to shelf
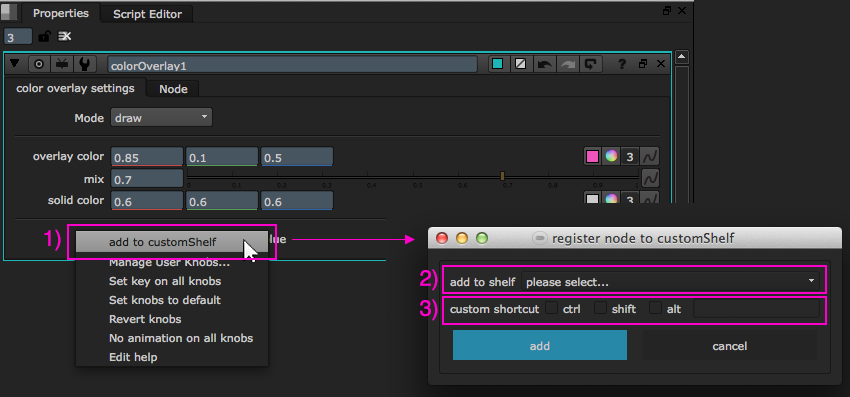
1) Right click the node that you like to append to a customShelf directly inside the properties bin and choose the command "add to customShelf".
2) Choose a customShelf that you like to add the node to.
3) Optional: You can set a shortcut to create that node.
Finally hit the "add" button.
Another way is to select the node that you like to add to a customShelf and choose "cragl->smartShelves->add selected node to customShelf". This will also show the "register node to customShelf" window.
6) Manually importing customShelves and gizmos
Whenever you create a customShelf then smartShelves sets up a folder with a sub folder structure automatically in which all imported gizmos for the customShelf are stored. If you haven't set your custom gizmos directory (please see 4.5 advanced settings)
then the gizmos root directory will be in "cragl/smartShelves" in your home directory. However, if you have set a custom gizmos directory then smartShelves
will use the set directory.
Each customShelf folder has this structure: Inside a customShelves folder you will find a "gizmos" folder and an "icons" folder. You can drop your gizmos and icons into the directories manually and the next time you launch NUKE these items will be added
to your customShelves automatically because whenever you launch NUKE all customShelves are scanned for new items. If smartShelves finds new items then these will be added automatically. That means you can drop as many items into the customShelves directory and they will all be added
automatically for you. This can save you a lot of time.
You can also create customShelves manually by creating the folder structure manually inside your explorer. That way you can also copy whole customShelves and they will all be added automatically. Please remember to stick to the folder structure as seen in the image below.
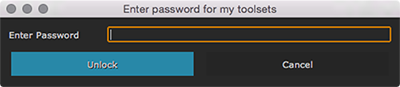
7) Locking custom shelvess
When creating a new shelf, you can password protect it. This is useful if you want to prevent other users from changing the custom shelf.
Simply check the "Password protected" checkbox when creating a new custom shelf.
 When clicking the blue "create new shelf" button, you will be prompted for a password. Enter a password and confirm it. The custom shelf is then password protected.
 When viewing the "edit smartShelves" tab, password protected shelves are greyed out.
 Any change to the shelf (adding new nodes, gizmos, toolsets, removing elements or the whole shelf) requires entering the password.
 Please understand that the password protect mechanism that smartShelves offers for you is by no means a fully secured system and we also do not intend to make this rocket save. The intention of the locking mechanism is rather to exclude certain users from quickly messing with custom shelves. We don't want to lock yourself as a custom shelves admin out in case you will ever forget the password. In case you do lock out yourself and cannot remember the password, please navigate to your shelves.xml which is located in your shelves directory (Probably in [USER-HOME-DIRECTORY]/cragl/smartShelves/shelves.xml when you have not set up a custom shelves directory in smartShelves advanced settings tab). In here, find your custom shelf, remove the "pw" tag and restart Nuke. The password protection will be removed. Alternatively, you can change the password to some different value. Search for an online md5 generator, type in your password and copy paste the md5 sum of your password into your pw tag.
FAQ for smartShelves
Here you will find some frequently asked questions on smartShelves. Please make sure to read them first. Please also have a look on the documentation. If you have any question that is not listed in here please don't hesitate to contact us. We are pleased to help you.
How do I install smartShelves?
Each cragl tool can be installed via cragl connect - our free tool to install and manage all of your cragl tools directly inside NUKE. If you haven't already done so please download connect.
By opening connect you will see a list of all cragl tools. You can drag and drop it to the right hand side of the connect window to reveal more infos. Just click on "buy". After purchasing you will receive an install code for your tool. Now simply click "install now" and enter the received install code. The tool will be downloaded and installed automatically for you. So you don't need to struggle with any install issue.
Do all machines need a license to view custom shelves?
No. You can see and use custom shelves even if you don't have a smartShelves license installed. This enables having one or just a few users that can add and edit custom shelves while the other users of the team will only have access to use the nodes and gizmos and can not edit these.
How do I connect smartShelves with my already existing repository?
You can use smartShelves with your existing repository. Please make sure to keep the folder structure as described in the documentation video so that smartShelves will find all your custom gizmos. Open the smartShelves window and navigate to the tab "advanced settings". In here you will find two inputs. one which will point to the gizmos directroy and one that will specigy the path for the shelves xml. All your settings are stored in the custom xml. So for example if you work in a company and need to connect to the company's repository just point the "custom gizmos directory" path to the directory in which all gizmos are stored. Your custom xml directory can then point to a local path on your computer. If you choose the custom xml directory to be on the server and another artist uses the same path then you will share a shelves xml and all your settings will be the same. So in most cases you will prefer the first option to store the shelves xml on your local disk.
I cannot remember the password of my protected custom shelf
Please understand that the password protect mechanism that smartShelves offers for you is by no means a fully secured system and we also do not intend to make this rocket save. The intention of the locking mechanism is rather to exclude certain users from quickly messing with custom shelves. We don't want to lock yourself as a custom shelves admin out in case you will ever forget the password. In case you do lock out yourself and cannot remember the password, please navigate to your shelves.xml which is located in your shelves directory (Probably in [USER-HOME-DIRECTORY]/cragl/smartShelves/shelves.xml when you have not set up a custom shelves directory in smartShelves advanced settings tab). In here, find your custom shelf, remove the "pw" tag and restart Nuke. The password protection will be removed. Alternatively, you can change the password to some different value. Search for an online md5 generator, type in your password and copy paste the md5 sum of your password into your pw tag.
Versions
Here you find an overview of the smartShelves's versions and its improvements. Please log in to download versions.
smartShelves v2.13
• Update to nuke-16
smartShelves v2.12
• Sort shelves alphabetically (advanced settings)
smartShelves v2.11
• Update to nuke-15
smartShelves v2.10
• Group nodes and gizmos under sub menus
smartShelves v2.9
• Add studio model
• Various style changes
• Add help menu
smartShelves v2.8
• Update to nuke-14
smartShelves v2.7
• Fix dropping license into license window raises UnicodeDecodeError
smartShelves v2.6
• Fix reading trial license data fails decrypting
• Send email to license author when machine installs license
smartShelves v2.5
• Make Nuke-13 ready
smartShelves v2.4
• Allow install if mac id is already in DB and license quantity is 0
• Speed up running in offline mode
smartShelves v2.3
• Open up for site licenses
• Use credentials to install a tool
• Update internal package structure
smartShelves v2.2
• Enable functionality to lock custom shelves
• Enable functionality to register nk files to custom shelves
• Enable functionality to export a node selection to custom shelves
• Fix converting gizmo to group node when option is enabled
• Fix icon was not saved to a gizmo when the icons folder did not exist
smartShelves v2.1
• Fixed bug that broke the settings when a setting value didn't exist.
smartShelves v2.0
• Made Nuke11 ready
• Major code updates and code improvements
smartShelves v1.2
• Quick Edit menu
• hide smartShelf
• edit smartShelf
• import gizmo to shelf - smartShelf automatically selected
• register node to shelf - shelf automatically selected
• Icons for all commands
• Settings advanced checkbox for show/ hide quick edit
smartShelves v1.1
• fixed bug that caused problems with loading custom shelves when setting up a custom shelves directory and xml directory paths in MacOS
smartShelves v1.0
initial release
You might also be interested in these tools