cragl vfx tools | Nuke Python Tools and Plugins | smartLook
smartLook
Fast look development inside NUKE, Infinite global toolsetssmart look development
smartLook offers the snapshot browser to take snapshots of your work, flag and comment snapshots and work collaboratively on look versions for your comps.
smartLook lets you save, edit, import and export looks for each node. You can save different node- and even multiple animation versions for your nodes. By using a slider you can then quickly toggle between your versions. This enhances look development inside NUKE and improves working efficiently with multiple node versions.
Infinite global toolset directories
Using smartLook you can set up an inifinite amount of global toolsets that you can use to share toolsets with your team. Do you need multiple global toolset directories for different shows at a time? No problem, using smartLook setting up a global toolset will take you just a few seconds. And meanwhile you can also use your personal private toolset directory.
Set your resolution faster than ever before
Using NUKE's internal dropdown menu to set your nuke script's downrez resolution is an efficient way of keeping even huge nuke script at a reasonable processing time while working. Using smartLooks downrez slider you can switch between multiple downrez scales faster than ever before.
FAQ
Do you have any question about smartLook? make sure to read our tools specific faq for smartLook.Features
• Enhancing look development inside NUKE• Snapshot browser
• Create, save, edit, import and export looks
• Quickly toggle between different looks
• Infinite global toolset directories
• Set your viewer resolution faster than ever before
Compatibility
Nuke11, Nuke12, Nuke13, Nuke14, Nuke15Linux, Mac, Windows
where to buy
download trial


1) Installing smartLook
Like any other cragl product, SmartLook can be installed with cragl connect directly inside NUKE.
Open connect and drag smartLook to the right to reveal more information. Just click on "buy" and you will be located to the web page where you can purchase smartLook.
After purchasing you will receive a mail including an install code. Now simply click on install, enter your received instal code and smartLook will be installed automatically on your machine.
2) Accessing smartLook
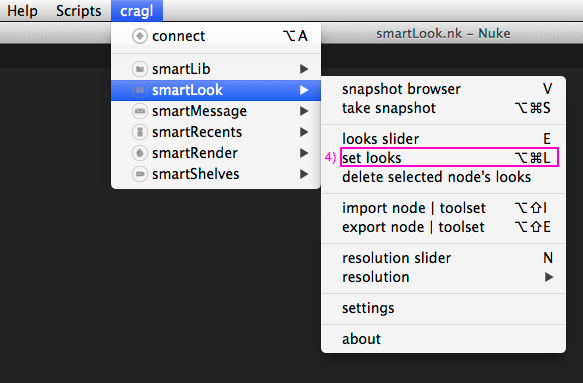
smartLook can be accessed via NUKE's menu bar. Click on "cragl". In here you will find the submenu "smartLook". It contains the following commands:
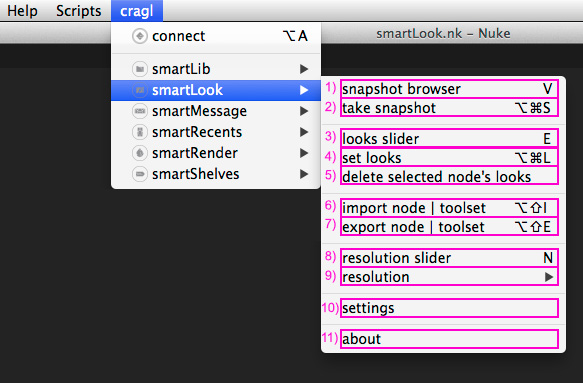 1) snapshot browser: Click to open the snapshot browser.
2) take snapshot: Click to take a snapshot from the current viewer node.
3) looks slider: Click to open the looks slider to switch between looks.
4) set looks: Click to create a new look for the currently selected node(s) at their current stage.
5) delete selected node's looks: Click remove all looks of the selected node(s).
6) import node | toolset: Click show the toolset import window.
7) export node | toolset: Click show the toolset export window.
8) resolution slider: Click show the resolution slider to change your viewing resolution.
9) resolution: Menu to change the viewing resolution manually.
10) settings: Click to open the smartLook settings window.
7) about: Click to open the smartLook about window.
Please note: All shortcuts for these commands can be customized in the settings window. Please refer to 8.3) Settings - hotkeys.
3) Working with snapshots
A snapshot is the complete node selection of your current viewer node. A snapshot contains the rendered preview image, the nuke nodes and some meta data. The snapshots can be viewed in the snapshot browser. To save a snapshot please refer to 3.2) Taking snapshots.
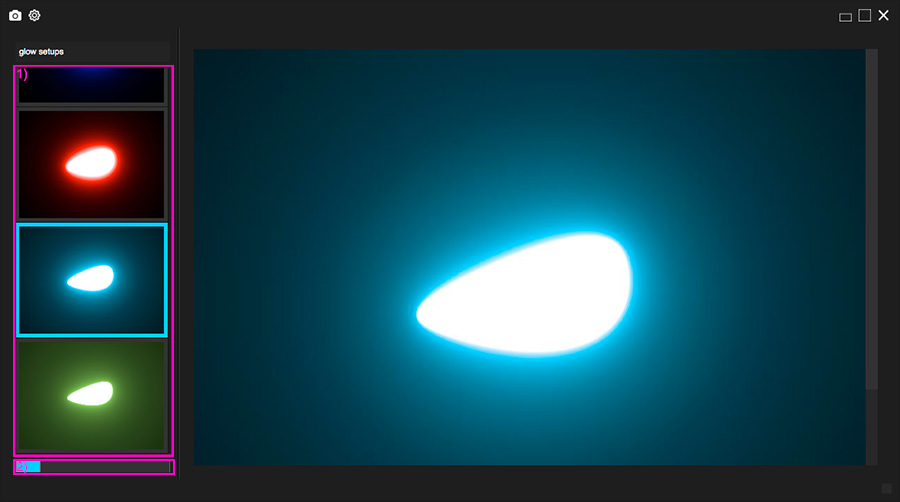
3.1) The Snapshot browser
The snapshot browser can be opened via nuke's menu bar: cragl->smartLook->snapshot browser. Alternatively you can press the V key on your keyboard.
This hotkey can be customized in the smartLook settings window in the hotkey section. Please refer to 8.3) Settings - hotkeys.
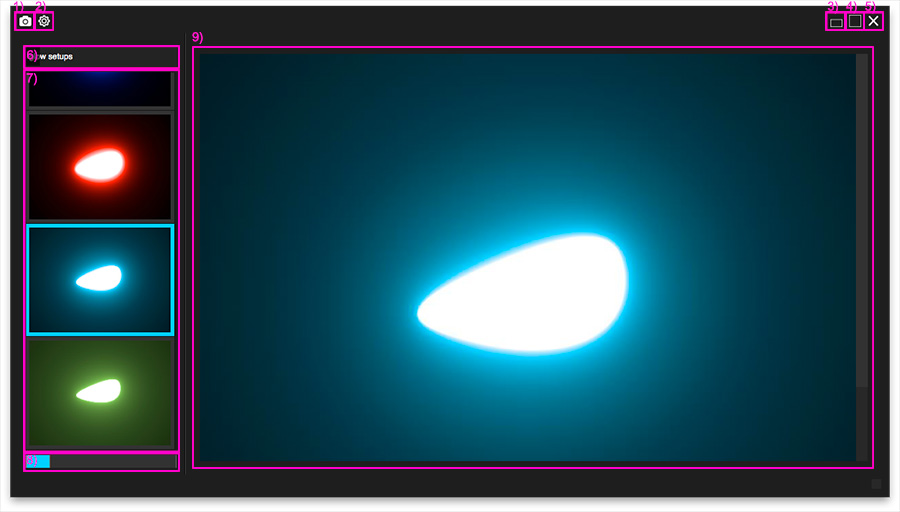 1) take snapshot: Click to take a snapshot of the current viewing node.
2) snapshot settings: Click to reveal the snapshot browser settings section.
3) custom size: Click to resize the snapshot browser to its custom size which can be set in the snapshot browser's settings section.
4) maximize: Click to maximize the snapshot browser to your monitor.
5) close: Click to close the snapshot browser.
6) switch snapshot directory: Click open a dropdown widnow to switch the current snapshot directory, delete or create a new snapshot directory.
7) snapshot thumbnails list: Lists all snapshots of the currently selected snapshot directory.
8) slide snapshots: Slider to change the snapshot preview.
9) snapshot preview: Preview of the currently selected snapshot.
3.2) Taking snapshots
To save a snapshot you can use the menu bar via cragl->smartLook->take snapshot. The default shortcut for this command is Ctrl+Alt+S
which can be customized in the smartLooks settings window. Please refer to 8.3) Settings - hotkeys. Alternatively you can create snapshots directly inside the snapshot browser
by clicking the small camera icon at the top left (1).
By taking a snapshot a snapshot will be exported to the currently set snapshot directory. You can set it with the "switch snapshot directory" pulldown (6).
A snapshot contains the rendered preview image, the nuke nodes and some meta data. The snapshot preview will be appended to the snapshot thumbnail list and will be selectable from here.
3.3) Snapshot browser settings
The snapshot browser provides an own settings section to customize it to your needs. By clicking the small settings icon at the top left of the snapshot browser the settings section will be revealed.
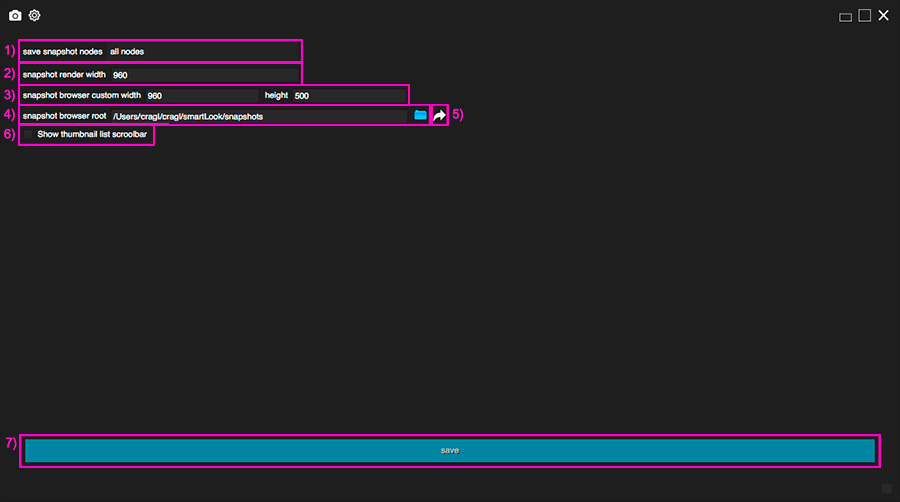 1) save snapshot nodes: Choose which nodes to save when taking a snapshot:
all nodes: All nodes in your nodegraph, meaning the whole nuke script
upstream nodes: All nodes that are upstream connected to your currently viewed node
node selection: All selected nodes
2) snapshot render width: Width of the snapshot previews. choose between a pixel width between 100px and 2048 px.
3) snapshot browser custom width and height: When clicking the custom size button at the top right of the snapshot browser resize the snapshot browser to the custom size that is set in here.
4) snapshot browser root: Here you can set the root directory in which all snapshot directories are created. By default this location is ~/cragl/smartLook/snapshots.
5) reveal snapshot browser root: Click this button to reveal you currently set snapshot browser root.
6) reveal snapshot browser root: If checked show scrollbar in thumbnail list. If you use a mouse which contains a scroll wheel then this scrollbar can be switched off as it is not needed.
7) save: Click to save the snapshot browser settings.
3.4) Working with snapshot directories
The snapshot root directory contains snapshot directories that contain snapshots.
The snapshot root directory can be set in the snapshot settings section. To set the snapshot root directory please refer to 3.3) snapshot browser settings (4) snapshot browser root).
To create a new snapshot directory open the snapshot browser and navigate to the snapshot browser dorpdown at the left. In the dropdown please choose "new snapshot directory":
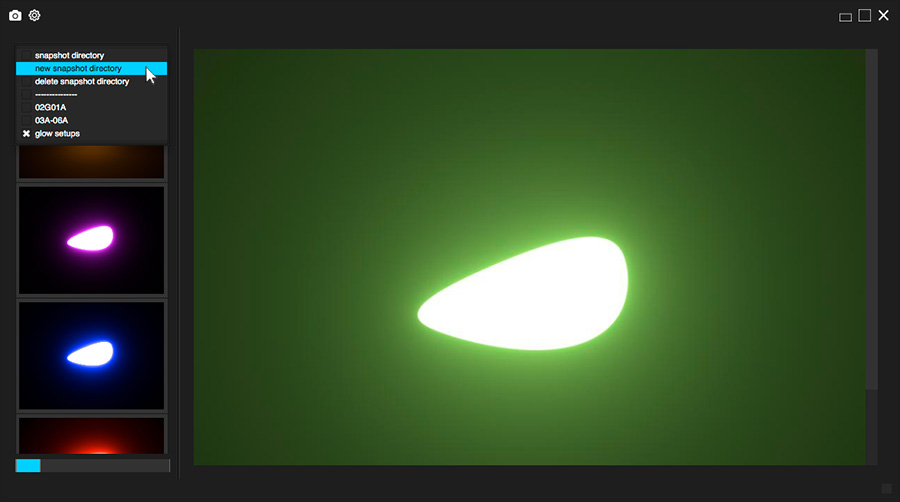 A dialog will open in which you can enter the new snapshot directory name. By clicking "ok" a new sub directory will be created inside the snapshot root directory.
3.5) Setting your snapshot directory
To set a snapshot directory please choose one of the snapshot directories in the snapshot browser's snapshot directory dropdown menu. As soon as you select it the snapshot thumbnail list gets populated with the snapshots of the currently set snapshot directory. the set snapshot directory will be remembered and whenever you re open the snapshot browser the snapshot directory will be set as current snapshot directory.
3.6) Deleting a snapshot directory
To delete a snapshot directory please select in from the snapshot directory first. As soon as it is selected re open the snapshoht directory and choose "delete snapshot directory". A dialog will show up to confirm deleting the snapshot directory. By clicking delete the snapshot directory including all snapshots preview images, nodes and meta data will be deleted. This action cannot be undone so please handle with care.
3.7) The snapshot thumbnail list
The snapshot thumbnail list contains all snapshots of the current snapshot directory. The thumbnails are listed descending by creation date meaning the latest thumbnails appear at the top of the list.
 To preview a snapshot thumbnail simply double click it. The thumbnail list can be enlarged by draging the vertical line next to the thumbnail list.
To cycle through all snapshots you can use the version slider at the bottom of the thumbnail list (2). By sliding it to the right will show older snapshot versions. Alternatively you can use the up and down arrow keys on your keyboard to cycle throught all snapshot versions.
To preview a snapshot thumbnail simply double click it. The thumbnail list can be enlarged by draging the vertical line next to the thumbnail list.
To cycle through all snapshots you can use the version slider at the bottom of the thumbnail list (2). By sliding it to the right will show older snapshot versions. Alternatively you can use the up and down arrow keys on your keyboard to cycle throught all snapshot versions.
3.7.1) The snapshot thumbnail list's right click menu
By right clicking the thumbnail list the following menu will popup:
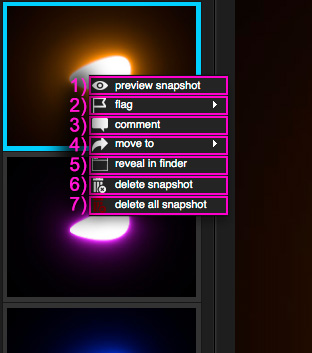 1) preview snapshot: Click to preview the currently selected snapshot in the preview section on the right.
2) flag: Menu to flag the currently selected snapshot. To find out more about flaging snapshots please refer to 3.7.2) Flagging snapshots
3) comment: Click to comment the currently selected snapshot. For more information about commenting a snapshot please refer to 3.7.3) Commenting snapshots
4) move to: Menu which displays all snapshot directories. Choose a snapshot directory to move the currently selected snapshot to another snapshot directory.
5) reveal in explorer: Click to reveal the currently selected snapshot in your explorer.
6) delete snapshot: Click to delete the currently selected snapshot. This can also be done by hovering over a snapshot and pressing the "D" key.
7) delete all snapshots: Click to delete all snapshots of the current snapshot directory. A dialog will appear in which you need to confirm this action. By deleting all snapshots all preview images, nodes and meta data of the current snapshot directory will be remove. Please note: This action cannot be undone. So please handle with care.
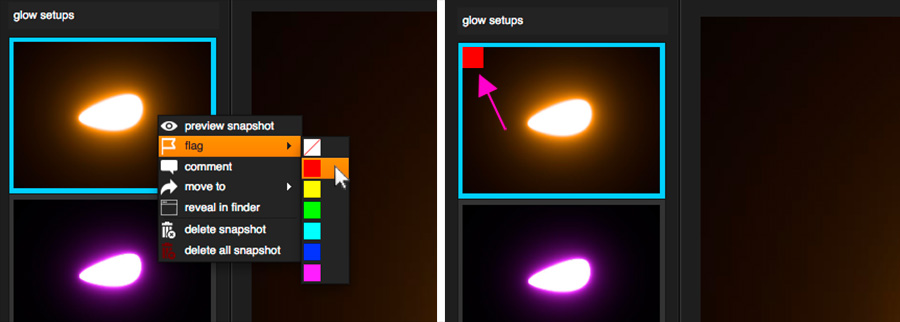
3.7.2) Flagging snapshots
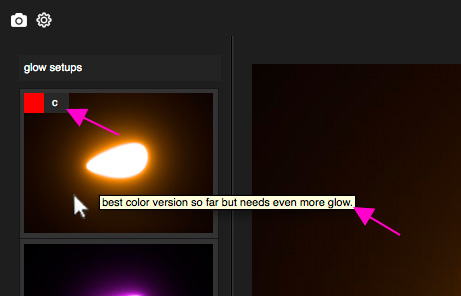
You can flag a snapshot so that it will be visible to you and other artist as a special snapshot.
To flag a snapshot hover over a snapshot right click and choose "flag" from the pop up menu and set a color. The thumbnail will now display the chosen color at the top left.
3.7.3) Commenting snapshots
You can comment a snapshot to keep some notes for you and other artists.
To comment a snapshot hover over a snapshot right click and choose "comment" from the pop up menu. A dialog appears in which you can enter your comment:
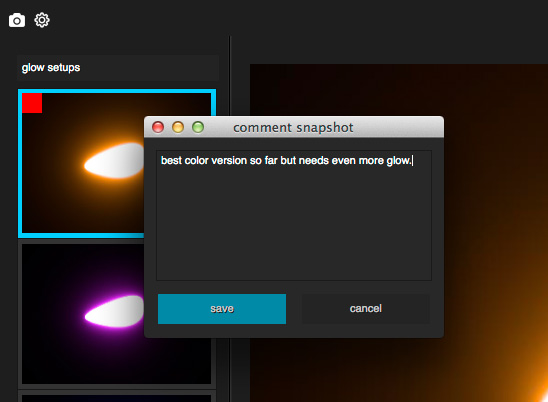 By clicking the "save" button the comment will be stored for the currently selected snapshot. A "C" icon will show up at the top left of the snapshot thumbnail displaying that this
snapshot includes a comment. To remove the comment just repeat the process and delete the text from the text input. The "C" icon will disappear.
The comment will be visible by hovering over the thumbnail:
By clicking the "save" button the comment will be stored for the currently selected snapshot. A "C" icon will show up at the top left of the snapshot thumbnail displaying that this
snapshot includes a comment. To remove the comment just repeat the process and delete the text from the text input. The "C" icon will disappear.
The comment will be visible by hovering over the thumbnail:
3.8) The preview section
The preview section shows the currently selected snapshot. To show a snapshot simply select one from the snapshot thumbnail list and double click it or right click a snapshot thumbnail and choose "preview snapshot".
3.9) Navigating the preview section
You can use your plus and minus key on your keyboard to zoom into the preview image. By pressing the "H" key the image will be resized to fit the preview section. To pan the preview image hold the Alt key and click and drag. This works like panning NUKE's image viewer.
3.10) The preview section's right click menu
Right click the preview image to display its right click menu:
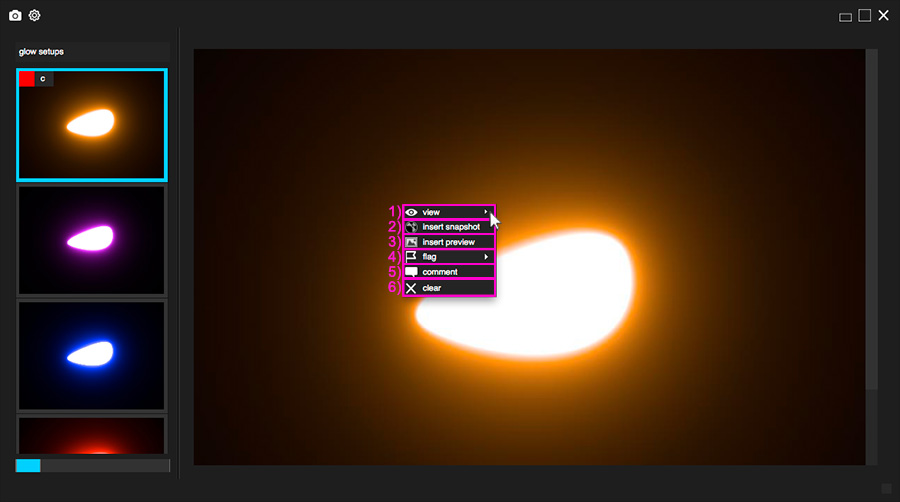 1) view: Navigation menu that shows the commands to zoom in, zoom out and fit to view. Please refer to 3.9) Navigating the preview section
2) insert snapshot: Click to insert the snapshot node connection of the current snapshot into your node graph. For more information please refer to 3.11) Inserting snapshots
3) insert preview: Click to insert the snapshot preview as a read node into your node graph.
4) flag Another location to flag your current snapshot. Please refer to3.7.2) Flagging snapshots
5) flag Another location to comment your current snapshot. Please refer to3.7.2) Commenting snapshots
6) clearClear the current snapshot preview. Please note: This will not delete your snapshot but simply clear it from the preview.
3.11) Inserting snapshots
To insert your current snapshot preview into your node graph please right click the snapshot preview and choose "insert snapshot".
A dialog will show up in which you have three options:
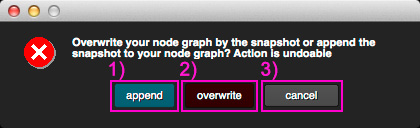 1) append: Click to append the snapshot nodes to your node graph. All
2) overwrite: Click to delete all your current nodes in your node graph and replace them with the snapshot nodes.
3) cancel: Cancel and don't insert any snapshot nodes.
Please note: The chosen action is undoable. So if you decide to undo the insertion there is no problem to do so.
3.12) Changing the snapshot root directory
In the snapshot browser settings section you can set your snapshot browser root directory. That is the folder in which all snapshot directories including all snapshots are saved. By default the snapshot root directory is in ~/cragl/smartLook/snapshots
Please note that you can set a network snapshot root directory that multiple artists can access. By doing so you and your team can work collaboratively in the same snapshot directory and share their snapshot amongst other artists.
To do so simply chose a path that can be accessed by multiple artsits. This could be for instance a path on your server or a path in your cloud.
4) Working with node looks
smartLook lets you create infinite looks on any node class. A look saves all knob values of the node at its current stage. Animations and
expression will be saved as well inside the nodes which makes trying different versions and look development inside NUKE quick and efficient.
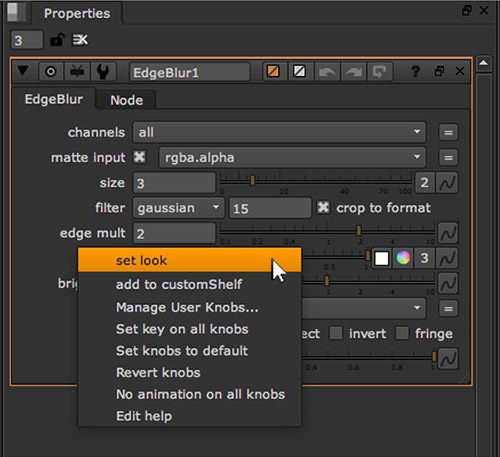
4.1) Creating looks
To create a look on a node simply right click on an empty space of the node's properties in the properties bin and choose the command "set look".
 An alternative way of creating looks, especially for a node selection of multiple nodes can be accomplished via nuke's menu bar. Please navigate to "cragl -> smartLook -> set looks".
 When executing this command looks will be created for all selected nodes. Using this function you can set looks for multiple nodes in one go.
Once you have executed the "set look" command a look container (group node) will be created in your node graph and automatically
positiond as most top left node in your node graph. the current node stage will be written to the the look container.
Your executed node will also gain a new tab "looks".

4.2) The looks tab
Once you have created a look for a node the node will contain a new tab "looks" which contains the following widgets:
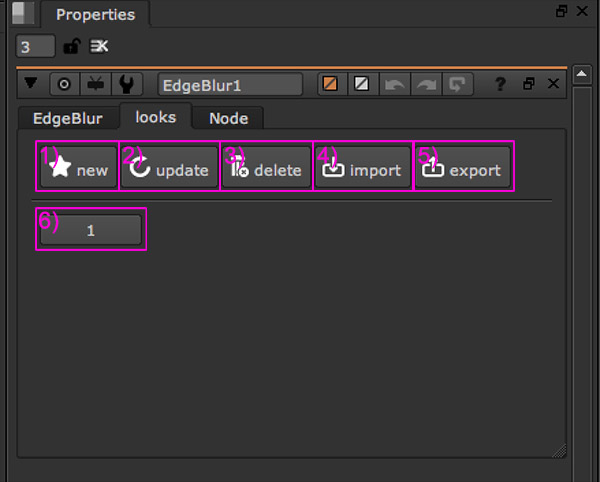 1) new: Click to create a new look based on the current node's stage.
2) update: Click to update a look.
3) delete: Click to delete a look.
4) import: Click to open the import browser.
5) export: Click to open the export browser.
6) looks buttons: Here are all look buttons stored. Clicking one item converts the node's stage to the selected look.
4.3) "New" button
Clicking the "new" button creates a new look for the selected node based on the node's current stage. This has the same effect as clicking the "set looks" command (2) Accessing smartLook) and right clicking the node and choosing "set look" 4.1) Creating looks
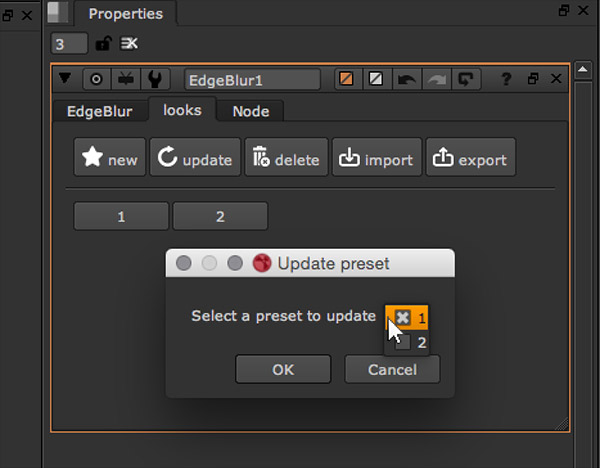
4.4) "Update" button
Clicking the "update" button opens a new window in which you can choose the look to update. The selected look will be overwritten with the node's current stage.
4.5) "Delete" button
Clicking the "delete" button opens a new window in which you can choose the look to delete. The selected look will be deleted from the look container and the look button on the node will disappear as well.
To delete all look knobs of the selected node(s) navigate to the menubar and choose cragl->smartLook->delete selected node's looks.

4.6) "Import" button / "Export" button
Clicking the "import" button opens the import browser. For more information about the import please refer to 6) Working with the Import nodes | toolsets window
Clicking the "export" button opens the export browser. For more information about the export please refer to 5) Working with the Export nodes | toolsets window
4.7) Look buttons
At the bottom of the looks tab all look buttons are stored. Clicking one item converts the node's stage to the selected look. You can use the looks slider to change to another look a lot quicker. Please refer to 4.9) Working with the Looks slider.
4.8) Delete selected node's looks
To delete all look knobs of the selected node(s) navigate to the menubar and choose cragl->smartLook->delete selected node's looks.

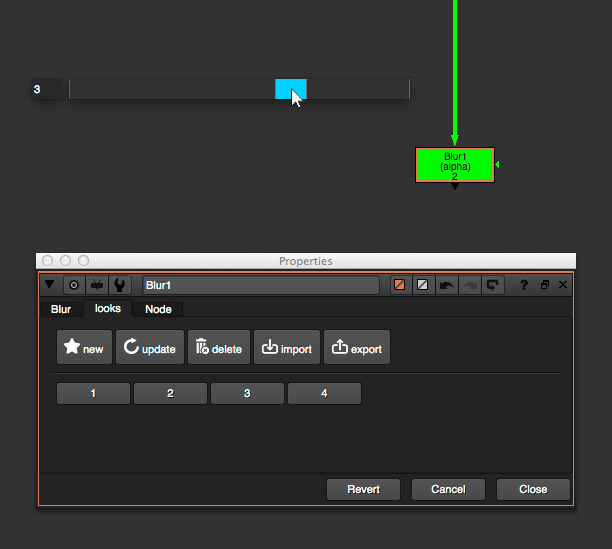
4.9) Working with the Looks slider
After having set some looks for a node / multiple nodes you can interactively slide through all node versions. Select the node(s) that contain looks and
press the E key on your keyboard. A slider will appear. By sliding it from left to right you change to node(s) to another version.
 In the smartLook settings window you can customize the hotkey for launching the looks slider. By default it is set to "E". For more information on customizing shortcuts please refer to 8.3) Settings - hotkeys.
5) Working with the Export nodes | toolsets window
smartLook provides an export window to export single node presets as well as toolsets (node connection containing multiple nodes). The node presets and toolsets are saved in so called "pools". You can create as many
pools as you like and use private pools that only you will have access to as well as public pools to work collaborative with other artists in a team.
One example: You can use one private pool for private toolsets, one private pool for toolsets that are "work in progress", several public pools for each show that you and your team
work on and one public pool for sharing toolsets in a team.
This is just one example of how you can use pools. Feel free to find your own workflow of using a combination of private and public pools. or use only private pools. Or only public pools. You decide.
5.1) Accessing the Export nodes | toolsets window
To open the export nodes | toolsets window select one node of multiple nodes that you like to export. By selecting just one node you will process exporting a single node preset.
By selecting multiple nodes you will process to export a toolset. After having selected a node / multiple nodes navigate to the menu bar and choose cragl->smartLook->export node | toolset.
By default the shortcut for this action is Shift+Alt+E. In the smartLooks settings you can customize this shortcut to your needs. For more information on customizing shortcuts please refer to 8.3) Settings - hotkeys.
By executing the command the export window will appear. The window contains 6 sections:
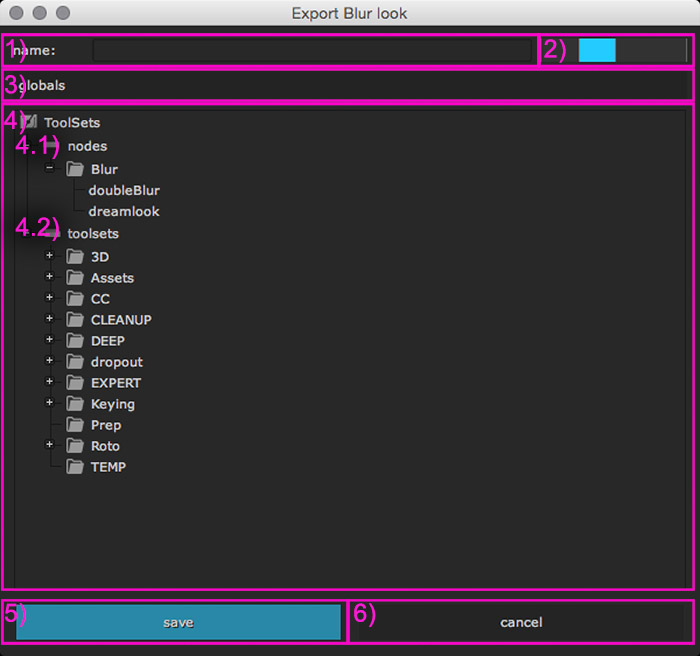 1) name: Here you can enter a name for the selected node preset / toolset.
2) zoom: Slide to increase/ decrease the size of the items in the tree view.
3) pool dropdown: Here you can switch the pool in which you will save the currently selected node / toolset to. The selected pool will be remembered.
3) pool tree view: This is the main section in which you find all the content of the pool. It is divided into two sections:
4.1) nodes: Here are listed all node presets of the current pool
4.2) toolsets: Here are listed all toolsets of the current pool
5) save: Click to save the node preset / toolset
6) cancel: Click to cancel the export
5.2) Exporting a node or toolsets
To export a node or toolset select the node or toolset that you would like to export. Navigate to your menu bar an choose cragl->smartLook->export node | toolset.
The default shortcut is Shift+Alt+E. This shortcut can be changed in smartLook's settings window. Please refer to 8.3) Settings - hotkeys.
By executing the command the export window will show up. In the export window's tree view you need to select an export destination.
You can always change to current pool by choosing another pool from the pool dropdown (3).
The tree view contains two sections: nodes at the top (4.1) and the toolsets section at the bottom (4.2).
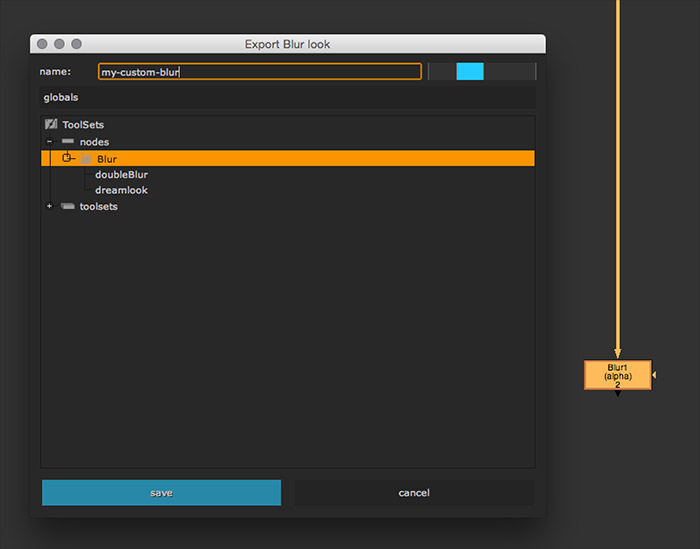
If you have selected just one node the nodes section at the top will be selected by default. But you can also save a single node as a toolset.
The nodes section contains a subdirectory of your selected node's class. Enter a name in the "name" input file and click "save" to save the node.
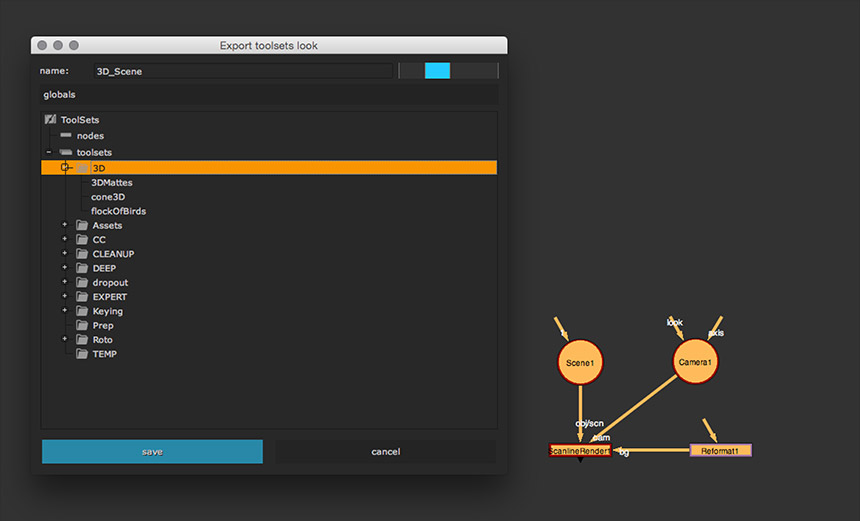
If you have selected multiple nodes and opened the export window then you can save them as a toolset.
enter a name and select a toolset category folder. When you are ready to export click the "save button".
 If needed you can always create new toolset categories on the fly by right clicking the "toolsets" tree item and choosing "new category":
 A new dialog will show up in which you can enter the new category's name.
5.3) Creating a new pool while exporting
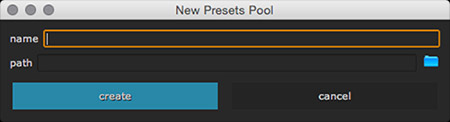
You can create a new pool on the fly while exporting a node or toolset. From the dropdow please choose "-- new pool --":
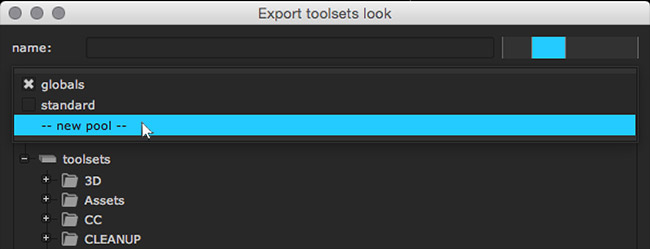 A dialog whill show up. Please enter the new pool's name and path. You can navigate to an existing pool or create a brand new one.
6) Working with the Import nodes | toolsets window
You can use the import window to import preset nodes and toolsets into your node graph. To open the import window please navigate to your menu bar an choose cragl->smartLook->import node | toolset.
The default shortcut is Shift+Alt+I. This shortcut can be changed in smartLook's settings window. Please refer to 8.3) Settings - hotkeys.
The import window looks pretty much like the export window but differs in some details that will be discussed in the following.
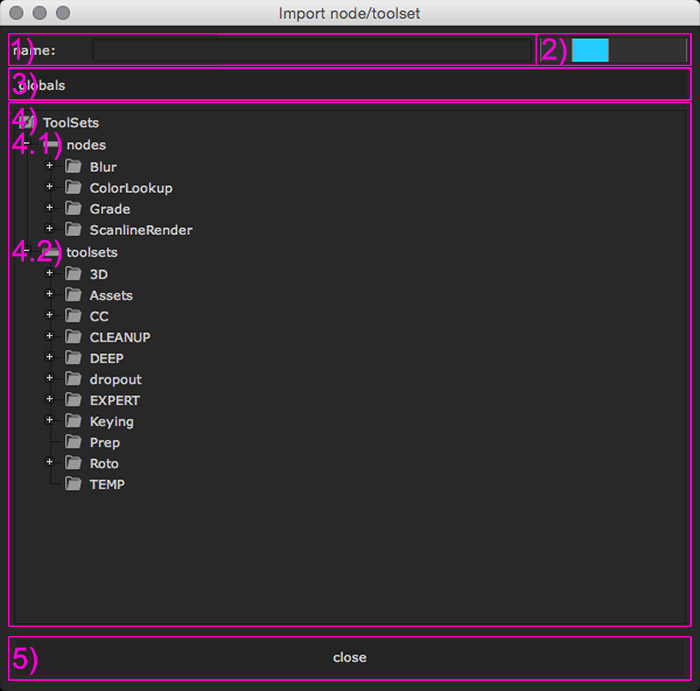 1) name: Here you can search for a node preset / toolset. As soon as you type in some values the tree gets filtered and only items with the typed in name are being displayed.
2) zoom: Slide to increase/ decrease the size of the items in the tree view.
3) pool dropdown: Here you can switch the pool that you would like to import from. The selected pool will be remembered.
3) pool tree view: This is the main section in which you find all the content of the pool. It is divided into two sections:
4.1) nodes: Here are listed all node presets of the current pool
4.2) toolsets: Here are listed all toolsets of the current pool
6) close: Click to close the import window
6.1) Importing nodes and toolsets
Importing nodes and toolsets can be done by double clicking the item in the tree view. It's that simple.
6.2) Import window right click menu
By clicking one of the items of the import window's tree view a pop up menu appears. The menu appears only on importable items, not on the root and class directories.
The menu offers the following commands:
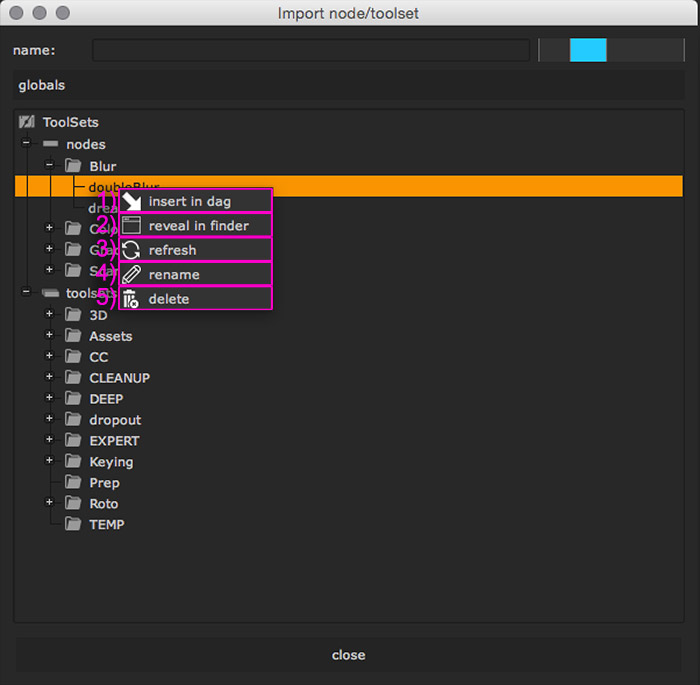 1) insert in dag:Inerts the selected node preset / toolset into the nodegraph. Has the same effect as double clicking the selected item.
2) reveal in finder:Reveals the selected item in the explorer.
3) refresh:Refresh the tree view.
4) rename:Rename the selected item. (Only visible in advanced settings mode. Please refer to 8.4) Settings - advanced)
4) delete:Delete the selected item. (Only visible in advanced settings mode. Please refer to 8.4) Settings - advanced)
7) Working with the resolution slider
smartLook provides a resolution slider to quickly change the so called "downrez" value - The resolution of pixels being rendered in the viewer node.
you can change to render every pixel, every other, 4th, 8th, 16th or 32th pixel.
changing the resolution of your viewer is a great way of getting faster results so that you can experiment with more versions in less time.
Nuke provides a menu to change the resolution of your viewer:
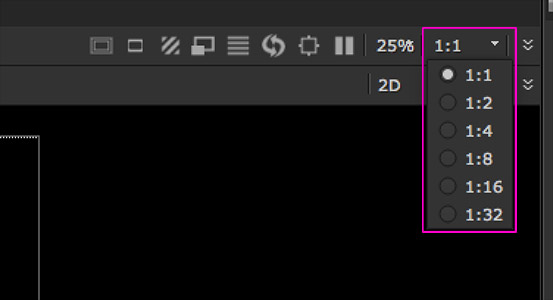
However when using this feature extensively it can become time consuming if you always have to find this small menu and browse through the dropdown.
A quicker way of changing the viewer's resolution is by changing it with smartLooks resolution slider. To show it press the N key on your keyboard or navigate to cragl->smartLook->resoulution slider.
The default shortcut "N" can be changed in smartLook's settings window. Please refer to 8.3) Settings - hotkeys.
The resolution slider looks like the looks slider from above:
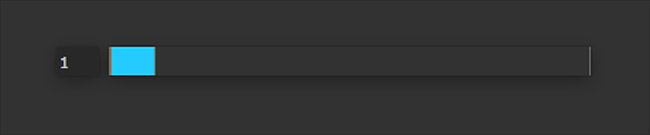 By sliding the slider from left to right will decrease the resolution of the current viewer node.
By releasing the shortcut key the resolution slider will disappear.
8) Settings
smartLook provides a settings window to customize it to your needs. To show the settings window navigate to cragl->smartLook->settings.
The settings window is divided into four sections:
1) general
2) presets pool
3) hotkeys
4) advanced
the save button sits in all sections. When you are done editing the settings click the save button to save the settings.
8.1) Settings - general
The general section provides settings to customize general smartLook elements from different sections:
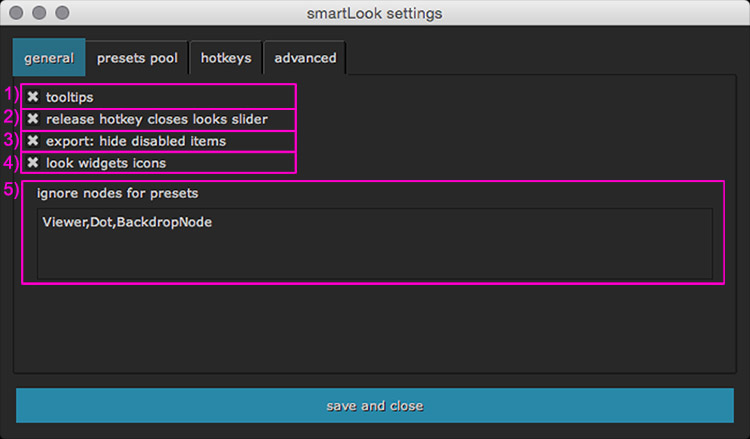 1) tooltips: If checked show tooltips on all major widgets.
2) release hotkey closes looks slider: If checked the looks slider will disappear once you release the looks slider hotkey.
3) export: hide disabled items: If checked all items that are not of the selected node class will be hidden.
4) looks widgets icons: If checked show icons for each look button. These are the buttons that are discussed in 4.2) The looks tab
5) ignore nodes for presets: All listed node classes in the textarea won't gain a look tab when batch executing registering looks via cragl->smartLook->set looks. Separate multiple node classes by comma.
8.2) Settings - presets pool
The presets pool section provides functions to manage your presets pools. Pools are directories that include preset nodes and toolsets.
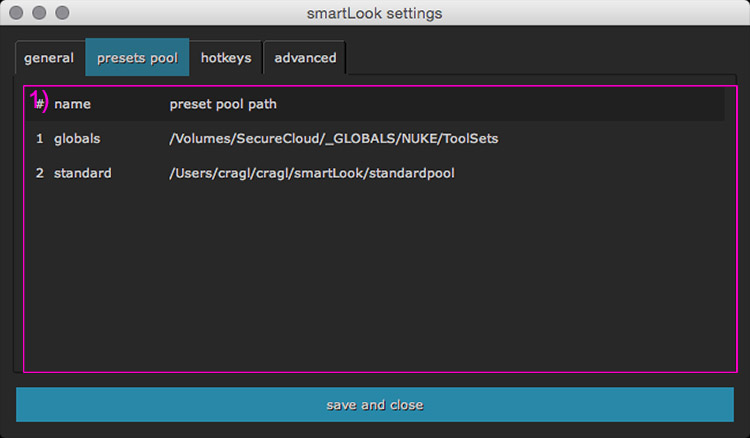 1) preset pools table:Here you see all preset pools that you have currently set.
8.2.1) managing presets pool
The presets pool section contains a right click menu to manage your pools.
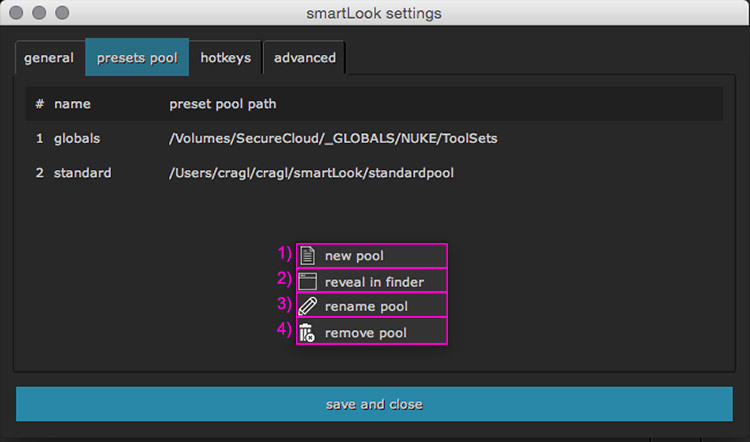 1) new pool: Click to create a new pool. In the upcoming dialogplease enter name and location and click the create button. The name is just used as a name in this list and doesn'T affect the pool in any way. You can either create a new pool or locate to an already existing pool. smartLook will automatically create the "nodes" and "toolsets" directories.
2) reveal in finder: Click to reveal the current folder in your explorer.
3) rename pool: Click to rename the currently selected pool. This only changes the name as it appears in this list as won't affect the pool in any way.
4) remove pool: Click to remove the currently selected pool. Please note that this will NOT physically delete any files or folders but simply remove the pool from the table. You can always relink to the removed pool by clicking the "new pool" command and navigating to the exoisting pool.
8.3) Settings - hotkeys
The hotkeys section contains the functionality to set shortcuts for most actions in smartLook.
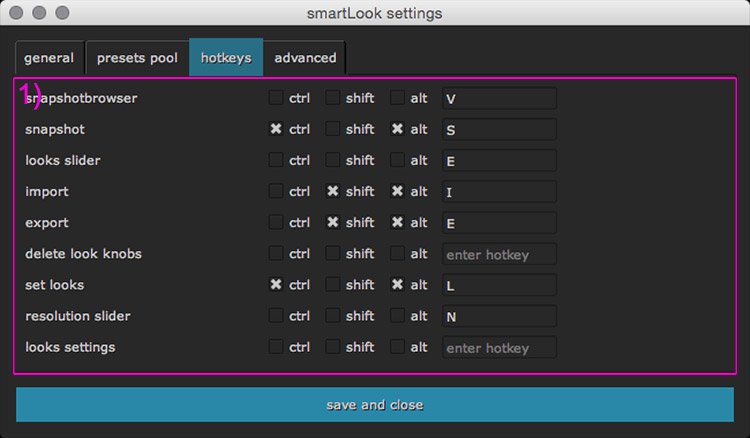 You can set shortcuts for:
• opening the snapshot browser
• taing a snapshot
• opening the looks slider
• opening the import window
• opening the export window
• delete looks knobs
• setting looks on one or multiple nodes
• opening the resolution slider
• opening the smartLooks settings window
For each command you can set a shortkey plus a combination of the modifiers command Ctrl (MacOSX: cmd), Shift, Alt.
8.4) Settings - advanced
The advanced section provides functionality to set some advanced user admin rights. Using the advanced section you are able to extend various smartLook settings and gain access to some hidden features that are not visible by default.
The advanced settings also provide some simple functionality to disable functionality for artists for security reasons. For instance: The artist is able to delete toolsets directly inside the import window ‐ some functionality that you probably don't want to expose to all users. By default all functionality is turned on.
The advanced settings values are stored in the file:
~/cragl/smartLook/advancedsettings.set
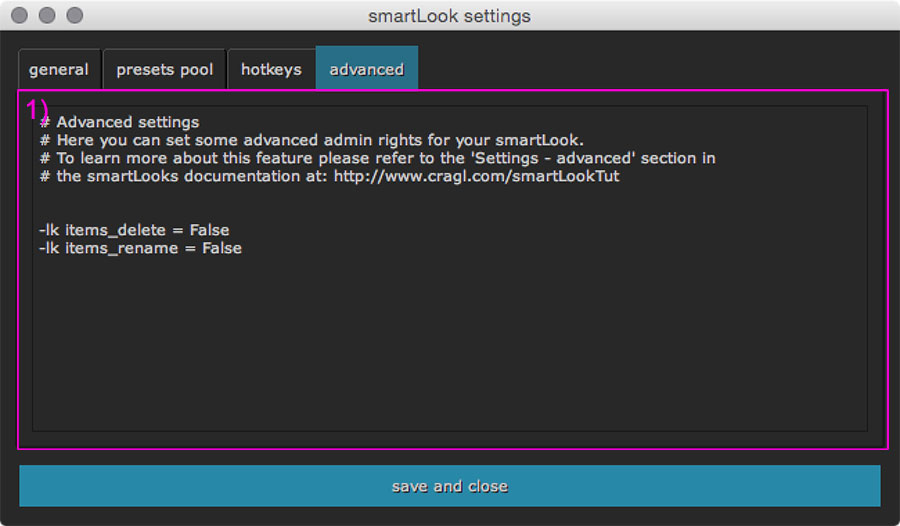 In the upcoming future we will introduce some more variables. Here is a list of existing features:
-lk items_delete: If False hide the command to delete an item in the import browser.
-lk items_rename: If False hide the command to rename an item in the import browser.
-lk import_window_transparent: If True the import window background gets transparent.
-lk export_items: If False disable the export nodes functionality.
-lk new_snapshot_directory: If False hide the 'new snapshot directory' command in the snapshot browser dropdown.
-lk delete_snapshot_directory: If False hide the 'delete snapshot directory' command in the snapshot browser dropdown.
FAQ for smartLook
Here you will find some frequently asked questions on smartLook. Please make sure to read them first. Please also have a look on the documentation. If you have any question that is not listed in here please don't hesitate to contact us. We are pleased to help you.
How do I install smartLook?
Each cragl tool can be installed via cragl connect - our free tool to install and manage all of your cragl tools directly inside NUKE. If you haven't already done so please download connect.
By opening connect you will see a list of all cragl tools. You can drag and drop it to the right hand side of the connect window to reveal more infos. Just click on "buy". After purchasing you will receive an install code for your tool. Now simply click "install now" and enter the received install code. The tool will be downloaded and installed automatically for you. So you don't need to struggle with any install issue.
Versions
Here you find an overview of the smartLook's versions and its improvements. Please log in to download versions.
smartLook v2.10
• Update to nuke-15
smartLook v2.9
• Add studio model
• Various style updates
• Add help menu
smartLook v2.8
• Update to nuke-14
smartLook v2.7
• Fix dropping license into license window raises UnicodeDecodeError
smartLook v2.6
• Fix reading trial license data fails decrypting
• Send email to license author when machine installs license
smartLook v2.5
• Make Nuke-13 ready
smartLook v2.4
• Keep presets when exporting nodes and toolsets
smartLook v2.3
• Allow install if mac id is already in DB and licence quantity is 0
• Speed up launching in offline mode
smartLook v2.2
• Create snapshots in proxy mode
smartLook v2.1
• Open up for site licenses
• Generate license by license file, login and install code
• Update internal package structure
smartLook v2.0
• Made Nuke11 ready
• Major code updates and code improvements
smartLook v1.0
initial release


