cragl vfx tools | Nuke Python Tools and Plugins | smartMessage
smartMessage
Instant messenger for NUKE and MAYA. Communicate with other artists, share data and connect locally and world wide.Connect with smartMessage
smartMessage gets you connected to your local artsits and artists world wide. You can write messages and share node setups, images, files and much more.
Connect locally and world wide
You can work with both - local storage of the data and storing everything on our server. The local option is interesting for companies that don't want to out source their communication data to the web. Everything is stored on a place on your server that all artists can access. So the machines don't need to be connected to the internet. The online option stores all data on our server.
We respect your privacy
With both options all data is safely stored encrypted. Only you and the other communication partner can read the messages.
Features
• Instant messenger for NUKE and MAYA• Connect world wide and with your local artists
• Group chats
• Exchange messages, nodes, images, files, etc.
• Everything is saved encrypted
Compatibility
Nuke11/12/13/14/15/16Maya2014, Maya2015, Maya2016
Linux, Mac, Windows
where to buy
download trial
MAYA users:
Please contact us, we will send you a download link.
browse changelog


1) Installing smartMessage
Depending if you use NUKE or MAYA the installation for smartMessage can be slightly different. Below you will find a detailed instruction on how to install it.
1.1) Installing smartMessage for Nuke
Like any other cragl product, smartMessage can be installed with cragl connect directly inside NUKE.
Open connect and drag smartMessage to the right to reveal more information. Just click on "buy" and you will be located to the web page where you can purchase smartMessage. After purchasing you will receive a mail including an instal code. Now simply click on install, enter your received instal code and smartMessage will be installed automatically on your machine.
1.2) Installing smartMessage for Maya
Installing smartMesssage for Maya takes basically three steps:
1) Download smartMessage
2) Copy it to your hard drive and reference it in the maya.env file.
3) Generate and import a license
Here you can find a brief tutorial that shows you how to install smartMessage for MAYA:
The steps that are taken are also explained in the following part. Don't be afraid of the long instruction as it simply describes each step in detail. Installing smartMessage is actually simpler than you think.
1.2.1) Downloading smartMessage manually
First you need to download the smartMessage plugin.
Please note: If you have downloaded and installed smartMessage already for NUKE via cragl connect then you don't need to download it manually because it was already downloaded by connect automatically.
By using connect smartMessage was downloaded to the following path:
Linux /home/[username]/.nuke/cragl/_cragl_tools/smartMessage_vX.X
Mac: /Users/[username]/.nuke/cragl/_cragl_tools/smartMessage_vX.X
Windows: C:\Users\[username]\.nuke/cragl/_cragl_tools/smartMessage_vX.X
By purchasing smartMessage you received smartMessage as a download. Alternatively you can download it from our website. To do so please follow these steps:
1) If you haven't already done so please register your cragl account. This account grants you access to all your cragl tools, support and information. Please make sure to use the same email address that you used to purchase smartMessage
2) Next, please login.
3) Once logged in, navigate to "Manual Tools download and activation". and click the "Continue to manuall download and activating>>" link.
Find the "tool downloads" section below. Here you can download smartMessage.
1.2.2) Unpacking smartMessage and adding it to your maya.env file
You can put the unzipped smartMessage folder anywhere on your machine and locate to this path.
Now you need to tell MAYA to load smartMessage. In order to do that you have to append your smartMessage folder location to your maya.env file. This is a text file which is located in your system as follows:
Linux: /home/[username]/maya/[maya_version]/Maya.env
Macintosh: /Users/[username]/Library/Preferences/Autodesk/maya/[maya_version]/Maya.env
Windows: C:\Users\[username]\My Documents\maya\[maya version]\Maya.env
Open the maya environment file with a text editor and add this line:
MAYA_MODULE_PATH=[SMARTMESSAGE_PATH]
Please make sure to replace [SMARTMESSAGE_PATH] with the coppied path of your smartMessage folder. You don't need any quotation marks in here. If there was already a line starting with "MAYA_MODULE_PATH=" then you can append it with a semicolon like this:
MAYA_MODULE_PATH=FirstPluginPath;smartMessagePath
1.2.3) Generating a license manually
Finally generate and import a license file:
smartMessage is node locked to your machine so now you need to find out your machine's mac address. To get it open MAYA and switch to 'cragl->license->import license'. In the upcoming window you will find your mac address which will be displayed in this format: xx:xx:xx:xx:xx:xx. Copy your mac address to your clipboard.
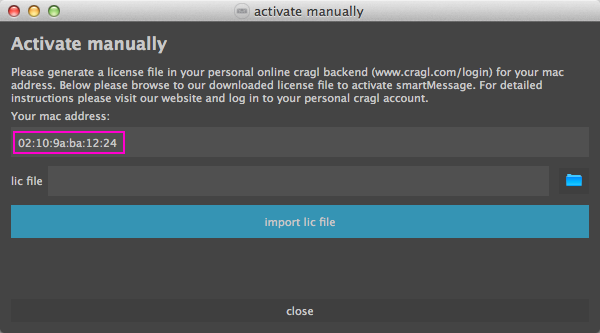 To generate a license please log in to your personal cragl account
Navigate to "Manual Tools download and activation". Click the link "Continue to manual download and activating>>".
In the dropdown below choose your instal code and paste your mac address of the machine. Click the "generate lic button" and download your license file somewhere on your machine.
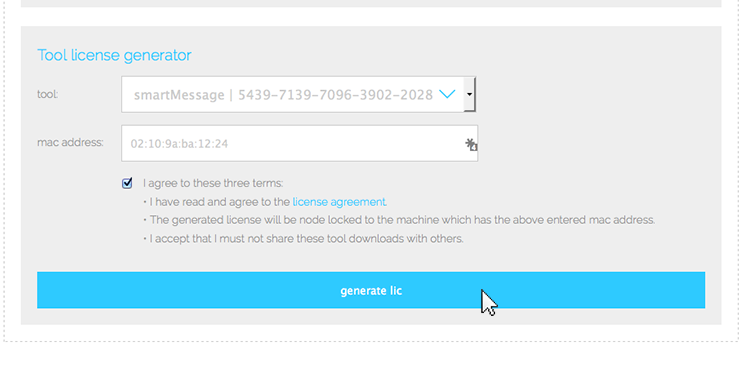
Now switch back to MAYA. From the menu bar choose 'cragl->license->import license' to open the license import window if it's not already open. Click the folder icon, browse to the downloaded license file and click the "import lic file" button.
2) Access smartMessage
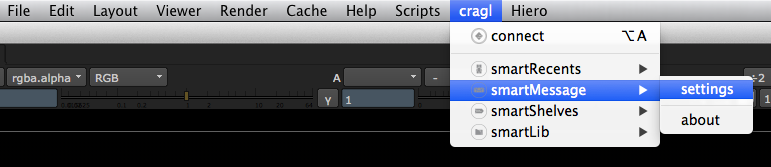
After the installation is finished you now find the new sub menu "smartMessage" inside your cragl menu. It contains two commands: "settings" and "about".
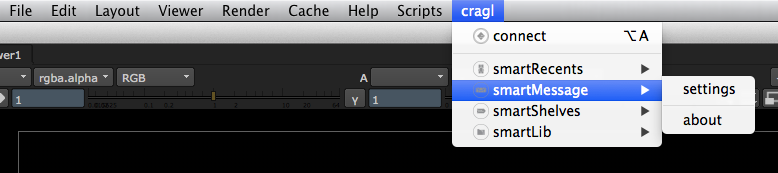 settings: opens the smartMessage settings. See 12) Settings
about: opens the smartMessage about window.
Depending on your Nuke version there are different ways how to access smartMessage:
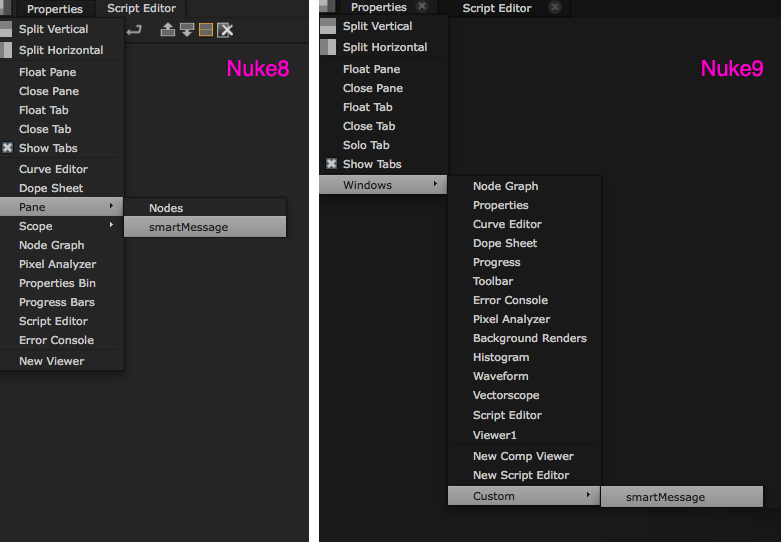 To access smartMessage in Nuke 9: You find a new entry in your pane menu under "windows-> custom ->smartMessage"
To access smartMessage in Nuke 8: You find a new entry in your pane menu under "Pane->smartMessage".
After integrating smartMessage into NUKE's interface you can save your layout so that smartMessage will be loaded whenever you launch NUKE.
To access smartMessage in Maya: Once installed you should find a "smartMessage" tab on the right of your screen under your Attribute Editor. smartMessage ships as a dockable window.
Simply click on the "smartMessage" tab and this reveals the smartMessage main panel.
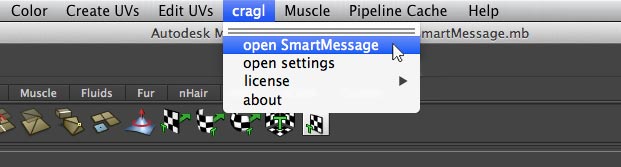
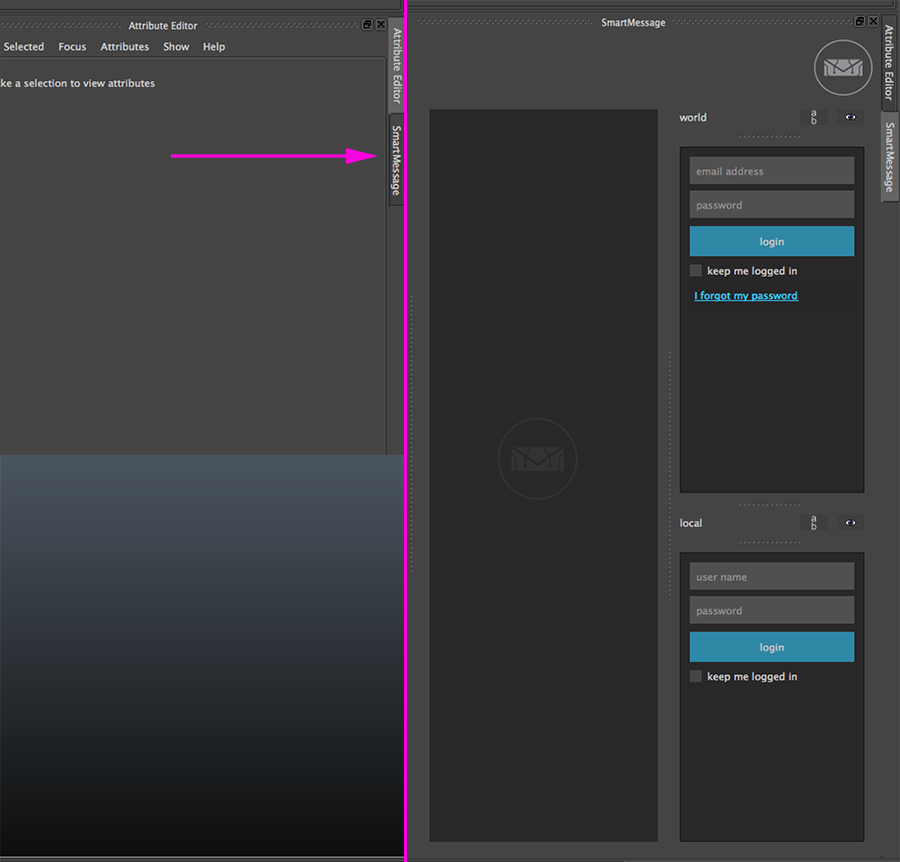 You will also find the "cragl" menu at the top right. If you close the smartMessage tab then choose "cragl->open smartMessage" to get it back.
This is how the smartMessage interface looks like when you are not loged in:
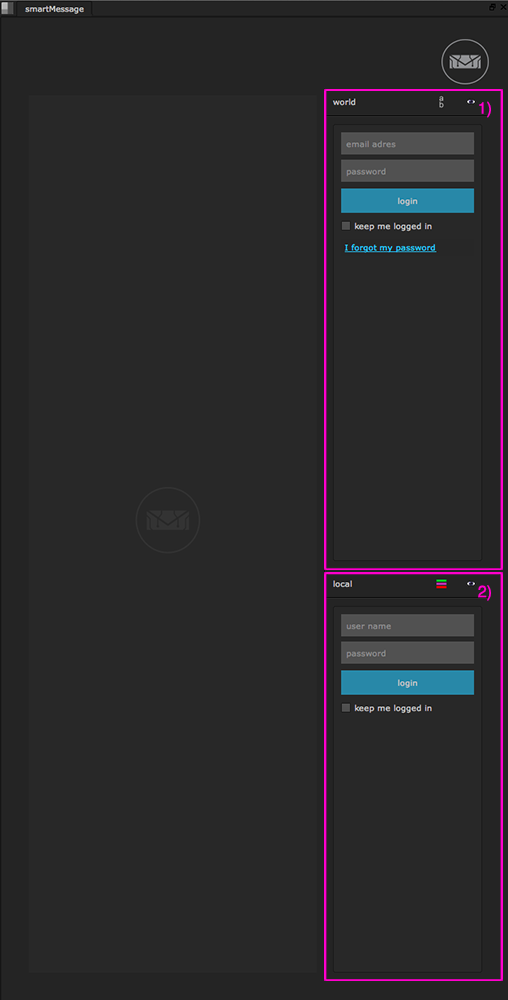 There are two login forms. One for the global network at the top (1) and the bottom one for the local network (2). These two terms are explained next in 3) Global and local network.
3) Global and local network
SmartMessage offers two options - and you can use both simultaneously.
Local network: On the one hand you can use smartMessage as a local network in a team. This can be for example inside your company.
All data that smartMessage generates is then stored on a local path which all artists can access – In most cases that will be a server that all artists are connected to.
You can also use an additional shared cloud folder. When you use the local option then all data is stored locally and the computers don't need to be connected to the web which makes
it interesting for companies in which the computers are not connected to the internet for security reasons.
Global network: On the other hand you can login to a world wide community. Then all data is stored on our server.
No matter which option you choose or if you use both options –
the data is always saved encrypted and only the communication partners themselves can read the chat.
4) Creating a global account
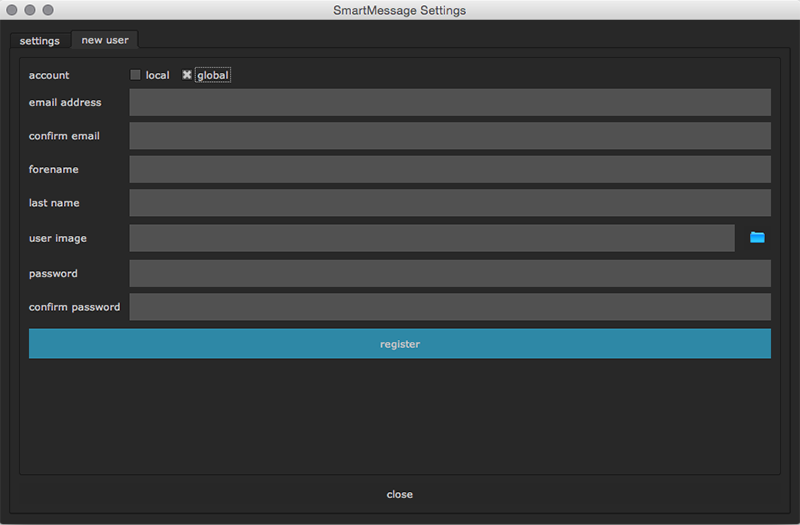
To create a global account open the smartMessage settings via "cragl->smartMessage->settings". Switch to the second tab "new user". Make sure to check the "global" checkbox for a global user.
Fill in all inputs and press the "register" button. You will receive a mail to the entered email address which includes an activation link. After clicking the activation link you are ready to use
your global smartMessage account.
 The global account will be connected to the license owner of the machine on which you create a global account on.
For companies: You can manage all smartMessage global accounts that are connected to your licenses. navigate to your personal cragl backend. In the 'smartMessage accounts' section you will find all
global accounts that are connected to your license. Here you can edit and delete accounts.
5) Setting up a local account
To create a local account you need to setup a data directory first. The dataDirectory is a folder in which all data that smartMessage generates is stored. This will be user accounts, send images, files and nodestacks, etc. Every artist in your team needs to point to that dataDirectory. So to create a local account you have to setup a dataDirectory first.
5.1) Setting up a dataDirectory
To setup a dataDirectory open the smartMessage's settings via "cragl->smartMessage->settings".
 This opens smartMessage's settings window:
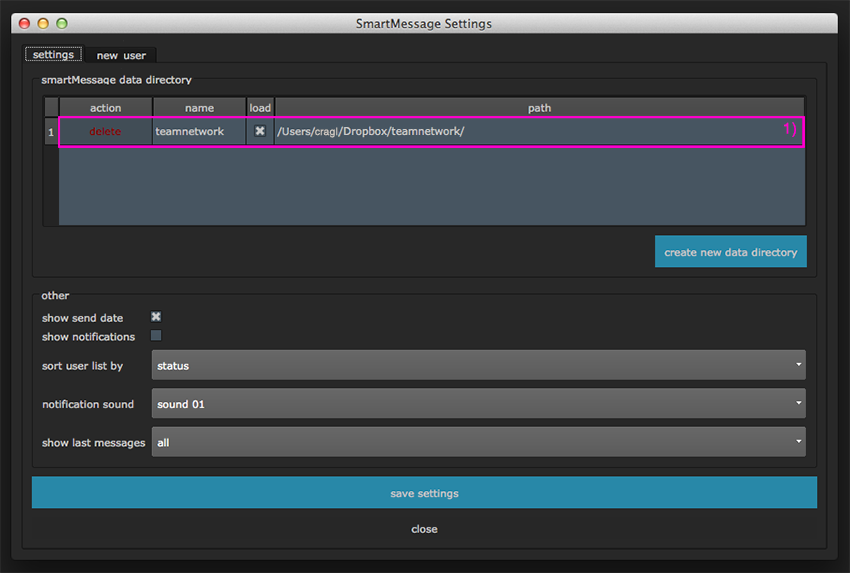
 The settings window contains two tabs: "settings" and "new local user". At the top you see a table which shows you all dataDirectories that smartMessage is connected to on your machine.
You can connect smartMessage to as many dataDirectories as you like. You can either create a new dataDirectory or connect to an existing one. By default smartMessage is not connected to any dataDirectory.
To create or connect to a dataDirectory click on the "create new data directory" button. This will reveal the necessary inputs to create a new data directory.
The settings window contains two tabs: "settings" and "new local user". At the top you see a table which shows you all dataDirectories that smartMessage is connected to on your machine.
You can connect smartMessage to as many dataDirectories as you like. You can either create a new dataDirectory or connect to an existing one. By default smartMessage is not connected to any dataDirectory.
To create or connect to a dataDirectory click on the "create new data directory" button. This will reveal the necessary inputs to create a new data directory.
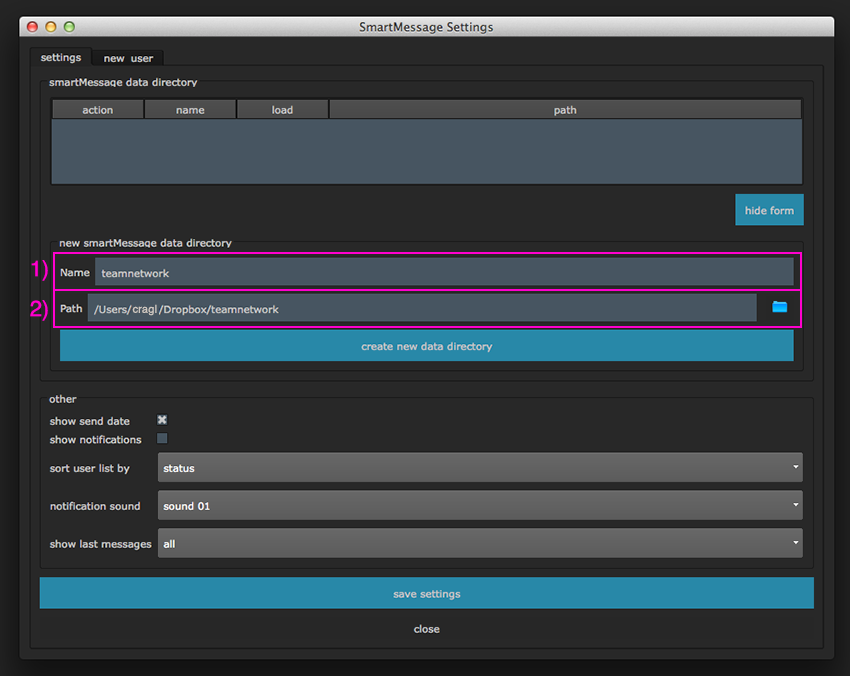 1) In the input "Name" enter a name for the dataDirectory. This is the name as it will appear in the dataDirectory table above.
2) Point to a directory that will be the dataDirectory. You can either create a new folder. smartMessage will then create all necessary subfolders and files automatically for you. You can also point to an existing dataDirectory,
meaning to a folder that already includes a folder structure that was already created by smartMessage.
After hitting the "create new data directory" button the dataDirectory will show up in the dataDirectory table above.
 You are now ready to create a local user.
5.2) Creating a local user
After smartMessage has been connected to a dataDirectory you can now create local users.
In the settings window switch to the second tab "new local user".
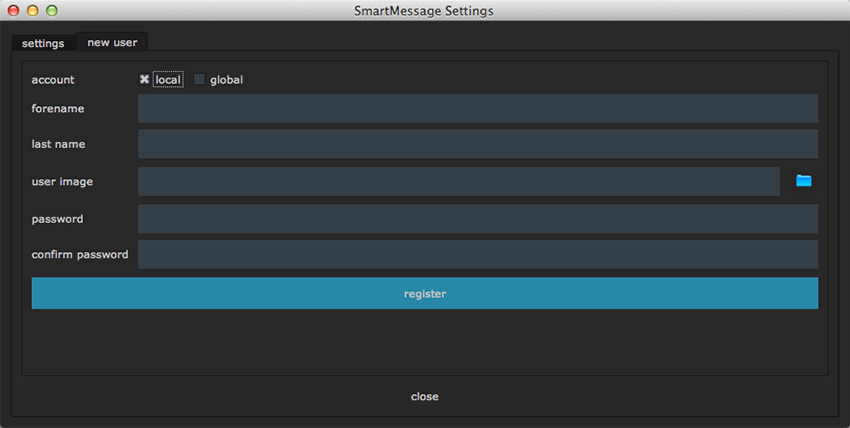 In here you need to add the user details. If you like you can choose an image to use a a profile icon. But you can also skip that part and do that later.
6) Using smartMessage
You can use smartMessage as a global and as a local network (See 03) Global and local network). To use it you need either a global account or a local account.
We will have a look on using the global network first. The local network works almost identically.
smartMessage is intuitive and works like any other instant messenger. After you have successfully loged in you can start a chat.
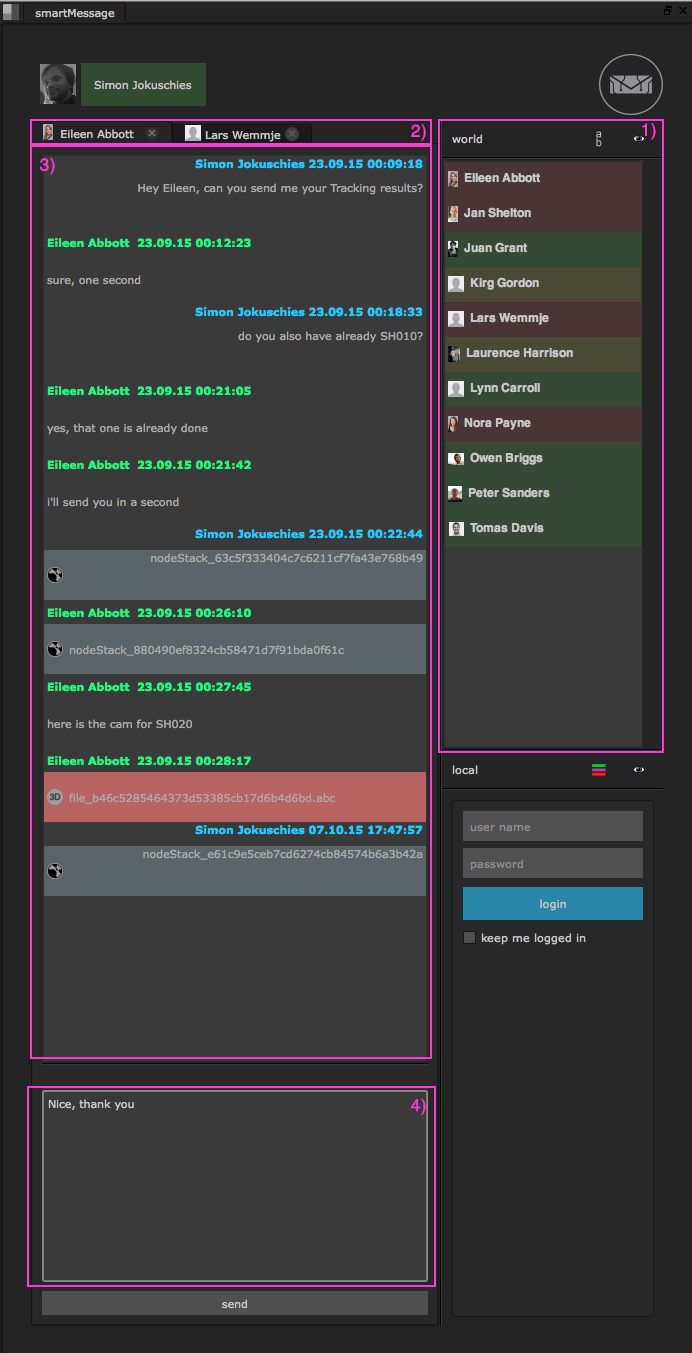 1) On the right you see your contact list.
2) To chat with a person simply double click it in the contact list. The chat opens and is listed on the left as a tab. The tabs can be reordered if needed.
3) On the left you see the chat history; the latest message will show up at the bottom.
4) Below you find the input where you can write a message.
To send a message hit the "send" button or press ctrl + enter (windows) or cmd + enter (mac).
7) sending data
Besides writing text smartMessage offers the ability to send data directly inside the chat which accelerates the workflow among artists. SmartMessage supports sending node setups, images, cameras, 3D objects and urls directly inside the chat.
7.1) sending nodes
To send some nodes simply select the nodes that you like to send, copy them to your clipboard and paste the text into the chat. After sending the message is shortened to a one line message and will look like this:
 Nuke only: To insert the nodes into the nodegraph simply click the message once. This enables sharing nodes among artists quickly and in an intuitive way. You can send a bunch of nodes and even whole nukescripts.
7.2) sending 3D data
To send 3D data like alembic, obj or fbx data just drag and drop the exported file into the chat. It 3D object like this:
 To insert the 3D data into your script simply click the message once.
7.3) sending other files
You can basically drag and drop almost any file into the chat. The file object looks like this:
 If it is an image file it will be shown in a separate window. Otherwise it will direct you to the location where it is saved. You can then take that file and copy it to your preferred location.
7.4) sending urls
If you type in a url into the chat then it will be converted to a url object which looks like this:
 By clicking the url object the web browser launches which directs you to that web page.
7.5) Storage path of downloaded files
All files that you download with your global account go inside this folder:
Linux /home/[username]/cragl/smartMessage/tmp
Mac: /Users/[username]/cragl/smartMessage/tmp
Windows: C:\Users\[username]\cragl\tmp
7.6) Storage of uploaded files and max file size
All files that are uploaded within a global account are stored on our cragl server.
Please note: All Uploads from a global account are limited to 300MB file size. From time to time old uploads will be removed.
8) Limiting the messages history by time
You can choose to display only the latest messages of a specific time.
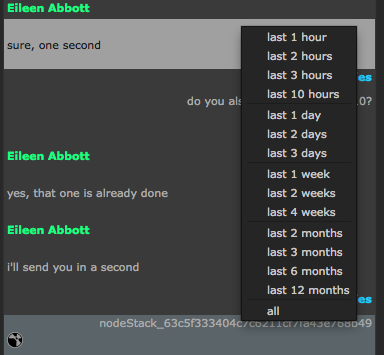 Right click the history of an active chat. This will show a small right click menu in which you can choose to display the latest messages of a specific time. To revert to the full history please choose "all" at the bottom of the list.
In the settings window in the first tab "settings" at the bottom you will find the dropdown "show last messages". Here you can set a permanent messages time display for all chats.
9) Adding new users
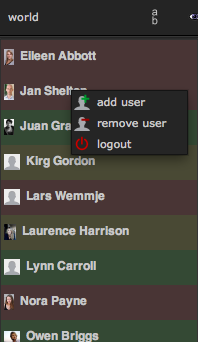
To add a user to your contact list right click the contact list. This will open a small right click menu. Choose the first entry "add user".
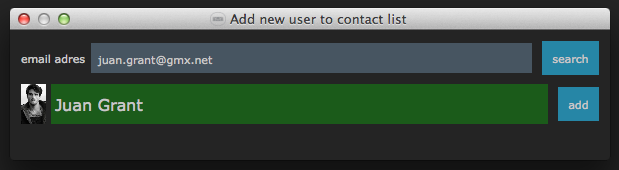
 This will open another window in which you have to enter the email address of the user that you like to add. Please ask the user about his/ her email address that he/ she uses with smartMessage. To add the person to the contact list please click the "add" button.
The person will be added to your contact list and you will be added to his/ her contact list. Please note that it may take a few seconds until the added contact appears in your contact list.
This will open another window in which you have to enter the email address of the user that you like to add. Please ask the user about his/ her email address that he/ she uses with smartMessage. To add the person to the contact list please click the "add" button.
The person will be added to your contact list and you will be added to his/ her contact list. Please note that it may take a few seconds until the added contact appears in your contact list.
9.1) Removing users from the contact list
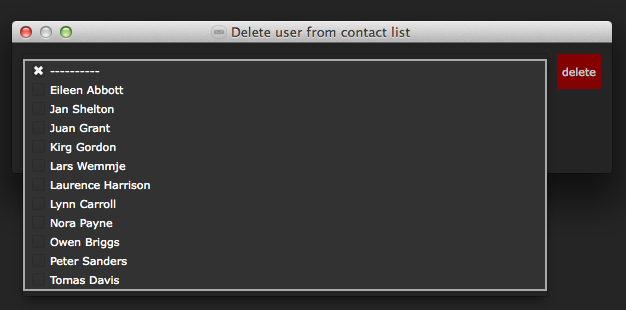
To remove a user from your contact list right click the contact list. Choose the second entry "remove user".
This will open another window in which you find a drop down list including all your contacts. Select the person that you like to remove from your contact list and hit the "delete" button. The person will be removed from your contact list and you will be removed from his/ her contact list.
10) Sorting user and hiding contact list
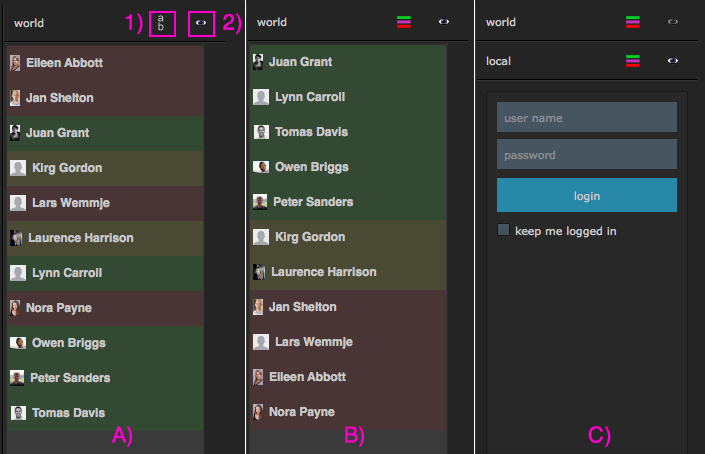 A) Sort user by alphabet
B) Sort user by status
C) Hide/ show contact list
You can sort your contact list by alphabet or by status (green: "online", yellow: "busy", red: "offline"). You can toggle the sorting method by clicking the sort button (1) at the top of the contact list.
By clicking the display icon (2) at the top of the contact list you can toggle the visibility of your contact list in order to make more space for the other contact list. Please note that at least one contact list (global or local) will always show up.
11) User right click menu
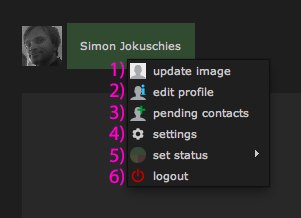 By right clicking your logged in user name or icon a right click menu appears in which you have these options:
1) update image: update your user icon
2) edit profile (global account only): click to edit your global user account details. Please refer to 11.1) Editing account details
3) pending contacts (global account only): click to see pending contact that you can accept or reject. By default new users are automatically added but in your account settings (11.1) Editing account details) you can change this behavior to always approve new contacts.
4) settings: open the smartMessage settings
5) set status; set your status manually
6) logout: logout your local/ global user.
Please note that there are two user menues if you use the local and the global network.
11.1) Editing account details
You can edit your global user account details. If you right click your global user account name or icon and choose "edit profile" a window appears in which you can edit your account's details.
 1) Here you can edit your last name
2) Here you can edit your forename
3) Here you can edit your email address
4) When checked you will get a notification mail that someone has written you a message on smartMessage. This mail will be send if someone writes you a message and when you are currently not logged in
5) show me in group list: If checked you will be listed in the group memer window. Uncheck if you don't want that
6) Pending contacts: "Contact requests must be confirmed by me" if checked people that try to add you to their contact list will be put on a "pending contact list" that you need to confirm before you get connected to the person. Please refer to 11.2) pending contacts
11.2) Pending contacts
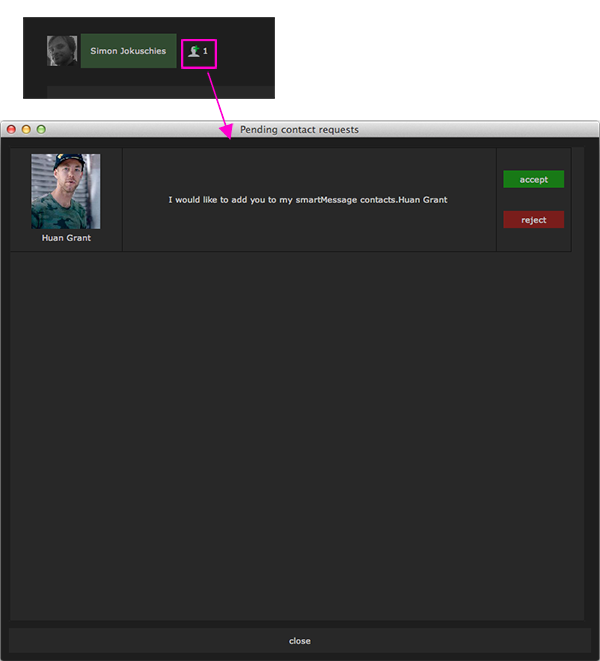
If you have pending contacts enabled (11.1) Editing account details) and someone tried to add you to their contact list then you will see a notification next to your global usermenu. If you click it then the pending contacts window appears in which you can accept or reject
the pending contacts. You will also receive a mail when someone wants to connect with you.
12) settings
As already seen in 5.1) Setting up a dataDirectory smartMessage offers a settings window to customize it. The settings window can be accessed via "cragl->smartMessage->settings". Alternatively you can access it via the right click menu on your logged in user.
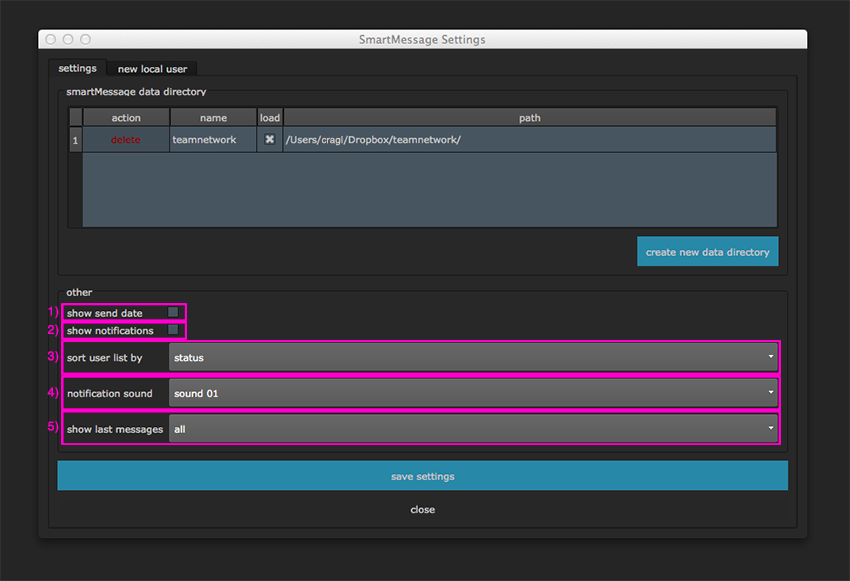 The settings window is divided into two tabs: "settings" and "new local user". As already seen at the top of the first tab you can connect smartMessage to a dataDirectory.
1) Here you can show/ hide the messages send dates.
2) Here you can show/ hide notifications. These will appear when a person has written you a message.
3) Here you can change the default contact list's sorting method.
4) Here you can enable and choose a notification sound when receiving a message.
5) Here you can set the default of displaying the recent messages in the chosen time.
In the second tab "new local user" you can create a new user for the local network.
13) Group chats
smartMessage offers group chats for the global account. Once you have logged in to your global account you will see all groups that you have joined at the bottom of your contact list.
Groups are either public and every user can join them or they are private and you can only join if you type in the right password.
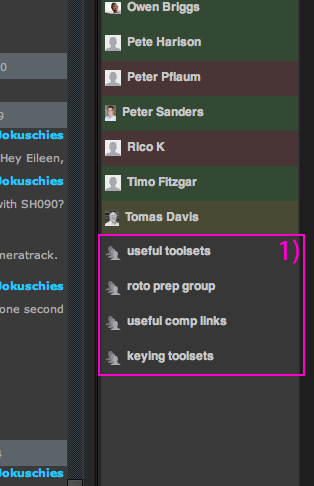 1) groups appear as grey items at the bottom of your contact list.
Chatting inside a group works exactly the same as chatting with one person. It's simply a chat that can be read and written by all group members.
13.1) Accessing the groups menu
To access the group add window and the group manage window right click your contact list and navigate to the group menu:
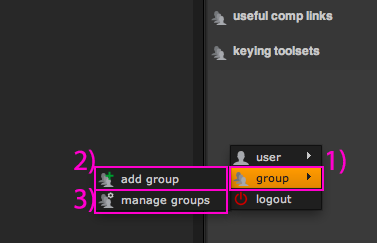 1) the group menu
2) click to open the group add window to search, join and create new groups. Please refer to 13.2) the add group window
3) click to open the group manage group window in order to manage all groups that you joined in. Please refer to 13.3) the manage group window
13.2) the add group window
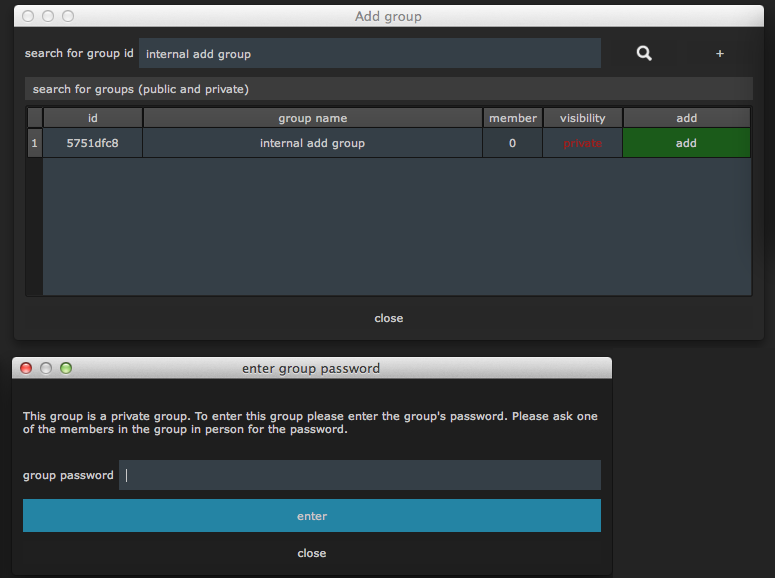
You can use the group add window to search for public and private groups, join groups as well as creating new groups. By default the group table at the bottom of the window shows only public groups.
To search for a private group type in the group name or the group id and hit the search button.
In the table each row represents one group.
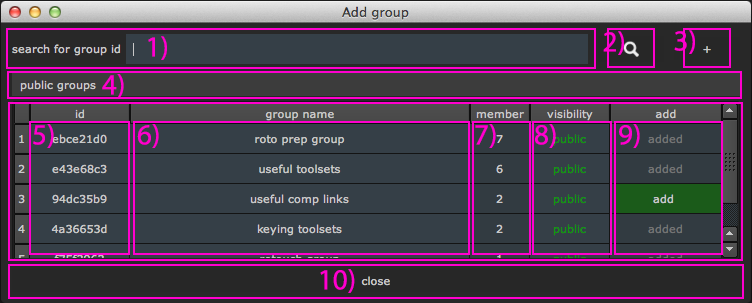 1) Search input for searching groups. To search a group enter a group name or the group id and press the search icon (2) or simply press enter.
2) Search icon for searching groups. See 1)
3) Press to create a new group. The window changes revealing all needed inputs for creating a new group. For further information of how to create a new group please refer to 13.2.2) creating a new group
4) current search: Depending on searching private or public groups this label will change to indicate what you are searching for at the moment
5) group id: each group has a unique group id that can be used to search for groups
6) group name: Displays te group name. Hover over the group name to get the group description
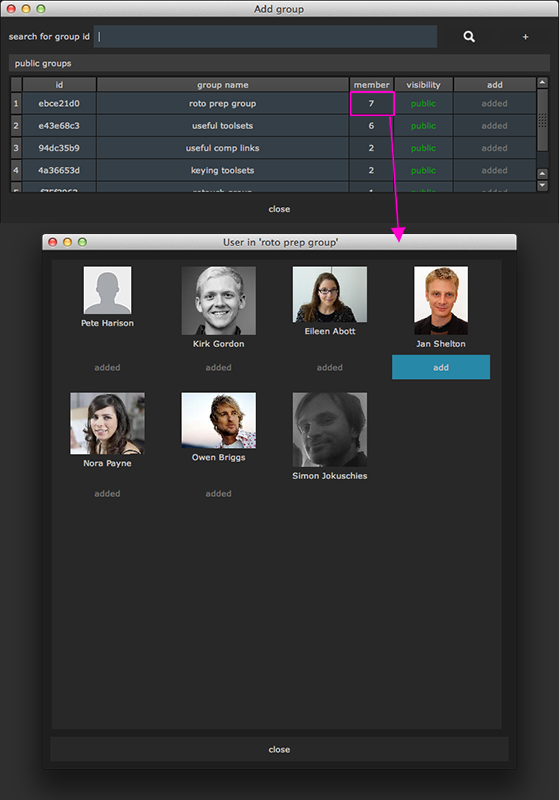
7) member: displays the number of members for the group. Click on it to see a window including all group members
8) visibility: displays the visibility of the group: public or private group
9) add: click to join the group. When you are joining a group the label displays "added"
10) Click to close the group add window
13.2.1) Group members
By clicking on one of the group members number a window appears that shows you all group members of that group. From here you can simply add new users. Please note: In your user account settings you can choose to be displayed in the list or not.
To disable being displayed in the group please refer to 11.1) Editing account details
13.2.2) creating a new group
You can create a new group. In order to do so please click the plus button at the top right of the group add window. The window changes revealing all needed inputs for creating a new group.
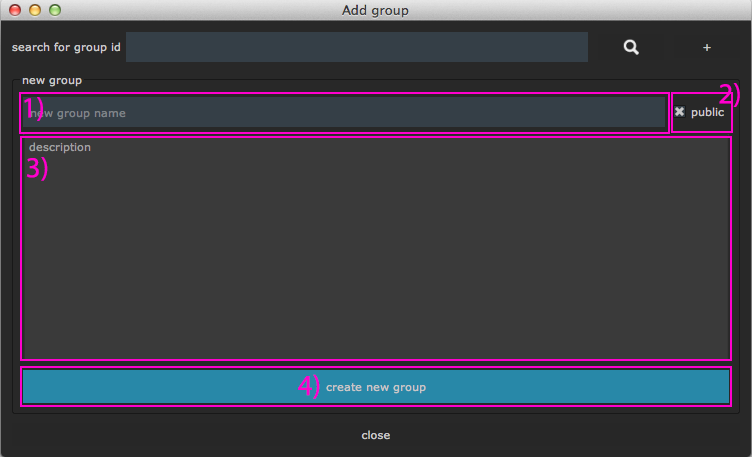 In order to create a new group please follow these steps:
1) Enter the group name. can be changed afterwards.
2) If you like the group to be private simply uncheck the "public" checkbox. This reveals two inputs to enter and confirm the groups password.
3) Enter a group description. can be changed afterwards.
4) Finally click the "create new group" button.
After entering all details and clicking the "create new group" button the group will be automatically set up and will be listed at the bottom of your contact list. You will also automatically be set as the group admin.
13.2.3) Searching private groups
By default the group add window shows only public groups. To search for a private group type in the group name or the group id and hit enter or click the search icon. The table will show you the results for your private group search.
Private groups always require a password to enter in order to join the group. Please ask the group admin or one of the group members in person for the password. To see a list of the group members press the member count button.
13.3) the manage group window
In the manage group window you can edit and manage all your joined groups.
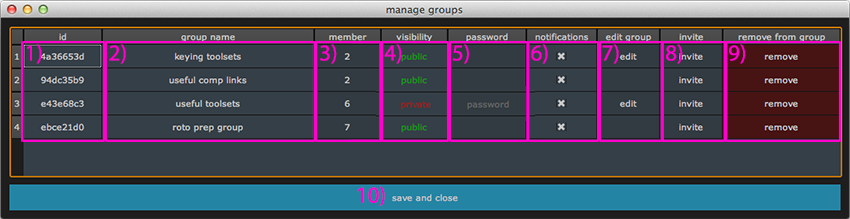 In the table each row represents a group.
1) group id: each group has a unique group id that can be used to search for groups
2) group name: Displays te group name. Hover over the group name to get the group description
3) member: displays the number of members for the group. Click on it to see a window including all group members
4) visibility: displays the visibility of the group: public or private group
5) password: If this is a private group click on the password button to reveal the group's password
6) notifications: If checked you will get a notification when there is a message written into the group. If you don't want to get notifications simply uncheck the checkbox
7) edit group: If you are the group admin click on the "edit" button. This will display a window in which you can edit the group details like group name, description, visibility and web access. For editing groups please refer to 13.5) Editing group details
8) invite: Click the invite button. This opens a new window to invite people to join the smartMessage group with the web browser. For further information on inviting people please refer to 13.6) Inviting people to group chats
9) remove: Click to remove yourself from the group
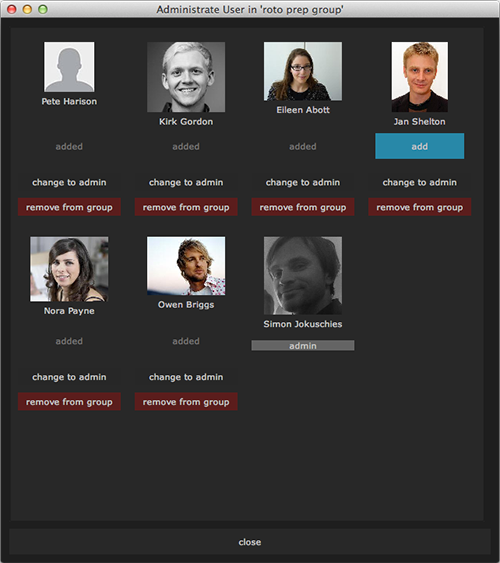
13.4) Managing group members
If you click on the member count number a new window will show up in which all group members are displayed. If you are the group admin you have the ability to remove user from a group:
13.5) Editing group details
If you are the group admin click on the edit button. his will display a window in which you can edit the group details like group name, description, visibility and web access.
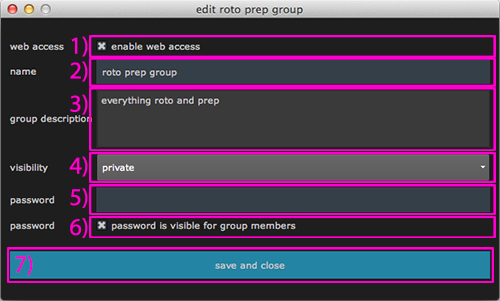 1) Enable web access: If this checkbox is checked then the group will be accessible with your web browser. If you don't want the group to be accessible via web then disable this checkbox
2) name: Here you can edit the group name
3) description: here you can edit the description
4) visibility: Here you can switch a group from public to private and vice versa
5) password: If the visibility is set to private then you can set a password in here
6) If this checkbox is checked then clicking the password button for the group will show up the password for all group members. Otherwise only the admin can see the group password
7) When you are finished editing click the "save and close" button
13.6) Inviting people to group chats
By Clicking the invite button a window will show up in which you can invite people to join the group chat with their favorite web browser.
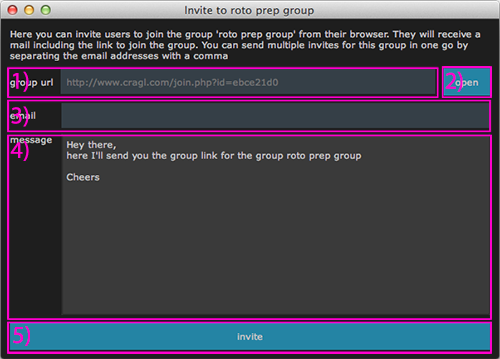 1) This is the url for the group. The url is always formed in this format: www.cragl.com/join.php?id=GROUPID where GROUPID is the id of the group
2) By clicking the "open" button your favorite web browser will show the group. For the web browser chat please refer to 14) Web browser chat
3) email: Here you can type in the email address for the receiving person. You can invite multiple persons in one go by adding multiple email addresses separated by comma
4) In here you can append a personal message that will appear in the group invitation email
5) When you have entered all details click the "invite" button to send the group invitation emails
14) Web browser chat
Group chats are accessible with you web browser. So even people without smartMessage can join the chats and read and write. This is only possible if the web access for a group is enabled. For more information please refer to 13.5) Editing group details.
If you navigate to www.cragl.com/join then you will see all public groups:
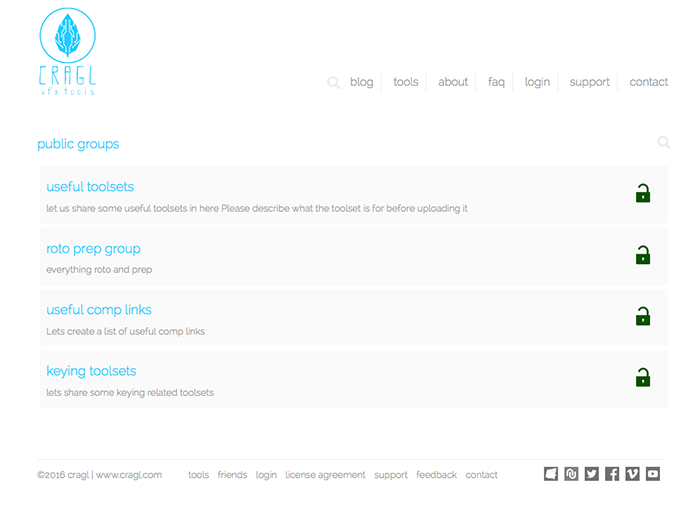 The open lock indicated a public group. To search for a group you can use the search icon on the right.
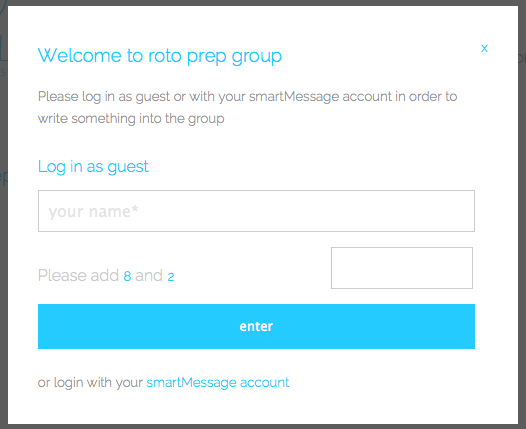
This will reveal a search input. When entering private groups you will need to enter a password:

A group can be accessed via www.cragl.com/join.php?id=GROUPID where GROUPID is the id of the group.
To write into the group you will be prompted to enter your name or login with your existing smartMessage account:
 The chats are accessible via desktop and mobile versions:

FAQ for smartMessage
Here you will find some frequently asked questions on smartMessage. Please make sure to read them first. Please also have a look on the documentation. If you have any question that is not listed in here please don't hesitate to contact us. We are pleased to help you.
How do I install smartMessage?
Each cragl tool can be installed via cragl connect - our free tool to install and manage all of your cragl tools directly inside NUKE. If you haven't already done so please download connect.
By opening connect you will see a list of all cragl tools. You can drag and drop it to the right hand side of the connect window to reveal more infos. Just click on "buy". After purchasing you will receive an install code for your tool. Now simply click "install now" and enter the received install code. The tool will be downloaded and installed automatically for you. So you don't need to struggle with any install issue.
How do I install smartMessage for Maya?
If you like to use smartMessage for MAYA you need to install it manually, please follow the steps in smartMessage'a documentation in 1.2) Instal smartMessage for MAYA
I need a user account to login in. How do I create one?
As smartMessage works as a local and as a global community you need a local account if you like to use smartMessage locally and a global account if you like to use smartMessage for the global network. To create a user account please switch to the documentation an see 4) Creating a global account and 5) Setting up a local account.
Can I use more than one dataDirectory?
Yes, you can use as many dataDirectories as you like.
Why are there two user accounts – the personal backend account and the smartMessage account?
Cragl offers you a personal cragl backend which grants you access to all your licenses, data and a support ticket system.
If you use our tool smartMessage then you can also setup another account which is your global smartMessage (instant messenger) user account. This is your user account that you will use to connect to other people, write messages and exchange data. Please note that both accounts are *not* interchangeable – Again: the one for your personal cragl backend and the other one for your instant messenger account.
Versions
Here you find an overview of the smartMessage's versions and its improvements. Please log in to download versions.
smartMessage v3.13
• Update to nuke-16
smartMessage v3.12
• Fix launch when being in offline mode
smartMessage v3.11
• Update to nuke-15
smartMessage v3.10
• Add studio model
• Add help menu, add settings button
• Fix - A locally set up com folder should be available immediately
smartMessage v3.9
• Update to nuke-14
smartMessage v3.8
• Fix adding user via email broke in latest version
• Fix creating global user bound user to trial when using site license
smartMessage v3.7
• Fix mac address of current machine does not get displayed correctly
smartMessage v3.6
• Fix dropping license into license window raises UnicodeDecodeError
smartMessage v3.5
• Fix reading trial license data fails decrypting
• Send email to license author when machine installs license
smartMessage v3.4
• Port to Nuke-13
• Bring back notification sounds
smartMessage v3.3
• Fix message author gets assigned to other user
smartMessage v3.2
• Allow install if mac id is already in DB and license quantity is 0
• Speed up running in offline mode
smartMessage v3.1
• Open up for site licenses
• Generate license by license file, login and install code
• Update internal package structure
smartMessage v3.0
• Made Nuke11 ready
• Major code updates and code improvements
smartMessage v2.1
• fixed bug that caused problems when uploading a user icon in local mode
• fixed bug that caused problems when trying to login locally in MacOS
smartMessage v2.0
• implemented private and public group chats (please refer to documentation point 12)
• group chats are accessible via web browser
• edit global account details when logged in (please refer to documentation point 13)
• pending approval contacts and ability to set some more settings for global user account (please refer to documentation point 14)
• fixed bug that caused problems when uploading a user icon for global smartMessage account in windows10
• fixed bug that caused nuke from not launching when set a data directory path that the user has no write access to
smartMessage v1.0
initial release
You might also be interested in these tools