Adding custom timelog fields
Depending on your needs, it is desirable to store custom data with your time logs. As an example, you want to store information about the environment a time log’s working file was created, the used OCIO path or you would like to get some information about the time log’s working file’s used dependencies. This is where custom fields come into play.
You can use this information at a later stage and pass it to other applications
if needed. In order to inject custom data into time logs when they get created
and/ or updated, smartLog offers the timelog_fields module. The module can
be found here:
<Path to smartLog_vX.X.X>/smartLog/custom/timelog_fields.py
A time log’s anatomy
A time log’s data structure is of dict type in the following format:
{
    "comment": "",
    "custom": {},
    "id": "690042e6-142e-4784-91bb-7adb85825317",
    "path": "/mnt/projects/show-a/001/001/show-a_001_001_comp_v001.nk",
    "tags": [],
    "time": 75,
    "timestamp": 1584226841,
    "user": "John Doe"
}
Note the custom key in here. You can inject custom data into it. The
custom key itself is a dict which means you can add as many keys to it
as needed. For that, simply create a function that returns any data and
register it as described below to a certain key.
Note
Keep in mind that your function’s return value must be serializable, otherwise you won’t be able to save it to the time log.
Registering fields
In order to add data to the custom key, we provide two different functions:
osl.register_custom_field_on_creation: Use this function to add custom data to thecustomkey when the time log gets created. That happens the first time you save your working file. The data gets only added once and will not change.register_custom_field_on_update: Use this function to add custom data to thecustomkey each time the time log gets updated. The custom data will be updated as well. The time logging interval is customizable. You can adjust it in smartLog’s settings in the ‘Log interval’ widget. Each time it times out which triggers to update thetimekey automatically, the custom data will be updated as well. Due to the nature of triggering your functions with each timeout, we recommend you keep your functions light weight in order to avoid any performance hit with each timeout.
register_custom_field_on_creation and register_custom_field_on_update
add both to the custom dict. Both functions take two arguments:
The first argument is the name of the key to store the value to. The second argument is the callable to execute. Keep in mind to use a callable and not calling the function directly, which means don’t* use round brackets as this would execute the function in place which is not what you want.
As described above, the registering takes place in:
<Path to smartLog_vX.X.X>/smartLog/custom/timelog_fields.py
This module contains already two custom field functions to show you how it
works. The actual registration itself is commented out so that it will not
be registered. Feel free to remove the # character to make it live. The
example functions get explained below.
Example: Adding information about the used Nuke version
Let’s store the used Nuke version that the time log’s working file was created
and store it inside the custom dict under a nuke_version key. For that
we want to add this information just once, so we will register it using
register_custom_field_on_creation.
The function to get the Nuke version is as follows:
import nuke

def get_nuke_version():
    return nuke.env["NukeVersionString"]
We can now register it using the following line of code:
osl.register_custom_field_on_creation("nuke_version", get_nuke_version)
This will add a custom nuke_version key inside the custom dict when
creating a new time log, meaning the first time you save a new working file.
Note
As already mentioned above: Keep in mind to provide a callable as second argument when registering the custom data. Don’t call the function in place using round brackets.
The time log will now look something like this:
{
    "comment": "",
    "custom": {
        "nuke_version": "12.1v1",
    },
    "id": "690042e6-142e-4784-91bb-7adb85825317",
    "path": "/mnt/projects/show-a/001/001/show-a_001_001_comp_v001.nk",
    "tags": [],
    "time": 75,
    "timestamp": 1584226841,
    "user": "John Doe"
}
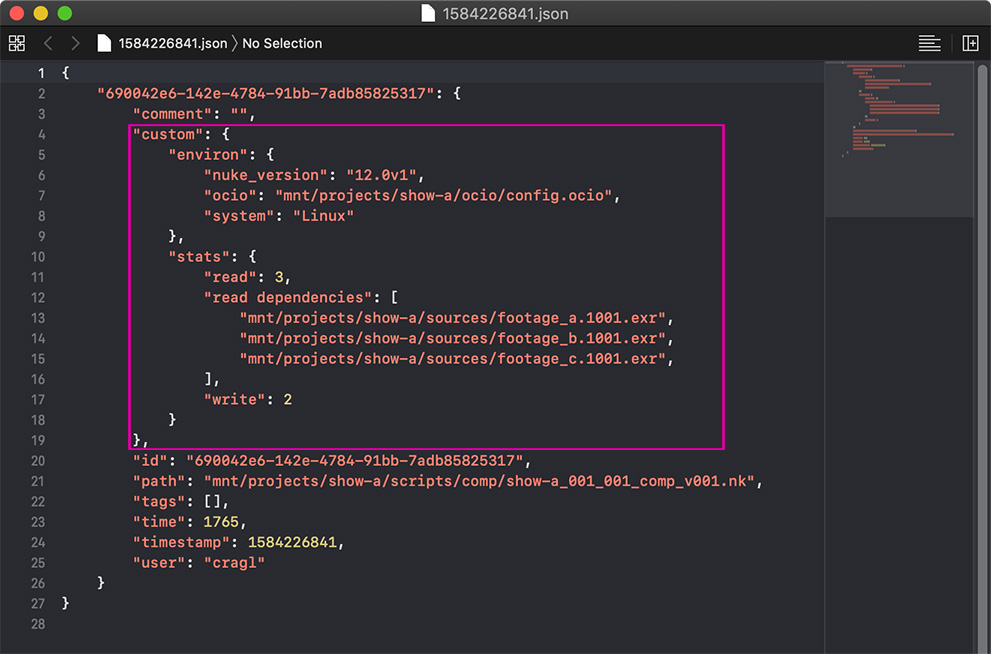
Sometimes however, you want to continuously update your data whenever the
time log gets updated. As an example, you can add a callback that gives you
statistics about the working file. As an example, have a look at the function
get_working_file_stats of the above mentioned timelog_fields module.
This function gets you information about the number of Read- and Write nodes in
your working file as well as the dependencies being read by all enabled Read
nodes that contain file paths.
Note
As mentioned above, keep in mind to keep the functions light weight as they will be triggered whenever your time log gets updated.