Backdrop Manager
The Backdrop Manager lets you create your custom Backdrop nodes in order to keep your Nuke scripts organized. For instance, you can bundle all your Read nodes into Backdrop nodes at the top of your Nuke script and use links down your stream to reference them. smartLink offers already multiple Backdrop presets out of the box. A preset sets up a custom Backdrop color, an icon and a label. You can edit the presets and add your own Backdrop presets to your needs.
Accessing the Backdrop Manager
To access the Backdrop Manager navigate to your menu bar and and choose: cragl -> smartLink -> Backdrop Manager.

An alternative way of opening the Backdropp Manager is using the shortcut Alt + B. In the Shortcut Manager you can also create your own shortcut for that.
Working with the Backdrop Manager
Let’s select some nodes in our Node graph and access the Backdrop Manager using the menu bar command or the shortcut Alt + B. The Backdrop Manager shows up.
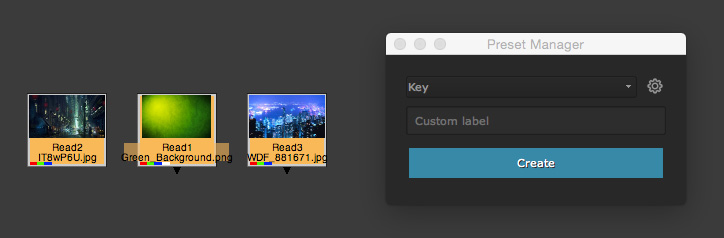
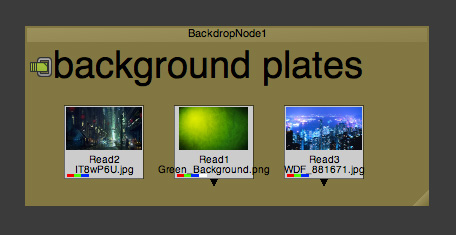
In the upper drop down menu you can choose a preset from the presets list. Let’s choose the preset Plate. In the input field below you can add a custom label. This is optional. If you provide any value in here then it will be added to the Backdrop’s label. Otherwise, the selected preset name will be added to the Backdrop node’s label. Let’s add the custom name background plates. When you are done, click the blue Create button. The Backdrop node gets created and wraps the node selection.
Editing and updating backdrop presets
To edit and update the presets click the settings button at the top right of the Backdrop Manager window. The Backdrop Manager changes to editing mode.
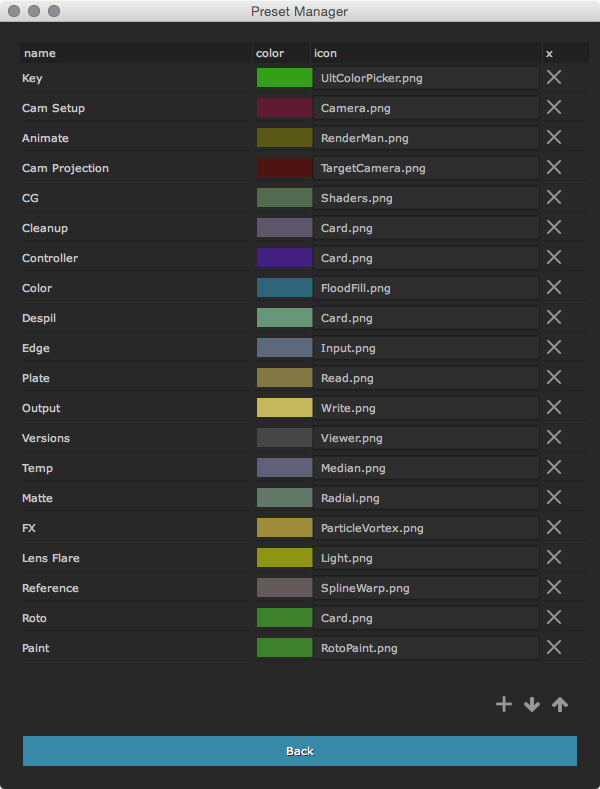
Each row represents a preset. In here you can update the preset color by pressing the color field. Next to the color field you find the icon field. In here you can change the icon that get displayed in the Backdrop node’s label. Use the file name including file extension. Keep in mind that the parent directory in which the icon is located in must be added to Nuke’s pluginPath using the following command in your init.py:
nuke.pluginAddPath('path/to/icons')
Next to the icon field you find an X. Clicking this button removes the preset from the presets list.
At the bottom right you find Up and Down buttons. Clicking a preset row and using these buttons changes the location of the preset in the presets list.
Adding new presets
To add a new preset to the list, click the + button at the bottom right.
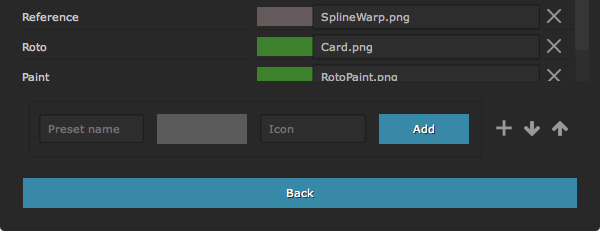
This will show the widgets to add a new preset. In here you can add a preset name, set a preset color and an icon. When you are done, click the blue Add button. The preset will be added to the bottom of the list. If required, you can use the Up and Down arrows in order to move the preset location within the list.