Quickscripts
Quickscripts allow you to execute code for a selected node. These can be accessed via buttons at the top of smartEdit:
A quickscript is simply a Python module that live on your hard disk at a very specific location so that smartEdit can discover and load it. The default quickscripts root directory is located here:
- Linux:
/home/[username]/cragl/smartEdit/quickscripts- Mac:
/Users/[username]/cragl/smartEdit/quickscripts- Windows:
C:\users\[username]\cragl\smartEdit\quickscripts
where [username] is your user name of your user account that you are
currently using on your machine.
In this root directory you can place folders for each node class. Inside these
folders you can place Python modules. Each python module will be mapped
automatically to a button at the top of smartEdit as soon as you launch
smartEdit with that node class selected. Each Python module must have an
execute() function. Let’s have a look at an example to fully understand
this workflow.
Quickscripts example: Adding a rolling blending mode for Merge nodes
Let’s create a quickscript for Merge nodes that will enable us to cycle through the blending modes. When having reached the last blending mode and clicking again, the blending mode should be set back to the first item of the blending mode dropdown menu. This quickscirpt is then available for every Merge node.
In order to let smartEdit discover the quickscript, we put it into a folder
with that node class name inside the above stated quickscript root directory.
Keep in mind that the class name of a Merge is Merge2 and not Merge.
You can always get the node class name of any node by selecting it and
clicking the I button. In the upcoming info window you can see the node
class for your node:
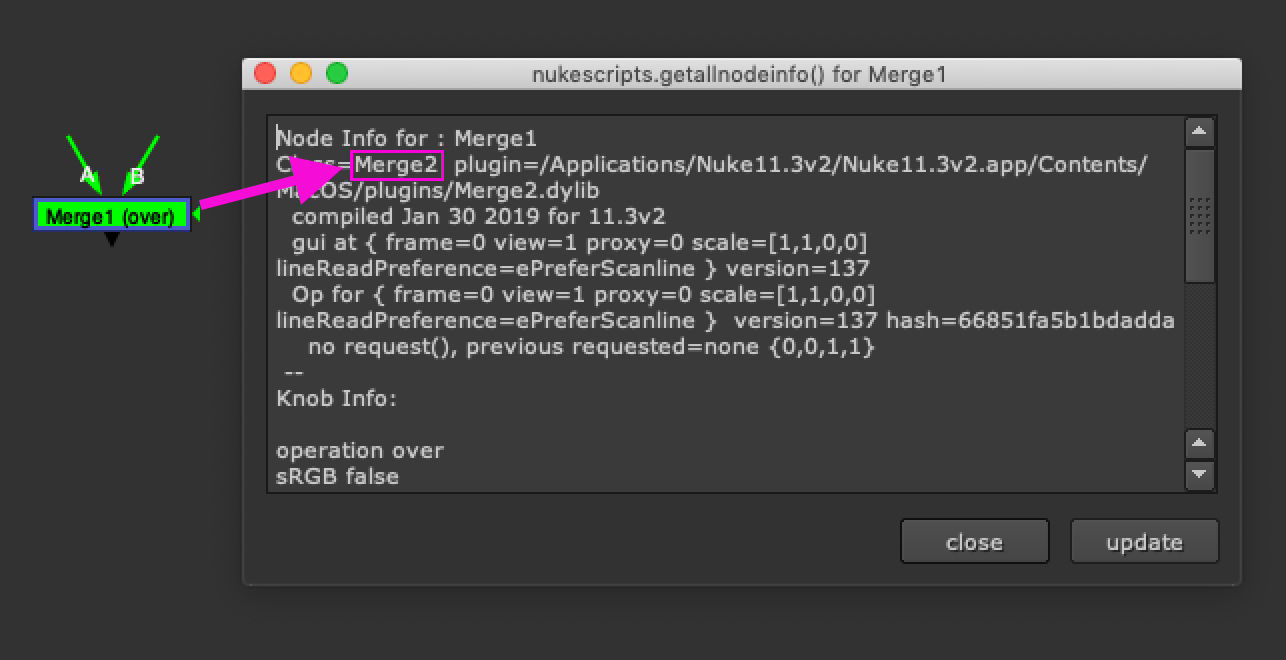
The underlying node class of a Merge node is Merge2.
That means we create a folder called Merge2 inside the quickscripts root
directory. For example, if we are on a Windows platform and our current user
name is UserA, then the folder path should look like the following:
C:\users\UserA\cragl\smartEdit\quickscripts\Merge2
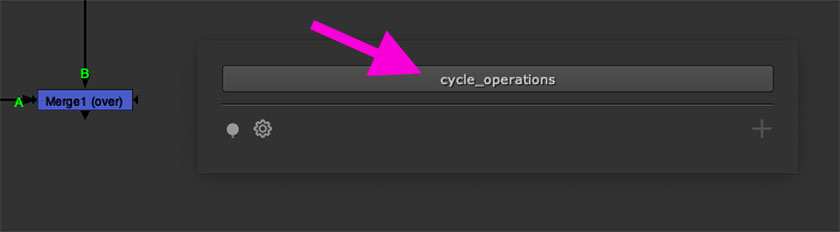
Inside this folder we create a new text file and call it
cycle_operations.py.
As stated above, each quickscript needs an execute() function. This is a
possible implementation of a rolling blending mode:
import nuke

def execute():
    node = nuke.selectedNode()
    update = node["operation"].setValue(int(node["operation"].getValue())+1)
    if not update:
        node["operation"].setValue(0)
At the top we import the nuke module so that it becomes available for us.
The core functionality lies in the execute function. In here we store the
currently selected node in a node variable. We will then update the node’s
operation knob -which is the blending mode- to use the next available index
after the current one and store the return value inside the update
variable. If changing the index to the next available index is successful,
Nuke will return a True on this knob changing operation. In most cases,
this becomes True. If we are however on the very last blending mode and try
to increase the index one more time, this will then return False, which
indicates that we are on the very last blending mode. In that case we can set
the blending mode back to the very first index. This ensures that we will
start from the beginning in case we reached the end of the dropdown menu.
You can now use this functionality to toggle through blending modes for each Merge node.
This was just a very basic example that demonstrates how quickscripts can be used to enhance your productivity. Keep in mind that you can use any amount of python code and you can also call code from external Python packages and modules.
Keep also in mind that you and your team can update the smartEdit settings configuration file to point to the same quickscripts root directory on your server or in a shared cloud folder. This enables you and your team to use and share the same pool and enables you to build a quickscripts library that everyone can access.